WebRTC Data Channel
Data channel is another channel in WebRTC other than video and audio. Using a data channel, you can send any kind of information to the other clients. Data channels can be utilized in various use cases, including chat, control messages or file sharing. Ant Media Server provides a generic data channel mechanism that can be used in all use cases.
Enable Data Channel
To use data channel functionality, first enable it from the AMS dashboard. This will allow you to send and receive anything via data channel with SDKs.
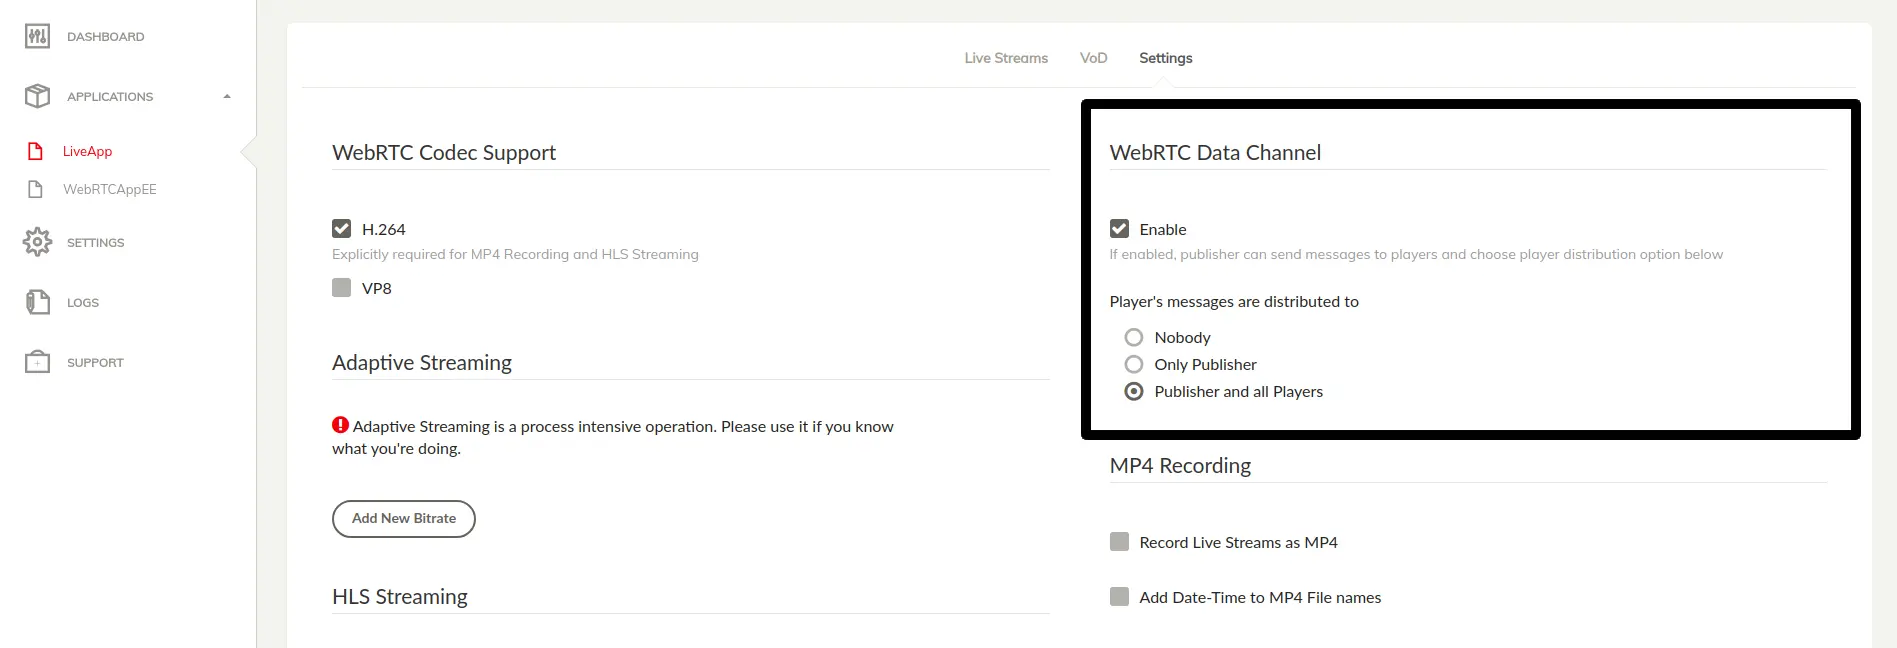
There are some data delivery options for data channels you can choose:
- Nobody: Only the publisher can send messages to the players and players cannot send messages.
- Only publisher: Player messages are only delivered to the publisher. Publisher messages are delivered to all players.
- Publisher and all players: Players' and publisher's messages are delivered to the publisher and all other players who are watching the stream.
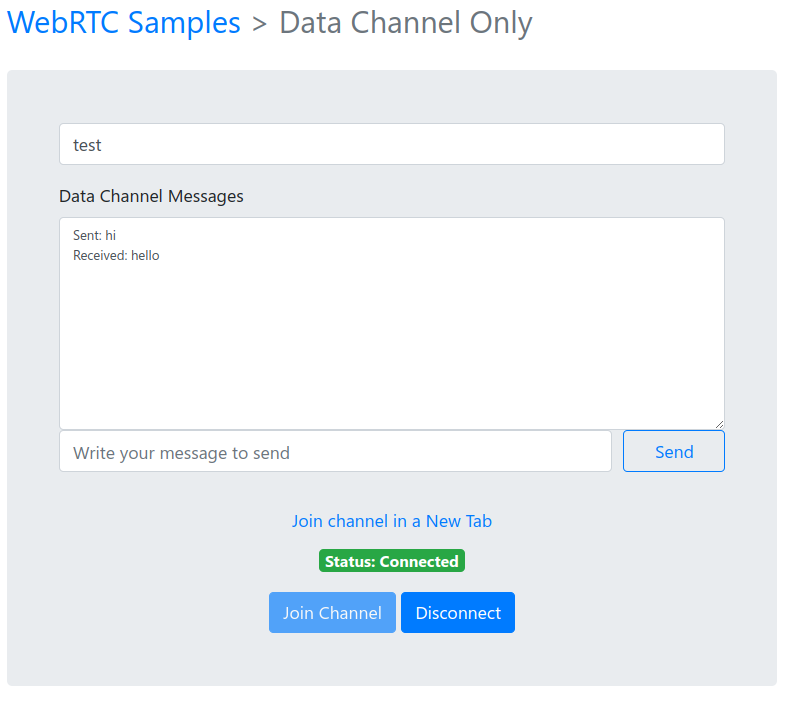
Data Channel Sample Page
Go to
https://your domain name:5443/live/datachannel.html to use the data channel sample.
If you have Ant Media Server installed on your local machine, you can also go to http://localhost:5080/live/datachannel.html.
Open the same page on another tab or another system and join with the same streamId there. Once you join from two or more tabs, you can send messages between peers.
Send & Receive Data with JS SDK
For sending data channel messages with the JavaScript SDK, the sendData function can be used. You can send either text messages or even Binary Data using ArrayBuffer or Blob. This function takes parameters as streamId and data.
sendData(streamId, data);
The data_received callback will be received in WebRTCAdaptor whenever we receive a message for a connected streamId.
callback: function (info, obj) {
    if (info == "data_received") {
      var data = obj.data;

      if (data instanceof ArrayBuffer) {
        handleImageData(data);
      } else if (data instanceof Blob) {
        data.arrayBuffer().then((buffer) => handleImageData(buffer));
      } else {
        handleTextMessage(data);
      }
    } else {
      console.log(info + " notification received");
    }
}
Send & Receive Data with Android SDK
Exchanging data through WebRTC data channels is also straightforward with the AMS Android WebRTC SDK. Your activity should implement the IDataChannelObserver interface as shown below:
  public interface IDataChannelObserver {

      /**
        * Called by SDK when the buffered amount has been changed
        */
      void onBufferedAmountChange(long previousAmount, String dataChannelLabel);

      /**
        * Called when the state of the data channel has been changed
        */
      void onStateChange(DataChannel.State state, String dataChannelLabel);

      /**
        * Called by SDK when a new message is received
        */
      void onMessage(DataChannel.Buffer buffer, String dataChannelLabel);

      /**
        * Called by SDK when the message is sent successfully
        */
      void onMessageSent(DataChannel.Buffer buffer, boolean successful);
  }
Initialization
The MainActivity.java sample code in Android SDK implements IDataChannelObserver the required initialization code.
The base data channel functionality is in the WebRTCClient.java, MainActivity file.
The sample below shows how to init, send and receive data messages in Android SDK. In order to init the WebRTCClient Before initialization of WebRTCClient, you also need to add the following lines in onCreate method of the Activity.
//Enable data channel communication by putting following key-value pair to your Intent before initialization of WebRTCClient
this.getIntent().putExtra(EXTRA_DATA_CHANNEL_ENABLED, true);

//Set your Data Channel observer in the WebRTCClient
webRTCClient.setDataChannelObserver(IDataChannelObserver setDataChannelObserver);
Send Data
WebRTClient has asendMessageViaDataChannel(DataChannel.Buffer) method to send messages. It has also been called in MainActivity as follows.
public void sendTextMessage(String messageToSend)
{
  final ByteBuffer buffer = ByteBuffer.wrap(messageToSend.getBytes(StandardCharsets.UTF_8));
  DataChannel.Buffer buf = new DataChannel.Buffer(buffer, false);
  webRTCClient.sendMessageViaDataChannel(buf);
}
Receive Data
When a data channel message is received, theonMessage method of the IDataChannelObserver is called. You can handle the received data in onMessage method as shown below.
public void onMessage(DataChannel.Buffer buffer, String dataChannelLabel)
{
  ByteBuffer data = buffer.data;
  String messageText = new String(data.array(), StandardCharsets.UTF_8);
  Toast.makeText(this, "New Message: " + messageText, Toast.LENGTH_LONG).show();
}
In this example, we show the incoming text in a toast message.
Send & Receive Data with iOS SDK
Initialization
Ant Media Server and WebRTC iOS SDK can use data channels in WebRTC. In order to use the data channel, make sure that it’s enabled both server-side and mobile. In order to enable it for the iOS SDK, you can just set the enableDataChannel parameter to true in setOptions method.
webRTCClient.setOptions(url: "ws://your_server_url:5080/WebRTCAppEE/websocket", streamId: "stream123", token: "", mode: .play, enableDataChannel: true)
The WebRTC iOS SDK also provides sample code for sending and receiving messages via a data channel.
Send Data
You can send data with the sendData method of AntMediaClient as follows:
if let data = textValue.data(using: .utf8) {
    /*
      Send data through data channel
      */
    self.client.sendData(data: data, binary: false)
}
Receive Data
When a new message is received, the dataReceivedFromDataChannel method is called:
func dataReceivedFromDataChannel(streamId: String, data: Data, binary: Bool) {
    Run.onMainThread {
      self.showToast(controller: self, message:  String(decoding: data, as: UTF8.self), seconds: 1.0)
    }
}
Take a look at the following VideoViewController.swift in order to see how to use data channels.
Send Data with REST API
You can also programmatically send a data channel message with REST API. Here is a CURL sample:
curl -X POST
http://localhost:5080/WebRTCAppEE/rest/v2/broadcasts/{STREAM_ID}/data
-H 'content-type: application/json'
-d '{message: "test"}'
You can send any text with this method. The sample command above just sends {message: "test"} to the publisher or players of the {STREAM_ID}.
Receive channel messages with webhook
You can programmatically collect all data channel messages for any stream with a web hook. All data channel messages are delivered to these hooks as well. Here is the step-by-step guide to adding a webhook for data channel messages.
-
Open your application settings --> Advanced settings from the AMS dashboard.
-
Add the webhook URL to the below property:
"dataChannelWebHookURL": "", -
Save the settings.
After this, your webhook URL is called with data channel messages by Ant Media Server. The POST method is used for sending data channel messages with "multipart/form-data" encoding. The name of the variable is the data that contains the data channel message.
Data Channel in Conference
Below are the conference-related data channel messages. These are essential for managing various user actions such as camera and microphone control, recording status, and interaction with other participants.
Refer to the Circle Conference Application for proper usage in the WebRTC conference implementation.
CAM_TURNED_ON: Triggered when a camera is turned on. This message contains the stream ID for publishing and a list of active streams in the conference for playback.CAM_TURNED_OFF: Triggered when a participant turns off their camera.MIC_MUTED: Triggered when a microphone is muted.MIC_UNMUTED: Triggered when a microphone is unmuted.TURN_YOUR_MIC_OFF: Used to request a participant to turn off their microphone.TURN_YOUR_MIC_ON: Used to request a participant to turn on their microphone.TURN_YOUR_CAM_OFF: Used to request a participant to turn off their camera.RECORDING_TURNED_ON: Triggered when recording is started in the conference.RECORDING_TURNED_OFF: Triggered when recording is stopped.REACTIONS: Used for sending reactions such as emojis or other feedback in the conference.PIN_USER: Used to pin a specific participant’s video on the screen.UNPIN_USER: Used to unpin a previously pinned participant's video.VIDEO_TRACK_ASSIGNMENT_LIST: Used to manage video track assignments for different participants.AUDIO_TRACK_ASSIGNMENT: Used to manage audio track assignments for different participants.TRACK_LIST_UPDATED: Triggered when the list of active tracks (audio or video) is updated.MESSAGE_RECEIVED: Used to notify when a chat message is received during the conference.UPDATE_AUDIO_LEVEL: Used to receive participants audio level through data channel. Audio Level between 0 and 127. 0 means max, and 127 means min. Contains audioLevel and streamId of the participant. You can use this to show a speaking indicator on client side.UPDATE_PARTICIPANT_ROLE: Used to update the role of a participant in the conference (e.g., from attendee to moderator).