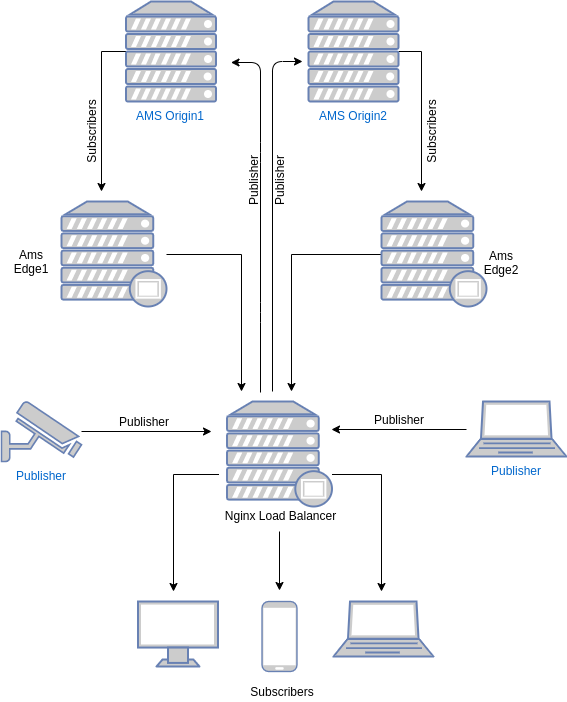
Installing with Nginx load balancer
What is Nginx?
Nginx started out as an open-source web server designed for maximum performance and stability. Today, however, it also serves as a reverse proxy, HTTP load balancer, and email proxy for IMAP, POP3, and SMTP.
Prerequisites
- One server with Ubuntu 20.04 installed for Nginx Load Balancer.
- One server with Ubuntu 20.04 installed for MongoDB Server (Optional).
This document is compatible with all Debian-based OS (Debian, Ubuntu, etc.)
You can do this setup in two ways:
- Using installation script
- Step-by-step installation
1. Using installing script
Installation Steps
With this script, you can easily set up and configure an Nginx Load Balancer with just a single command by providing the Edge/Origin IP addresses.
You can achieve the following actions with this script.
- Install Nginx
- Set up SSL with Let's Encrypt
- Configure Nginx for Ant Media Server
This script is compatible with Ubuntu 20.04.
wget https://raw.githubusercontent.com/ant-media/Scripts/master/nginx/install_and_configure_nginx.sh && chmod +x install_and_configure_nginx.sh
Run the script without parameters to see usage.
./install_and_configure_nginx.sh
Options:
  -o origin_server_ips       Set origin server IP array (e.g., -o "10.0.1.1,10.0.1.2,10.0.1.3")
  -e edge_server_ips         Set edge server IP array (e.g., -e "10.0.0.1,10.0.0.2,10.0.0.3")
  -d domain_name             Set domain name (e.g., -d example.com)
  -m email_address           Set email address for Let's Encrypt notifications (optional)
  -s                         Enable SSL certificate installation. If domain name and email_address is defined, it becomes enabled
  -c                         Create Nginx configuration only, without installing Nginx or SSL

Usage Examples:

1. Create Nginx configuration only:
   install_and_configure_nginx.sh -o "10.0.1.1,10.0.1.2,10.0.1.3" -e "10.0.0.1,10.0.0.2,10.0.0.3" -d example.com -c

2. Create Nginx configuration only with making SSL enabled in the Nginx configuration:
   install_and_configure_nginx.sh -o "10.0.1.1,10.0.1.2,10.0.1.3" -e "10.0.0.1,10.0.0.2,10.0.0.3" -d example.com -c -s

3. Install Nginx and generate Nginx configuration without installing SSL and without making SSL enabled in the Nginx configuration:
   install_and_configure_nginx.sh -o "10.0.1.1,10.0.1.2,10.0.1.3" -e "10.0.0.1,10.0.0.2,10.0.0.3" -d example.com

4. Install Nginx, generate Nginx configuration, and install SSL certificate:
   install_and_configure_nginx.sh -o "10.0.1.1,10.0.1.2,10.0.1.3" -e "10.0.0.1,10.0.0.2,10.0.0.3" -d example.com -m user@example.com
Example:
When you run the script as shown below, it will perform the following tasks: Nginx installation, SSL installation with Let's Encrypt, and configuration of Origin/Edge.
./install_and_configure_nginx.sh -o "192.168.1.201" -e "192.168.1.202,192.168.1.203" -d example.com
2. Step-by-Step Installation:
Nginx Installation
Install the prerequisites
sudo apt install curl ca-certificates lsb-release -y
To set up the apt repository for stable nginx packages, run the following command:
echo "deb http://nginx.org/packages/`lsb_release -d | awk '{print $2}' | tr '[:upper:]' '[:lower:]'` `lsb_release -cs` nginx" | sudo tee /etc/apt/sources.list.d/nginx.list
Import an official Nginx signing key.
curl -fsSL https://nginx.org/keys/nginx_signing.key | sudo apt-key add -
Run the following commands to install Nginx
apt update && apt install nginx -y
Let's Encrypt for Nginx SSL Termination
Run the following commands to install Certbot:
sudo apt install certbot python3-certbot-nginx -y
Run the following commands to create certificate
certbot --nginx -d yourdomain.com -d www.yourdomain.com
Edit crontab file
crontab -e
add the below line to renew the certificate every 80 days.
0 0 */80 * * root certbot -q renew --nginx
Configure NGINX as a Load Balancer
Backup default nginx configuration
mv /etc/nginx/nginx.conf{,_bck}
Create a new nginx.conf file with your favorite editor
vim /etc/nginx/nginx.conf
In that file, copy the following contents. Please change the content in curl brackets ' ' with your own values.
    # RTMP stream configuration
    stream {
        # Change {AMS_ORIGIN1_IP} and {AMS_ORIGIN2_IP} with your origin Ant Media Server instances.
        upstream stream_backend {
            server {AMS_ORIGIN1_IP}:1935;
            server {AMS_ORIGIN2_IP}:1935;
            #you can add more instances
        }

        server {
            listen        1935;
            proxy_pass    stream_backend;
            proxy_timeout 3s;
            proxy_connect_timeout 1s;
        }

    # If you want to use RTMPS, uncomment the lines below. Change {YOUR_DOMAIN} with your fully qualified domain name.

    #    server {
    #        listen 1936 ssl;
    #        proxy_pass stream_backend;
    #        ssl_certificate /etc/letsencrypt/live/{YOUR_DOMAIN}/fullchain.pem;
    #        ssl_certificate_key /etc/letsencrypt/live/{YOUR_DOMAIN}/privkey.pem;
    #    }

    # If you want to use SRT, uncomment the lines below.
    # Change {AMS_ORIGIN1_IP} and {AMS_ORIGIN2_IP} with your origin Ant Media Server instances.

    #    upstream srt_stream_backend {
    #        server {AMS_ORIGIN1_IP}:4200;
    #        server {AMS_ORIGIN2_IP}:4200;
    #    }
    #    server {
    #        listen 4200 udp;
    #        proxy_pass srt_stream_backend;
    #    }
    }

    user nginx;
    worker_processes auto;
    pid /var/run/nginx.pid;
    worker_rlimit_nofile 1048576;

    events {
        worker_connections 1048576;
        multi_accept on;
        use epoll;
    }

    # Change {AMS_ORIGIN1_IP} and {AMS_ORIGIN2_IP} with your origin Ant Media Server instance addresses
    http {
          #Ant Media Origin
          upstream antmedia_origin {
          least_conn;
          server {AMS_ORIGIN1_IP}:5080;
          server {AMS_ORIGIN2_IP}:5080;
        }

    # Change {AMS_EDGE1_IP} and {AMS_EDGE2_IP} with your origin Ant Media Server instance addresses
        #Ant Media Edge
        upstream antmedia_edge {
          least_conn;
          server {AMS_EDGE1_IP}:5080;
          server {AMS_EDGE2_IP}:5080;
        }

    # Dashboard upstream setting.
        # Use 4444 port number to login to Dashboard. You can add Origin and Edge servers.
        upstream antmedia_dashboard {
          ip_hash;
          server {AMS_EDGE1_IP}:5080;
          server {AMS_ORIGIN1_IP}:5080;
        }


        sendfile on;
        tcp_nopush on;
        tcp_nodelay on;
        server_tokens off;
        keepalive_timeout 300s;
        types_hash_max_size 2048;
        include /etc/nginx/mime.types;
        default_type application/octet-stream;

        # ssl settings
        ssl_protocols TLSv1.2;
        ssl_prefer_server_ciphers on;
        ssl_ciphers         HIGH:!aNULL:!MD5;
        ssl_session_cache shared:SSL:50m;
        ssl_session_tickets off;

        # logs settings
        log_format  main  '$remote_addr - $remote_user [$time_local] "$request" '
                          '$status $body_bytes_sent "$http_referer" '
                          '"$http_user_agent" "$http_x_forwarded_for"'
    		              '"$hostname" "upstream: $upstream_addr"';
        access_log /var/log/nginx/access.log;
        error_log /var/log/nginx/error.log;

        # gzip
        gzip on;
        gzip_disable "msie6";
        gzip_http_version 1.1;
        gzip_comp_level 6;
        gzip_types text/plain text/css application/json application/javascript text/javascript application/x-javascript text/xml application/xml application/xml+rss application/vnd.ms-fontobject application/x-font-ttf font/opentype font/x-woff image/svg+xml image/x-icon;

        # proxy settings
        proxy_redirect off;
        proxy_http_version 1.1;
        proxy_read_timeout 10s;
        proxy_send_timeout 10s;
        proxy_connect_timeout 10s;

        #redirect all http requests to https
        server {
            listen 80 default_server;
            server_name _;
            return 301 https://$host$request_uri;
        }

        #Origin Configuration
        #Change {YOUR_DOMAIN} with your fully qualified domain name.
        server {
                listen 443 ssl;
                ssl_certificate /etc/letsencrypt/live/{YOUR_DOMAIN}/fullchain.pem;
                ssl_certificate_key /etc/letsencrypt/live/{YOUR_DOMAIN}/privkey.pem;
                server_name yourdomain.com;

                location / {
                    proxy_pass http://antmedia_origin;
        	    	    proxy_http_version 1.1;
                    proxy_set_header X-Forwarded-For $proxy_add_x_forwarded_for;
                    proxy_set_header Host $host;
                    proxy_set_header Upgrade $http_upgrade;
                    proxy_set_header Connection "Upgrade";
                   proxy_set_header X-Forwarded-Proto https;
                }
            }


        #Edge Configuration
        #  Change {YOUR_DOMAIN} with your fully qualified domain name.
        server {
                listen 5443 ssl;
    	        ssl_certificate /etc/letsencrypt/live/{YOUR_DOMAIN}/fullchain.pem;
                    ssl_certificate_key /etc/letsencrypt/live/{YOUR_DOMAIN}/privkey.pem;
    	        server_name yourdomain.com;

     	        location / {
                    proxy_pass http://antmedia_edge;
                    proxy_http_version 1.1;
                    proxy_connect_timeout 7d;
                    proxy_send_timeout 7d;
    		            proxy_read_timeout 7d;
                    proxy_set_header X-Forwarded-For $proxy_add_x_forwarded_for;
                    proxy_set_header Host $host;
                    proxy_set_header Upgrade $http_upgrade;
                    proxy_set_header Connection "Upgrade";
                    proxy_set_header X-Forwarded-Proto https;
                }
            }

        #Dashboard Configuration
        #Change {YOUR_DOMAIN} with your fully qualified domain name.
        server {
                listen 4444 ssl;
                ssl_certificate /etc/letsencrypt/live/{YOUR_DOMAIN}/fullchain.pem;
                ssl_certificate_key /etc/letsencrypt/live/{YOUR_DOMAIN}/privkey.pem;
                server_name yourdomain.com;

                location / {
                    proxy_pass http://antmedia_dashboard;
                    proxy_http_version 1.1;
                    proxy_set_header X-Forwarded-For $proxy_add_x_forwarded_for;
                    proxy_set_header Host $host;
                    proxy_set_header Upgrade $http_upgrade;
                    proxy_set_header Connection "Upgrade";
                }
            }


    }
Save and close that file.
When you use Nginx as a Load Balancer, you must use
port 4444to access Dashboard.
On our server, we have to remove the symbolic link to default in the /etc/nginx/sites-enabled folder.
sudo rm -f /etc/nginx/sites-enabled/default
Check your configuration for any Error using the following command.
nginx -t
Enable and restart nginx service
systemctl enable nginx
systemctl restart nginx