Bitmovin Video Analytics

Optimize every play in real-time with Online Video Analytics

About Bitmovin Video Analytics

The Bitmovin Video Analytics plugin for Ant Media Server is an extension that enables real-time monitoring of your live streams. It helps you cut costs and improve your streams’ performance thanks to collected analytics.

Increase viewer engagement and retention through actionable data collected across a variety of video players, not exclusive to the Bitmovin Player. Fix playback issues before they impact your viewers and optimize for the best experience, always.

  • Reduce the cost of playback errors
    Solve playback issues faster by analyzing user session data. Quickly find and debug error sessions to fix issues. Calculate the cost of streaming errors and see how much you could save.
  • Error debugging tools for video developers
    See the highest impact errors, and find commonalities across devices, player versions & stream types. See player event logs & network-level requests/responses to find the root cause of streaming issues.

  • Integrate with your workflow
    Analytics fits seamlessly into your data architecture. Use APIs and full data exports to access data, store data in central data repositories and for custom analysis.

How it works?

Check out the workflow diagram below to understand how Ant Media Server and the Bitmovin Video Analytics plugin work together. 

how bitmovin video analytics plugin works with ant media server

Getting Started

The application uses the Bitmovin video analytics platform to track video usage from Ant Media Server to Bitmovin. Start by creating an analytics account at bitmovin.com.

Prerequisites

You need to have an active Ant Media Server(AMS) license. You can either subscribe to Ant Media Server on different cloud providers’ marketplaces or purchase a license from the Ant Media website if you plan to install Ant Media Server manually.

Login to your Bitmovin account, navigate to the Analytics menu tab and click on the Licenses page. Then copy the API key for your license.

Deployment

Watch the video below to see the demonstration on how to install the Bitmovin Video analytics plugin. Use timestamps on the video to navigate between event parts easier.

There are two ways to get started with this integration. Either upload the already created application war file or copy over the necessary files and import them into your project. 

Option 1: Upload the Application War File

The easiest way to start utilizing Bitmovin in your live streams is to upload the application war file that has been created. 

Simply navigate to your Ant Media Server dashboard and upload the war file. 

Uploading Bitmovin application war file

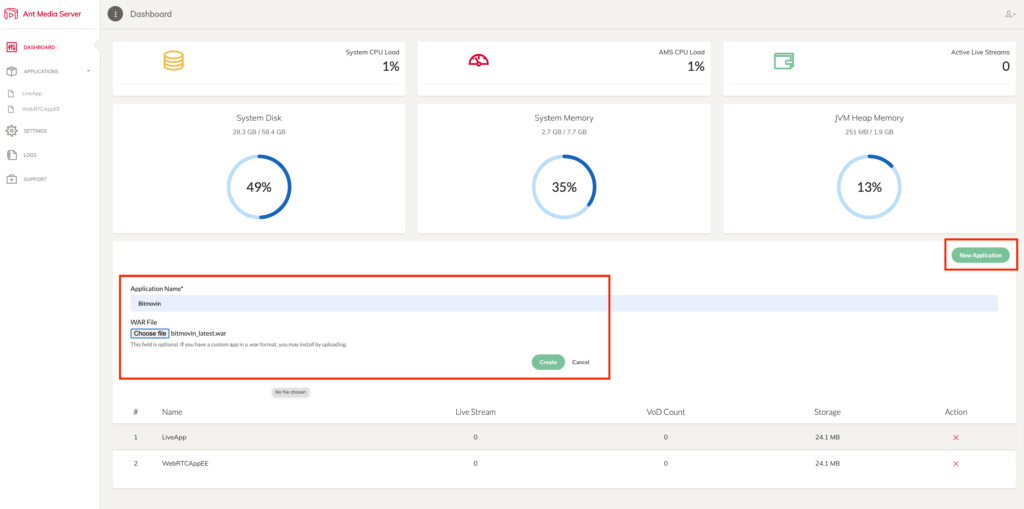
Uploading the Bitmovin application war file

This will create a new application in the left-hand menu under “Applications” which already has the necessary integration files. 

Just start publishing a live stream and navigate to the play.html page. 

Option 2: Copy over the necessary files

There is a working example of the Bitmovin implementation. Navigate to Github and access the StreamApp repository under the bitmovin_latest branch. 

git clone --branch bitmovin_latest git@github.com:ant-media/StreamApp.git

Then navigate to the webapp folder to access the example player file.

https://github.com/ant-media/StreamApp/blob/bitmovin_latest/src/main/webapp/play.html

To integrate Bitmovin tracking on your current Ant Media Server applications, you’ll need to include some additional Javascript files that are referenced in the example player file.

Include the Bitmovin JavaScript file within the head section of the page:

Now copy over the main analytics.js file which you can find in the webapps/js/external folder:

https://github.com/ant-media/StreamApp/blob/bitmovin_latest/src/main/webapp/js/analytics.js

and now import the script along with the WebRTC Adaptor:

import {Analytics} from "../js/analytics.js

Be sure to pick up the necessary URL parameters for customerID and bitmovinKey then initialize the Analytics object:

var analytics =new Analytics(bitmovinKey);

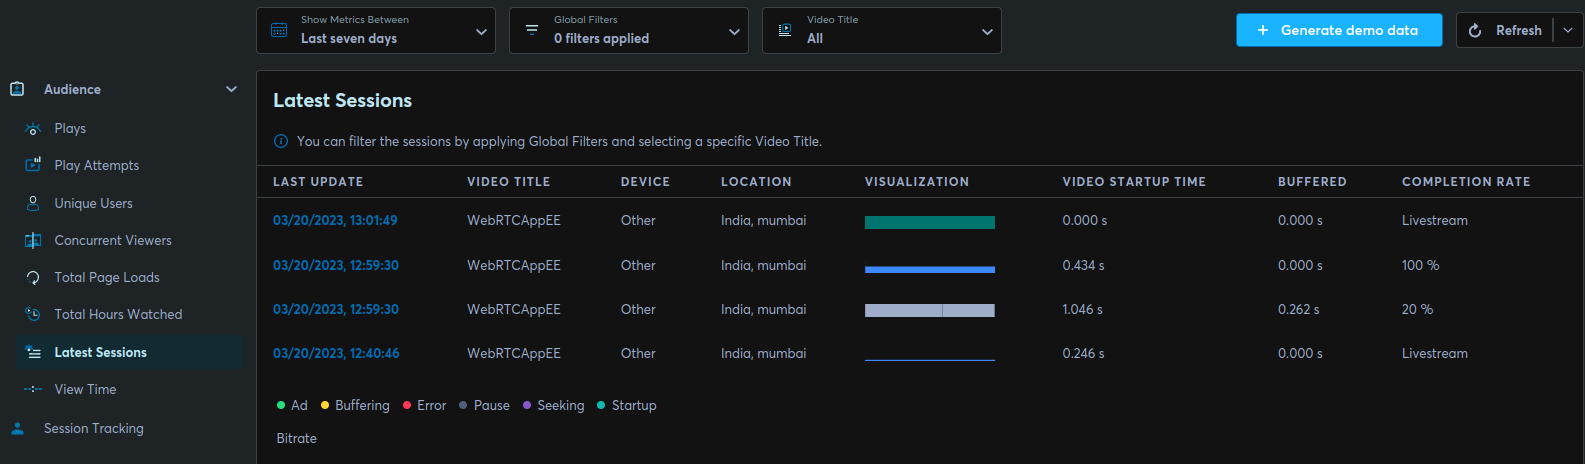
Now Bitmovin is setup to start tracking your video usage.  For instance, send usage data back to Bitmovin when publishing has started by simply calling the analyze() method inside the startPublishing() function.

analytics.analyze(Analytics.publisher,streamId,applicationName,customerId,Analytics.webrtc,"localVideo");

How to use the plugin?

To send analytics data from Ant Media Server to Bitmovin using this plugin, you’ll need the API key that was copied earlier and pass it into the query string using the parametre bitmovinKey.

Below are examples of how to pass the API key in the query string for both playing and publish pages.

Simply add the bitmovinKey parameter to the query string and append your Bitmovin API key.

playing 

http://localhost:5080/WebRTCAppEE/play.html?id=stream1&bitmovinKey=Your_API_KEY

As soon as you start publishing or playing a  live stream, video analytics data will start to be sent from Ant Media Server to your Bitmovin account where you can view all the analytics data in the dashboard.

Track Individual Users

If you’ve integrated the publish and play pages into your application, then you will be able to track individual customers/users of your application.

Simply add an additional parameter of customerId in the query string and pass the customer id.

An example is below:

http://localhost:5080/WebRTCAppEE/play.html?id=stream1&bitmovinKey=Your_API_KEY&customerId=PASS_UNIQUE_ID

Now, you can track the individual customer and view their usage from within the Bitmovin Dashboard.

Support

Our engineers will be available for you. Please  if you need technical help. Also, we have some support package offerings here.

Screenshots

Enable live streaming video analytics

chatsimple