Publish WebRTC Stream
Step 3: Publish a WebRTC Live Stream in Android
In this step, we will start coding. We will create our layout for the UI part, create an Activity and set the manifest file. Then we will be able to run our application.
- Create the UI part.
First we need to create a layout folder under res directory and then we will create a xml file. For this application, a simple UI with only a SurfaceViewRenderer is enough. SurfaceViewRenderer is a View that is provided by the WebRTC Android SDK. We will use it to render our camera locally in our app.
You can create the UI by Android Studio UI Designer or you can just copy the following lines into your xml file, say webrtc_streaming.xml.
<?xml version="1.0" encoding="utf-8"?>
<RelativeLayout xmlns:android="http://schemas.android.com/apk/res/android"
    android:layout_width="match_parent"
    android:layout_height="match_parent">
    <org.webrtc.SurfaceViewRenderer
        android:id="@+id/full_screen_renderer"
        android:layout_width="match_parent"
        android:layout_height="match_parent" />

</RelativeLayout>
- Create the sample Activity Now.
We will create a Java class that extends Activity class. Let's name it WebRTCStreamingActivity. In onCreate method, we will build an IWebRTCClient
object by configuring it and calling its publish method. That is all. Here is the necessary code for our activity.
package io.antmedia.mywebrtcstreamingapp;

import android.app.Activity;
import android.os.Bundle;
import io.antmedia.webrtcandroidframework.api.IWebRTCClient;

public class WebRTCStreamingActivity extends Activity {
    @Override
    protected void onCreate(Bundle savedInstanceState) {
        super.onCreate(savedInstanceState);
        setContentView(R.layout.webrtc_streaming);

        IWebRTCClient webRTCClient = IWebRTCClient.builder()
                .setActivity(this)
                .setLocalVideoRenderer(findViewById(R.id.full_screen_renderer))
                .setServerUrl("wss://test.antmedia.io:5443/WebRTCAppEE/websocket")
                .build();

        webRTCClient.publish("stream1");
    }
}
- Edit Android manifest file.
We will edit two things in the AndroidManifest.xml file.
- First, we will set our WebRTCStreamingActivity as the default activity for our application.
- Second, we will add required permissions for our streaming application. Here is the edited manifest file.
<?xml version="1.0" encoding="utf-8"?>
<manifest xmlns:android="http://schemas.android.com/apk/res/android"
    xmlns:tools="http://schemas.android.com/tools">

    <uses-feature android:name="android.hardware.camera" />
    <uses-feature android:name="android.hardware.camera.autofocus" />
    <uses-feature
        android:glEsVersion="0x00020000"
        android:required="true" />

    <uses-permission android:name="android.permission.ACCESS_NETWORK_STATE" />
    <uses-permission android:name="android.permission.BLUETOOTH" />
    <uses-permission android:name="android.permission.CAMERA" />
    <uses-permission android:name="android.permission.MODIFY_AUDIO_SETTINGS" />
    <uses-permission android:name="android.permission.INTERNET" />
    <uses-permission android:name="android.permission.BLUETOOTH_CONNECT" />

    <application
        android:allowBackup="true"
        android:dataExtractionRules="@xml/data_extraction_rules"
        android:fullBackupContent="@xml/backup_rules"
        android:icon="@mipmap/ic_launcher"
        android:label="@string/app_name"
        android:supportsRtl="true"
        android:theme="@style/Theme.MyWebRTCStreamingApp" >

        <activity android:name=".WebRTCStreamingActivity"
            android:exported="true"
            android:theme="@style/Theme.AppCompat.DayNight">
            <intent-filter>
                <action android:name="android.intent.action.MAIN" />

                <category android:name="android.intent.category.LAUNCHER" />
            </intent-filter>
        </activity>
    </application>
</manifest>
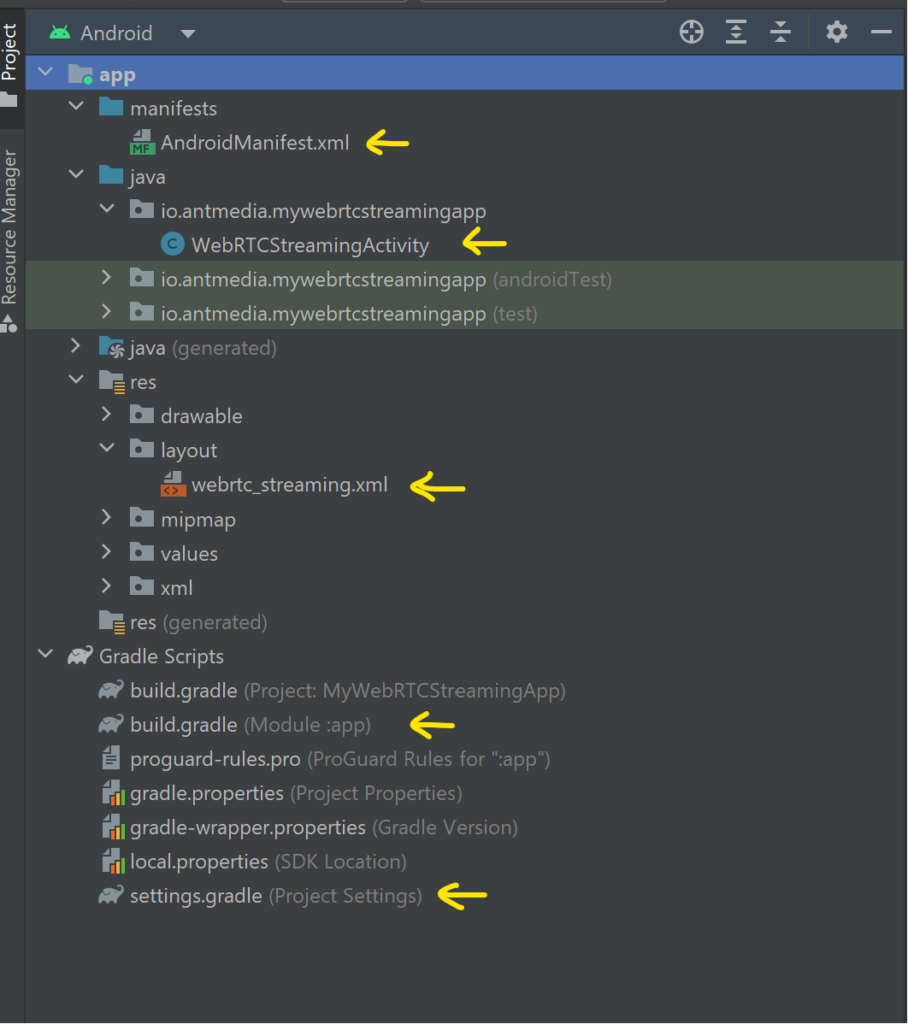
Congratulations! Our WebRTC Android Publish Application is ready now. The project structure should be as shown in the following image, where the files we created and edited are pointed with arrows.
We can run it on an Android emulator or a real Android device after connecting to the computer. Click the Run button on Android Studio and wait for installation.
In the first run, our application asks you to grant access. Accept them, and it will start streaming. On the Android emulator, it will be like this:
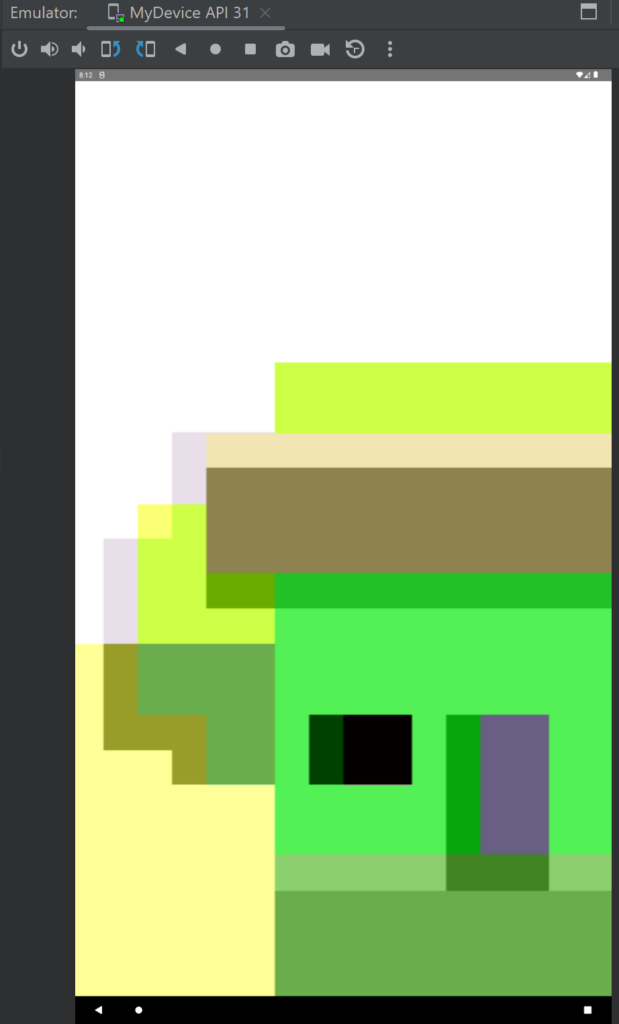
Congratulations! You are now publishing your live stream.
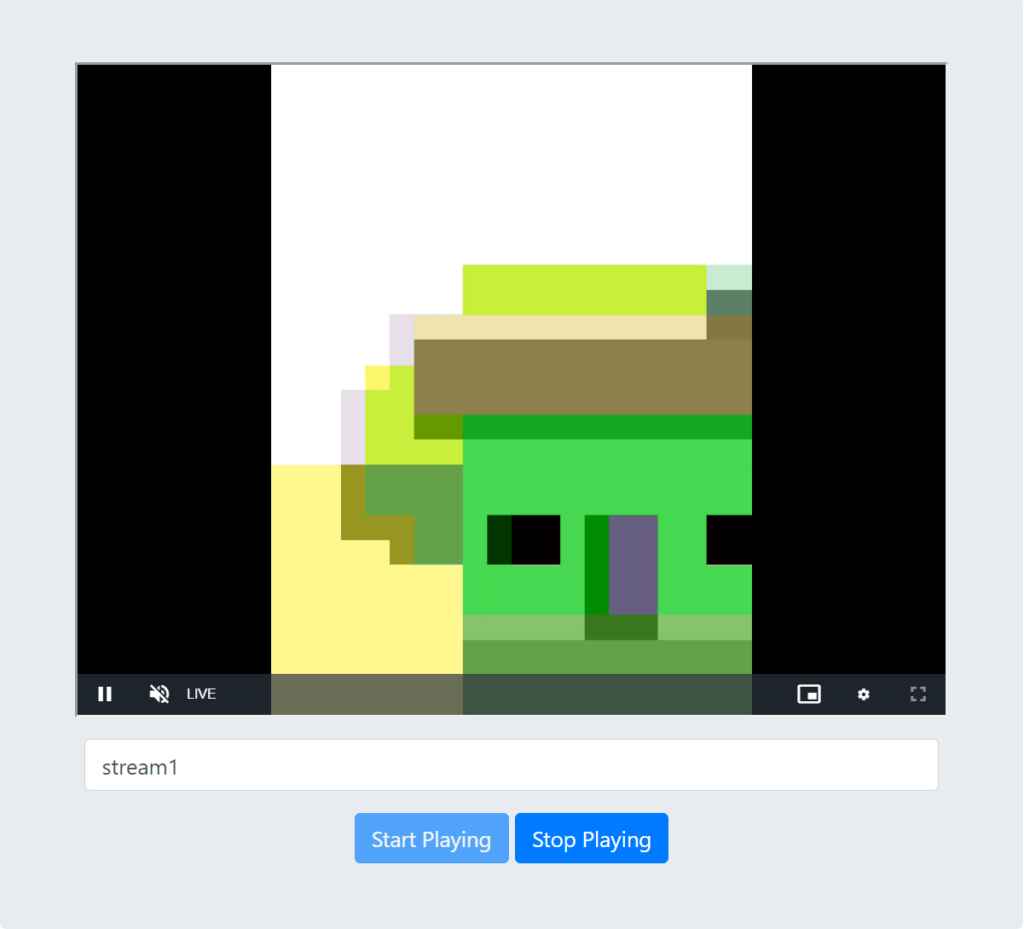
To play the stream we created from our WebRTC Android Publish Application, visit Ant Media’s Test WebRTC Player, write the stream1 to the box, and click the Start Playing button.