How to Enable SSL
Setting up SSL for Ant Media Server
Setting up SSL is a mandatory task when requesting access to the microphone and camera. Also, you need to enable HTTPS and WSS (WebSocket Secure) for Chrome to run WebRTC and WebSocket applications. In addition, developers want to serve their content with a secure connection as well.
There are several options to get the SSL certificate. Please choose the one appropriate for you.
Option 1: Enabling SSL from the Web Panel
In previous versions, configuring SSL involved intricate steps, such as accessing the server through SSH and executing the enable_ssl.sh script from the installation directory usr/local/antmedia.
However, with the release of Ant Media Server version 2.6.2, we have streamlined the SSL enablement process, allowing users to seamlessly secure their media server directly from the AMS Web Panel. This empowers users to enable SSL with utmost ease and convenience.
-
After installaling the Ant Media Server, login to the web panel and navigate to
SETTINGS > SSL.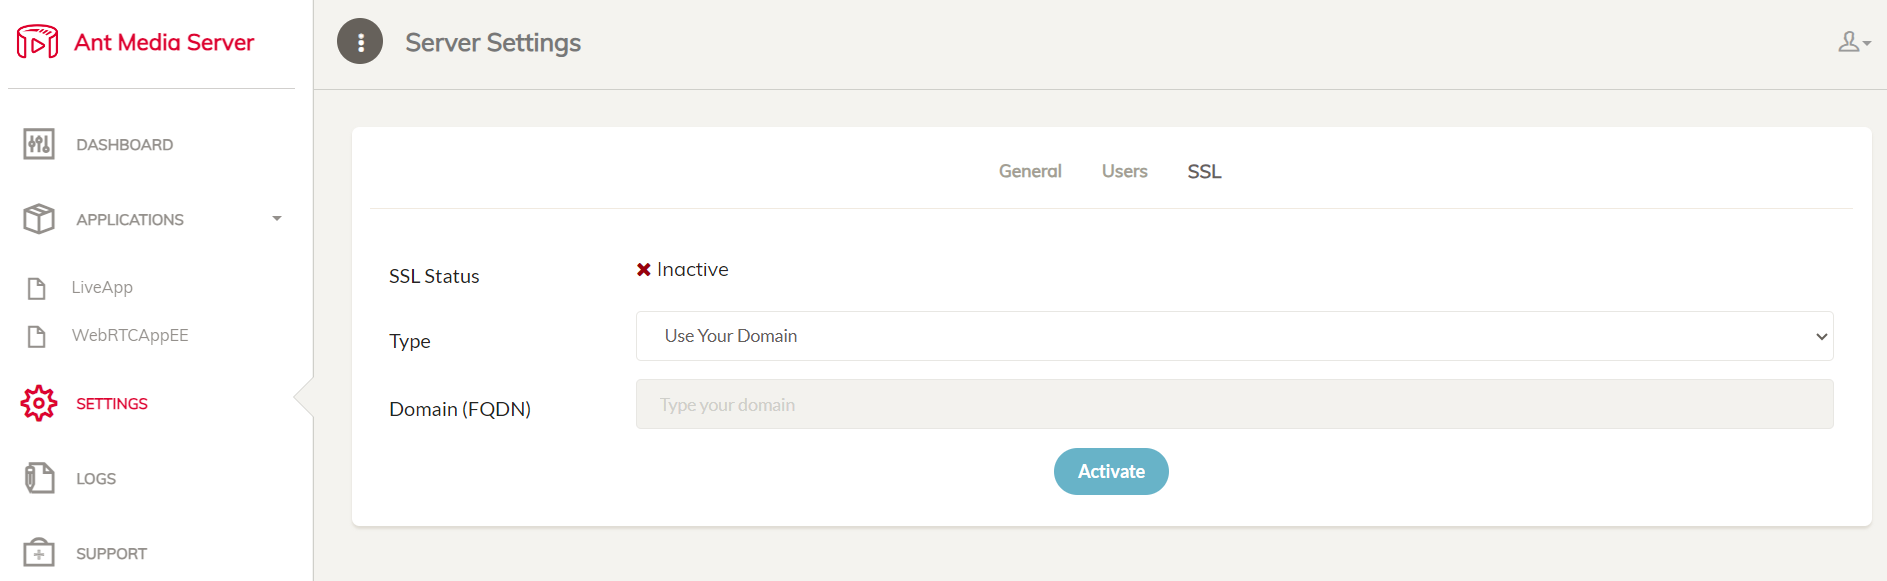
-
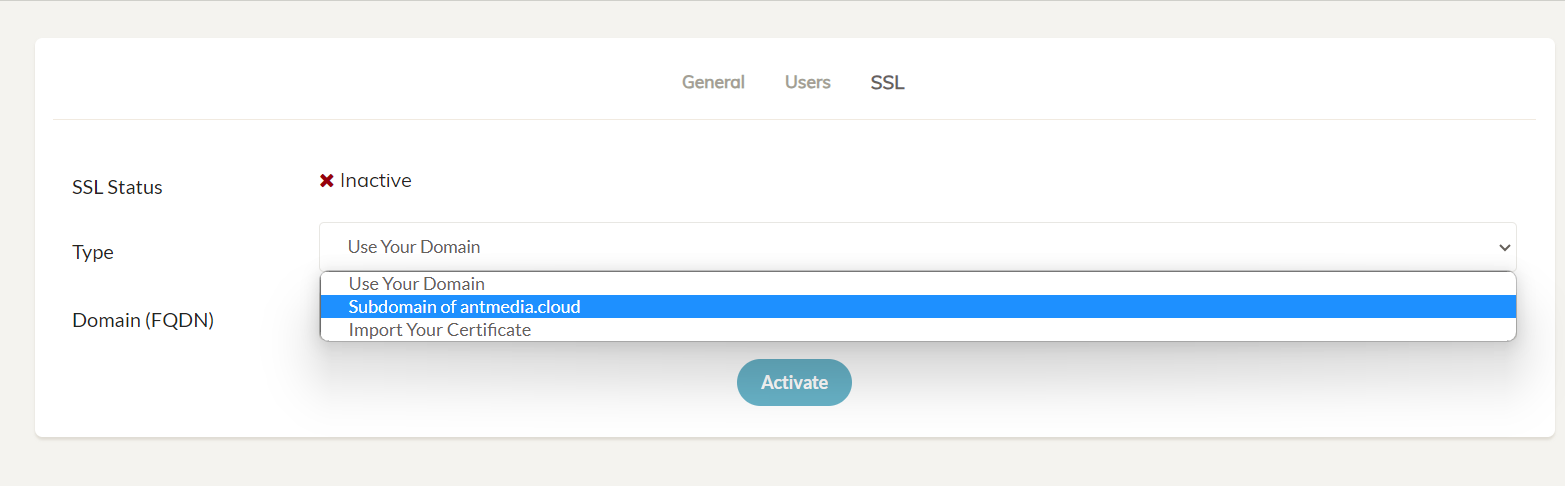
In the drop-down select box named Type, choose among the various options to enable SSL, like using your own domain, free subdomain of antmedia.cloud, or import your own certificate and then click Activate to enable the SSL and restart your server.
-
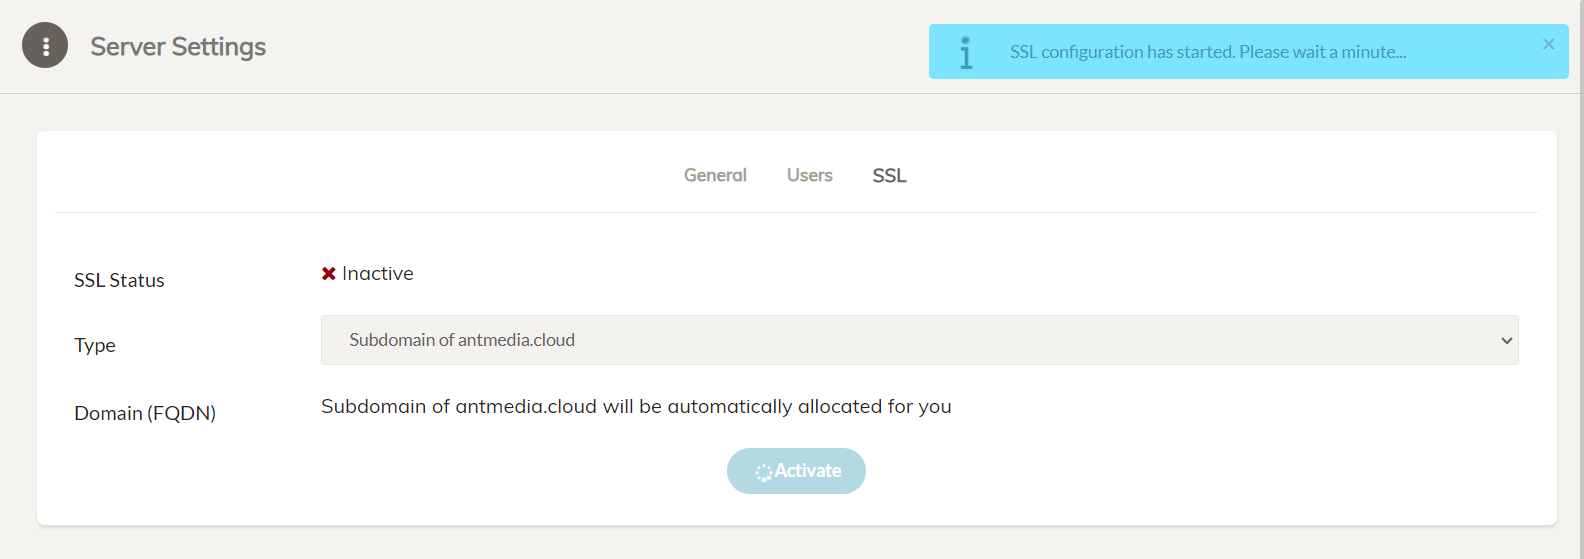
This will start to enable SSL for your Ant Media Server.
-
The Ant Media Server instance will restart and the server can now be accessed securely with SSL enabled.

Option 2: Installing SSL using the Terminal
Apart from the web panel, SSL for the Ant Media Server can also be installed using the terminal and there are a number of ways to do it as per your specific use case and requirements.
Get a free subdomain and install SSL with Let's Encrypt
If you do not have a domain name and want to install an SSL certificate, you can use this feature. With this feature, enterprise users will have a free domain name with the extension ams-[id].antmedia.cloud, and the Let's Encrypt certificate will be automatically installed. This feature is available in versions after 2.5.2
If you want to use the free sub-domain from antmedia.cloud, please make sure that your server has a static/fixed IP address so that the domain can be mapped to a fixed IP.
If the IP is dynamic/changed, then the server will not be accessible on a previously generated sub-domain.
- Go to the folder where Ant Media Server is installed. The default directory is
/usr/local/antmedia
cd /usr/local/antmedia
- Run the
enable_ssh.shcommand to install the SSL.
sudo ./enable_ssl.sh
Create Let's Encrypt certificate with HTTP-01 challenge
The script in this document installs Let's Encrypt SSL certificate.
First, create an A record for your domain name in your DNS records. This way, your domain name will be resolved to your server's public IP address. Note that this guide is for Ubuntu systems, but there are several guides on the internet for other Linux distributions as well.
-
If there is a service that uses port 80, you need to disable it first. For example, if your system has Apache web server, you need to disable it using:
sudo service apache2 stop -
Go to the folder where Ant Media Server is installed. The default directory is
/usr/local/antmediacd /usr/local/antmedia -
Run the
enable_ssh.shcommand to install the SSL.sudo ./enable_ssl.sh -d example.com
Import your custom certificate
The enable_ssl.sh script supports external fullchain.pem, chain.pem and privkey.pem files in the following format:.
sudo ./enable_ssl.sh -f {FULL_CHAIN_FILE} -p {PRIVATE_KEY_FILE} -c {CHAIN_FILE} -d {DOMAIN_NAME}
Example:
sudo ./enable_ssl.sh -f yourdomain.crt -p yourdomain.key -c yourdomainchain.crt -d yourdomain.com
sudo ./enable_ssl.sh -f yourdomain.pem -p yourdomain.key -c yourdomainchain.pem -d yourdomain.com
Create Let's Encrypt certificate with DNS-01 challenge
In this method, there will be no HTTP requests back to your server. This method is useful to create an SSL certificate in restricted environments, such as AWS Wavelength. This feature is available in versions after 2.4.0.2.
Run enable_ssl.sh with -v custom as follows:.
sudo ./enable_ssl.sh -d {DOMAIN_NAME} -v custom
The script will ask you to create a TXT record for your domain name.
Text
Create a TXT record in your DNS records as instructed above. For the sample above, we created a TXT record _acme-challenge.subdomain.yourdomain.com having a value ziB3UjMMSSO-La7jgqPXXXXeK-r2Ja80HluNJVvkg
After you create the TXT record, press Enter to continue.
The process should be completed successfully if you set everything correctly.
Create Let's Encrypt certificate with DNS-01 challenge and Route 53
Let's Encrypt have some plugins to simplify the authorization. Route 53 plugin creates TXT records and deletes them after authorization is done. It's useful while creating instances in AWS Wavelength Zones, as the HTTP-01 challenge does not work in the AWS Wavelength zone due to its nature.
- Create a policy (i.e., dns-challenge-policy) in the IAM service with the following content:. Check this out if you don't know how to create a Policy.
{
  "Version": "2012-10-17",
  "Id": "certbot-dns-route53 sample policy",
  "Statement": [
      {
          "Effect": "Allow",
          "Action": [
              "route53:ListHostedZones",
              "route53:GetChange"
          ],
          "Resource": [
              "*"
          ]
      },
      {
          "Effect" : "Allow",
          "Action" : [
              "route53:ChangeResourceRecordSets"
          ],
          "Resource" : [
              "arn:aws:route53:::hostedzone/*"
          ]
      }
  ]
}
-
Create a Role (i.e. dns-challenger) in IAM user for EC2 and attach the policy above to that role
-
Assign this role to the EC2 instance where you plan to install SSL
-
Create
Arecord for your domain name in Route 53 that resolves to your IP address. -
Run the
enable_ssl.shas follows:sudo ./enable_ssl.sh -d {DOMAIN_NAME} -v route53 -
If everything is set up properly, you can access the server via
http://{DOMAIN_NAME}:5443
If you disabled a service that binds to port 80, such as Apache Web Server, enable it again.
sudo service apache2 start
If the scripts above return successfully, SSL will be installed on your server, and you can use HTTPS through 5443, as follows:
https://example.com:5443
The enable_ssl.sh command will fail if port 80 is already in use by another process or has been forwarded to another port.
Please disable the process or delete the port forwarding temporarily before running the enable_ssl.sh script above.