HLS Playing
HLS playback is available in both the Community and Enterprise Editions of Ant Media Server. Prior to initiating playback of a stream, ensure that the stream is actively broadcasting on the server.
Quick Link: Learn How to Publish Live Streams
Enable HLS
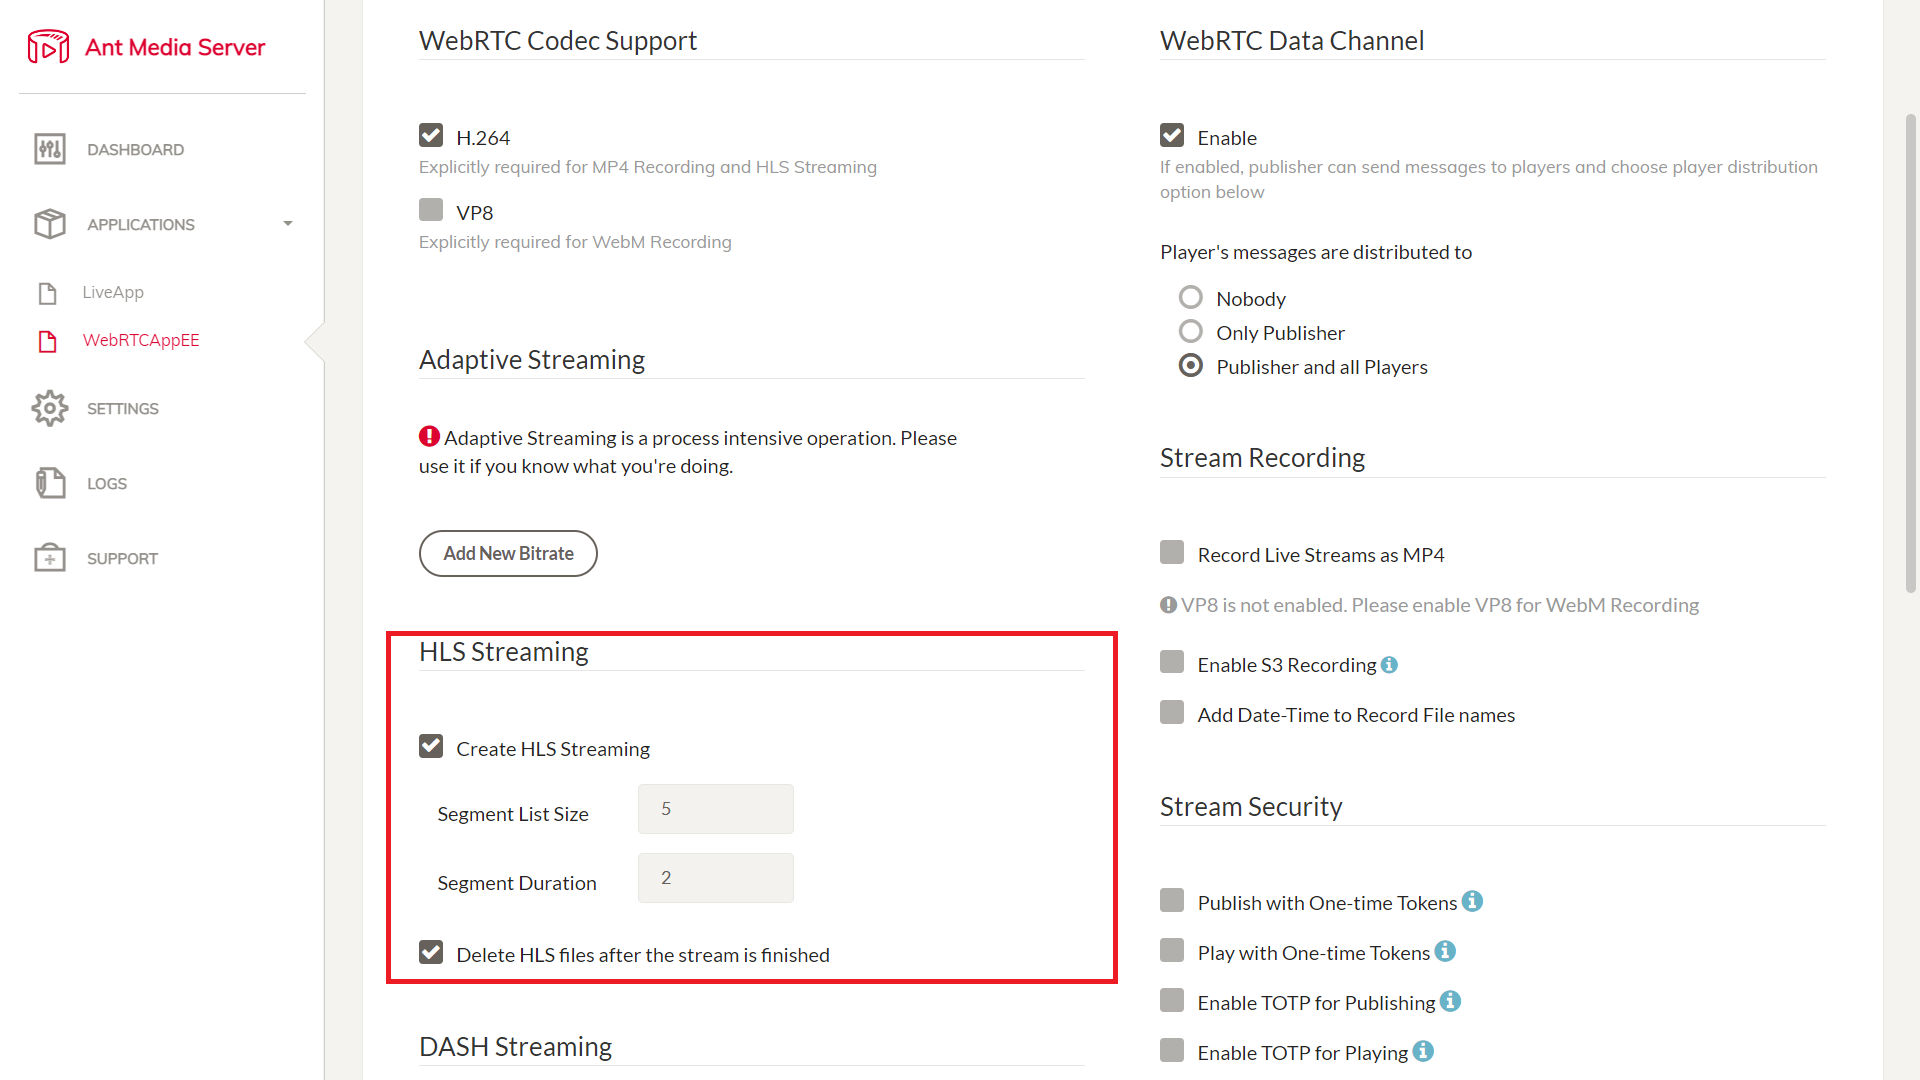
Ensure that HLS muxing is enabled in your application settings. You can verify this by selecting the Create HLS Streamingcheckbox within the application's settings on the web management panel.
HLS is automatically enabled by default.
Enable HLS at the Broadcast Level
To enhance the HLS (HTTP Live Streaming) feature, you can now pass HLS parameters (hlsTime, hlsListSize, hlsPlayListType) while creating a live stream. This allows for more granular control over your HLS streams directly during the creation process.
hlsTime: Sets the target duration of each segment in seconds.hlsListSize: Defines the number of segments in the playlist.hlsPlayListType: Specifies the playlist type (eventorvod).
Example:
Here’s an example of how to pass these parameters in a POST request to create a live stream with specific HLS settings:
curl -X POST -H "Accept: Application/json" -H "Content-Type: application/json" http://<Your-Ant-Media-Server>/<App-Name>/rest/v2/broadcasts/create -d '{"streamId":"test1","name":"test1s","type":"liveStream","hlsParameters":{"hlsTime":"4","hlsListSize":"7","hlsPlayListType":"event"}}'
hlsTimeis set to4, meaning each segment will be 4 seconds long.hlsListSizeis set to7, meaning the playlist will contain 7 segments.hlsPlayListTypeis set toevent, indicating that the playlist type is an event playlist.
Play HLS Streams with Embedded Player
You can use the embedded player in play.html to play the streams with HLS. To use play.html, go to the below URL format.
https://AMS-domain-name:5443/WebRTCAppEE/play.html.
If you have Ant Media Server installed on your local machine, you may also go to
http://localhost:5080/WebRTCAppEE/play.html.
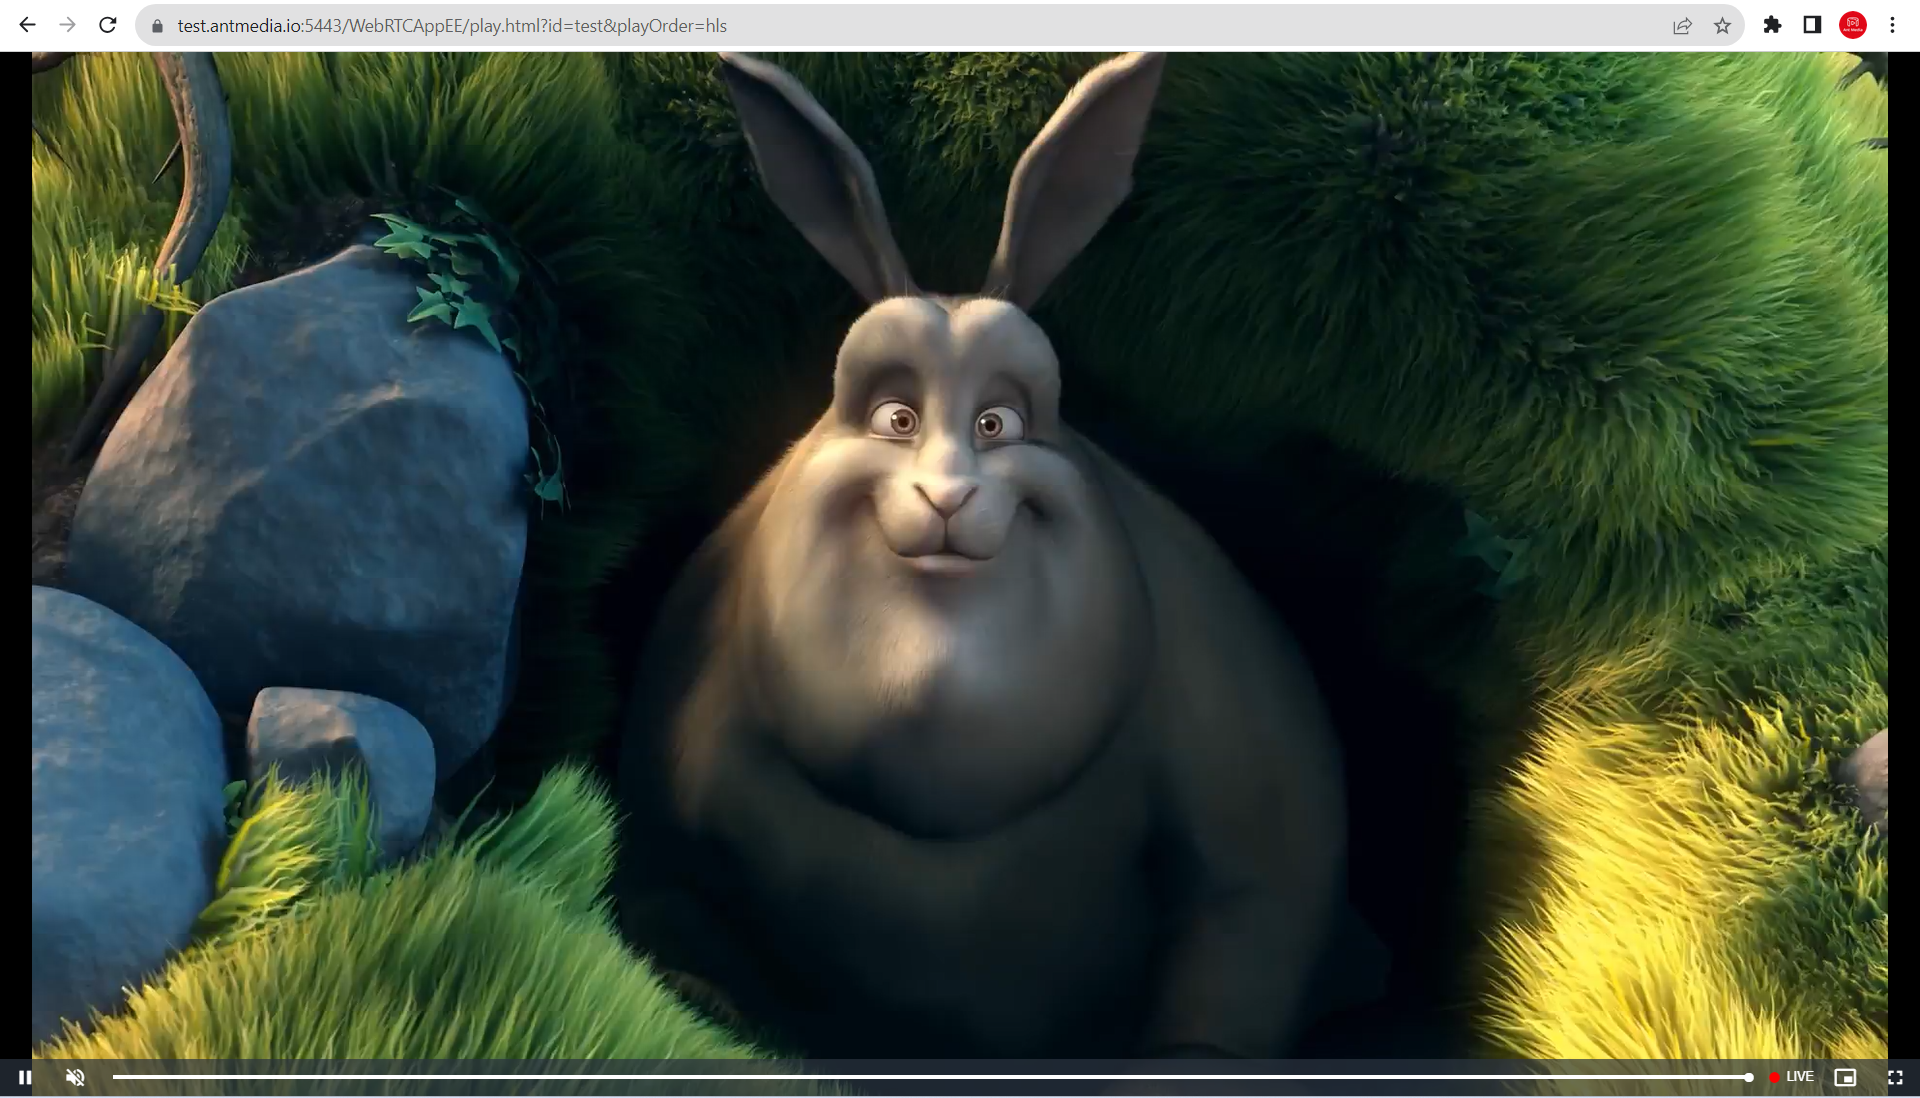
To play a HLS stream, provide streamId as the id and hls as the playOrder parameters in the URL shown below.
https://AMS-domain-name:5443/WebRTCAppEE/play.html?id=test&playOrder=hls
The HLS playback will start automatically when the stream is live.
To learn more about the embedded player, check the document.
Autoplay is enabled by default in a player, but it may be disabled for certain policies in Chrome and Firefox. So you might need to click the player button to get it started. Check out the following links:
Play HLS Streams with React Player
To play HLS streams with React Player component in React, configure the player like below:
<ReactPlayer
  url="https://{AMS-URL}:5443/{APP-NAME}/streams/{STREAM-ID}.m3u8"
  config={{
    file: {
      hlsOptions: {
        xhrSetup: function(xhr) {
          xhr.withCredentials = true // send cookies
        }
      }
    }
  }}
/>
Enabling xhr.withCredentials to send cookies is essential for accurate HLS viewer counts. Without this configuration, the viewer count may not be correctly determined by the Ant Media Server.
Special thanks to @geneukum for this configuration contribution.
Playing streams from SubFolders
When creating or updating a stream on Ant Media Server via the Rest API, you have the option to specify a subfolder for the broadcast. This allows HLS files to be generated within that designated folder.
This functionality ensures that when HLS files are being generated on the server side, they will be placed in the specified subfolder path within the /usr/local/antmedia/webapps/{appName}/streams directory. For instance, if you create a stream with the streamId teststream and a subfolder mySubFolder in the WebRTCAppEE application, then your HLS files (.m3u8 and.ts) will be generated under:
/usr/local/antmedia/webapps/WebRTCAppEE/streams/mySubFolder directory.
Curl sample to create a broadcast with subFolder:
curl -X 'POST' 'https://domain:5443/WebRTCAppEE/rest/v2/broadcasts/create' \
  -H 'accept: application/json' \
  -H 'Content-Type: application/json' \
  -d '{
    "streamId":"teststream",
    "subFolder": "mySubFolder"
}'
Alternatively, if you name subFolder as teststream/mySubFolder your HLS files will be generated under:
/usr/local/antmedia/webapps/WebRTCAppEE/streams/teststream/mySubFolder directory.
Curl Sample:
curl -X 'POST' 'https://domain:5443/WebRTCAppEE/rest/v2/broadcasts/create' \
  -H 'accept: application/json' \
  -H 'Content-Type: application/json' \
  -d '{
    "streamId":"teststream",
    "subFolder": "teststream/mySubFolder"
}'
Remember, if you try to HLS play a stream that has a subFolder defined, you need to pass subFolderName/streamId as an ID to the embedded player.
So if you created a stream with "streamId":"teststream" and "subFolder":"mySubFolder" you should play it with:
https://domain:5443/WebRTCAppEE/play.html?id=mySubFolder/teststream&playOrder=hls
If you created a stream with "streamId":"teststream" and "subFolder":"teststream/mySubFolder" you should play it with:
https://domain:5443/WebRTCAppEE/play.html?id=teststream/mySubFolder/teststream&playOrder=hls
To observe how folders and files are generated, go to /usr/local/antmedia/webapps/{appName}/streams
directory.
Playing HLS stream directly via M3U8
Assume HLS muxing is enabled and a stream is published to Ant Media Server.
The default HLS (.m3u8) URL will be as follows:
http(s)://AMS-domain-or-IP:Port/AppName/streams/StreamId.m3u8
If adaptive bit rates are enabled in the application (Enterprise Edition), the HLS (.m3u8) URL will be as follows:
http(s)://AMS-domain-or-IP:Port/AppName/streams/StreamId_adaptive.m3u8
Beginning with version 2.4.1, the filename structure included the bitrate in the name. For example, 480p ABR is enabled on the server and you want to play it.
In prior versions, the HLS filename was streamId_480p.m3u8, but now it is stream1_480p1000kbps.m3u8, as we enabled the same resolution with multiple bitrates.
If you would like to use the old structure, check the following post.
Interactive HLS Streaming with ID3 Timed Metadata
Using ID3 tags in HLS, you can insert any kind of timed metadata, such as overlaying some text or images in specific moments to show comments, emojis, ads, markers, etc. where ID3 is a data stream.
The feature to use ID3 tags was introduced in Ant Media Server version 2.7.0
Enabling ID3 Tags
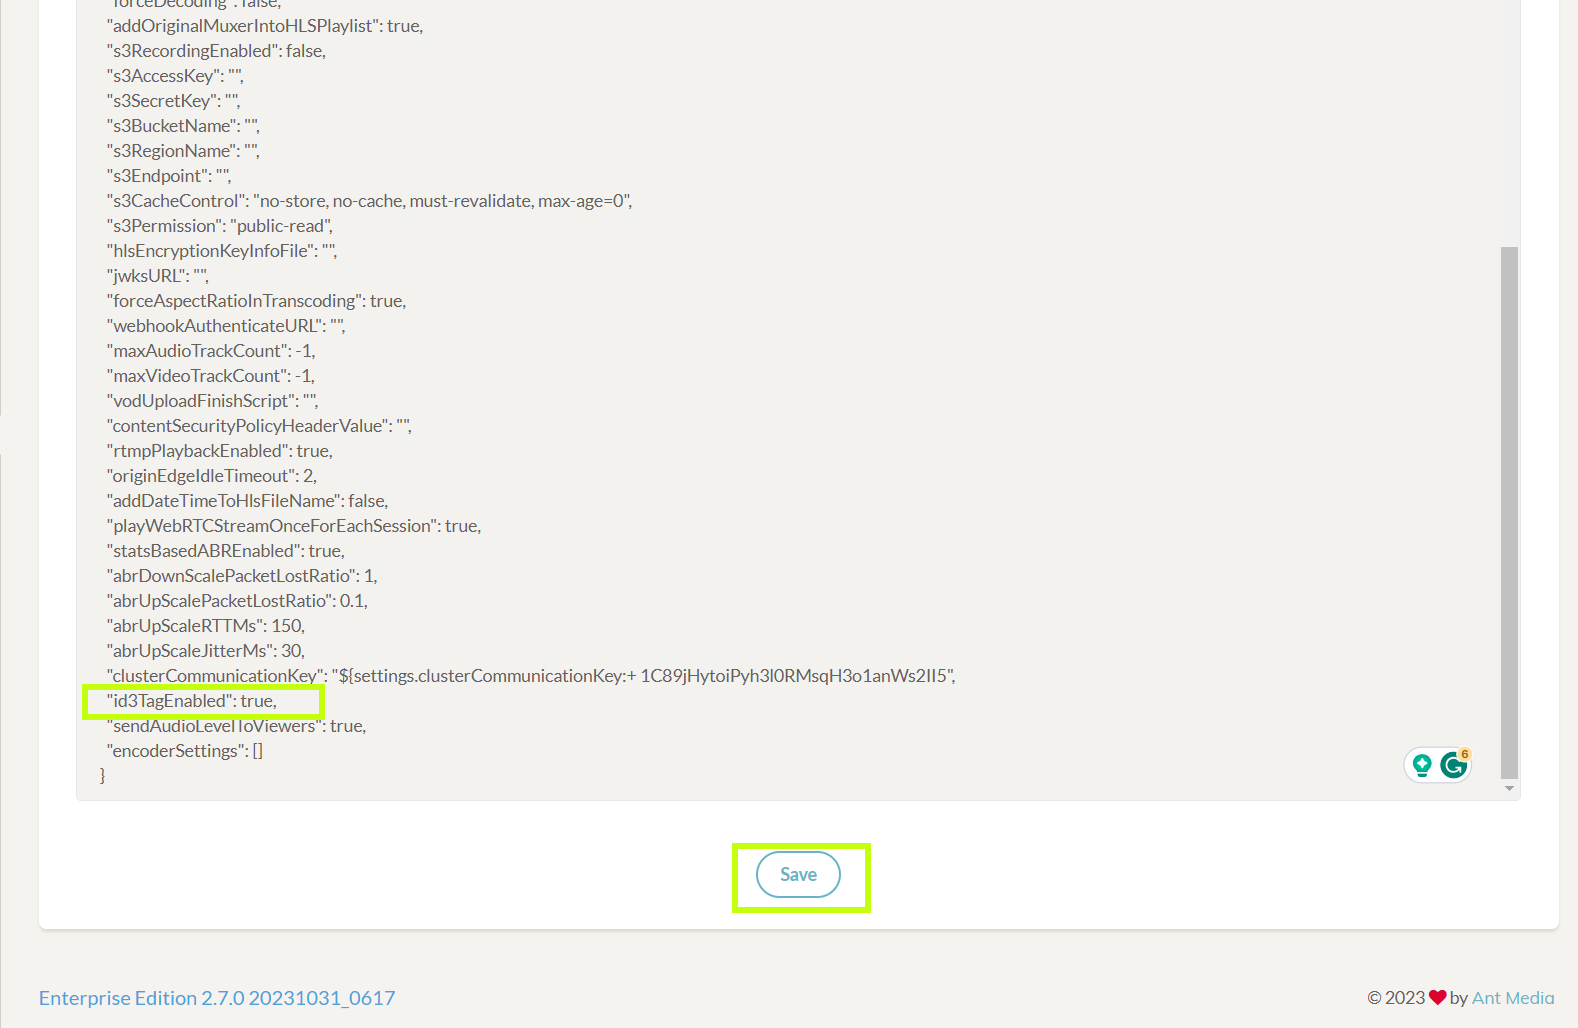
To use the ID3, it is first needed to enable the ID3 tags for the application.
It can be enabled from the Advanced settings by making "id3TagEnabled": true located under the application settings on the Ant Media Server Web Panel.
Adding ID3 Text
To insert an ID3 tag into any stream, just call the REST method with your metadata and use that metadata in your player.
Below is a curl sample to use ID3 metadata
curl -X 'POST' 'https://domain:5443/AppName/rest/v2/broadcasts/streamId/id3' \
  -H 'accept: application/json' \
  -H 'Content-Type: application/json' \
  -d '"string"'
Check out this video tutorial where we discussed and demonstrated ID3 tags.
Currently, ID3 Tags does not work with Ant Media Server default player (play.html) so you can use this Codepen sample for the testing.
HLS Play For a Given Time Interval
Using the HLS modifier, playing an HLS stream within specified time intervals is achievable in Ant Media Server.
The HLS modifier feature is included by default on the server side, starting with version 2.9.0 of Ant Media Server.
You can include the startTime and endTime parameters in the query string of the m3u8 request to play the stream during that specific time frame.
https://domain:5443/WebRTCAppEE/streams/streamId.m3u8?start=1668454888&end=1668454999
Configuration for HLS Manifest Modifier
Set the below settings from application settings -> advanced settings through the web panel
"hlsflags":"+program_date_time", to add program date time in m3u8 file.
"hlsPlayListType":"event", to keep all ts files references in m3u8 file.
"deleteHLSFilesOnEnded":false to keep all .ts files on the disk after the stream finishes.
Usage of HLS Manifest Modifier Plugin
Request m3u8 by adding the start and end date and time in the Unix timestamp as below:
https://domain:5443/AppName/streams/streamId.m3u8?start=1668454888&end=1668454999
You can get the time stamp as per the ts file date and time via Epoch Converter.