Frequently Asked Questions
How can I install SSL on an AWS EC2 instance?
- Configure an Elastic IP address.
- Add an A record to your Elastic IP address.
- Check the new A record exists using dnschecker
- Then follow the SSL Setup Tutorial
How do I upgrade Ant Media Server (AMS)?
To upgrade AMS, back up your data, download the latest version from your Ant Media Server downloads page (enterprise users), stop the AMS server, install the new version, and start the server again. For detailed instructions, refer to the AMS upgrade guide
Where can I download the JavaScript SDK?
The JavaScript SDK is available for Ant Media Server and can be accessed via http://SERVER_ADDR:5080/live/js/webrtc_adaptor.js.
Its file location is /usr/local/antmedia/webapps/live/js/webrtc_adaptor.js and the source code is available here
Check out the Java Script SDK documentation here for more details and implementation.
Can I use Docker to deploy Ant Media Server?
Yes, AMS can be deployed using the Docker.
Utilizing a Docker image is a very common way of deploying Ant Media Server. Check the Installation and the official Ant Media Server Docker images here.
I cannot login to AMS dashboard after upgrading
Starting from version 2.2, Ant Media stores passwords with MD5 encryption. For this reason, you need to change your passwords to MD5 encryption. You can encrypt your password using any MD5 encryption tool like: hmd5online.org
Here are the steps:
-
Login to MongoDB
-
Run the commands below:
use serverdb
db.getCollection('User').find() //Get User details```
db.User.updateOne({"_id": "5e978ef3c9e77c0001228040"},    {$set:{password: "md5Password"}}) //Use User ID in updateOne section and use password with MD5 protection
How can I reset the admin password?
- Stop the server using
service antmedia stop. - Delete the
server.dbfile under/usr/local/antmedia/ - Start the server using
service antmedia start
If you're using mongodb as the database, your password will be stored in the serverdb database under the User collection.
- Connect to your
mongodbserver withmongoclient. - Type
use serverdb; - Type
db.User.find()and it shows you the output like below.{ "_id" : ObjectId("5ea486690f09e71c2462385a"), "className" : "io.antmedia.rest.model.User", "email" : "test@antmedia.io", "password" : "1234567", "userType" : "ADMIN" } - You can update the password with a command something like below. Change the parameters below according to the your case.
db.User.updateOne( { email:"test@antmedia.io" }, { $set: { "password" : "test123" }}) - Alternatively, you can delete the user with a command something like below. Change the parameters below according to the your case.
db.user.deleteOne( { "email": "test@antmedia.io" } ) - As of version 2.3.2, passwords should be hashed with MD5.
What is HLS?
The HLS (HTTP Live Streaming) protocol was developed by Apple. The HLS streaming protocol works by chopping MPEG-TS video content into short chunks. On slow network speeds, HLS allows the player to use a lower quality video, thus reducing bandwidth usage. HLS videos can be made highly available by providing multiple servers for the same video, allowing the player to swap seamlessly if one of the servers fails.
How can I reduce the latency for RTMP to HLS streaming
To reduce the HLS latency, you need to modify a few parameters to achieve a reduced latency of around 8-10 secs.
- Update the HLS segment time to 2 seconds in your Application settings of Ant Media Server. You can decrease this value to have lower latency but players start to poll servers more frequently which is a waste of resources.
- Update the key frame interval to 2 seconds (this value should be consistent with the HLS segment time). For example, Open Broadcaster Software (OBS) sends key frames every 10 seconds by default.
After making these adjustments, the latency should be significantly reduced.
How can I enable SSL for Ant Media Server?
Follow the SSL Setup Tutorial
How can I remove port forwarding?
Use the command below to check the existing port forwarding on your system.
sudo iptables -t nat --line-numbers -L
The command above should give an output live as follows:
  Chain PREROUTING (policy ACCEPT)
  num  target     prot opt source               destination
  1    REDIRECT   tcp  --  anywhere             anywhere             tcp dpt:https redir ports 5443
  2    REDIRECT   tcp  --  anywhere             anywhere             tcp dpt:http redir ports 5080
To delete a specific rule, use the following command, replacing line_number with the actual rule number from the output. For example, to remove the rule forwarding port 5080, run below command. This will delete the rule at line 2, which redirects HTTP traffic (port 80) to port 5080.
iptables -t nat -D PREROUTING 2
How can I fix "Make sure that your domain name was entered correctly and the DNS A/AAAA record(s)" error?
- First, make sure that A record is entered in your DNS settings and pointed to your server.
- Check the ports (443 and 80) are not blocked or are not forwarded to any other ports.
- If you forward 80 or 443 ports to 5080 and 5443, then remove these port forwarding settings as described above.
How can I fix "NotSupportedError" while publishing ?
To solve this problem you must enable SSL. Follow the SSL Setup Tutorial
WebRTC stream stops after a few seconds.
This issue is generally caused by closed UDP ports. Please make sure that UDP ports 50000 to 60000 are open.
Note- For WebRTC, the default range is 50000-60000 in v2.4.3 & above. Before 2.4.3, the default value was 5000-65000.
How can I fix a 403 Forbidden error when using Ant Media APIs?
A 403 error usually indicates insufficient permissions or authentication issues when accessing the Ant Media REST APIs. Please refer to this guide for details on securing REST APIs and ensuring proper authentication.
How can I prevent streams from stuttering when publishing in Ant Media Server?
To prevent stuttering in streams, ensure your network bandwidth is stable and sufficient for the bitrate you're streaming. Additionaly, please adjust these settings on your encoders (like OBS and etc).
- Avoid B-frames (Must)
- Set the profile to baseline for better compatibility.
- Use a low-latency encoding preset.
- For x264 Encoder: Use the setting tune: zerolatency for reduced latency.
- For NVENC Encoder: Enable low-latency mode (LL) for improved performance.
How does adaptive bitrate work (ABR)?
Ant Media Server dynamically measures the client's bandwidth and selects the most suitable video quality based on available adaptive bitrates.
For example, if three bitrate options are available—2000Kbps, 1500Kbps, and 1000Kbps—and the client’s bandwidth is 1700Kbps, the server will automatically deliver the 1500Kbps stream to ensure smooth playback.
Click here for more details on ABR.
How to configure auto-scaling and clustering with Ant Media Server?
Please refer to the auto-scaling documentation here.
What is the difference between the LiveApp, WebRTCAppEE and live?
The primary difference between the three applications is their names. To enhance flexibility, Ant Media Server allows each application to have its own unique settings and configurations.
The three default applications included with Ant Media Server let you run separate setups with different configurations, catering to different use cases. For example, one application can be configured to use H.264, while the other uses VP8.
How can I improve WebRTC bitrate?
You can set the bandwidth property to any value you want to use in WebRTCAdaptor using the Javascript SDK. This is the maximum bitrate value that WebRTC can use. Its default value is set to 900kbps.
What latencies can I achieve with Ant Media Server Enterprise Edition?
| Latency (seconds) | Publish | Play | Platform |
|---|---|---|---|
| 0.15 | WebRTC | WebRTC | AWS Wavelength |
| 0.5 | WebRTC | WebRTC | Standard |
| 0.5-1 | RTSP / RTMP | WebRTC | Standard |
| 8-12 | RTMP / WebRTC | HLS | Standard |
How many different bitrates are possible with Ant Media Server Enterprise Edition?
There is no strict limit on the number of bitrates you can use. However, it is generally recommended to use 2 or 3 for optimal performance. Here are the recommended resolutions and their corresponding bitrates:
| Resolution | Bitrate (Kbps) |
|---|---|
| 240p | 500 |
| 360p | 800 |
| 480p | 1000 |
| 720p | 1500 |
| 1080p | 2000 |
Does ultra-low latency streaming support adaptive bit rates?
Yes, Ant Media Server provides ultra-low latency and adaptive bitrate support at the same time.
Does Ant Media Server have an Embedded SDK?
Yes. Ant Media Server Enterprise has a native Embedded SDK for ARM, x86 and x64 platforms.
How can I configure the location for MP4 recordings?
By default, MP4 recordings are saved in the streams folder within the respective web application's directory in Ant Media Server.
If you want to store recordings in a different location, you can create a symbolic link (soft link) pointing to your desired folder.
Check out this document for more details.
How to use Self-Signed Certificate on Ant Media Server?
1.Install OpenSSL package.
For Ubuntu, you can install OpenSSL with the following command. Similarly, for CentOS, you can use yum to install it.
apt-get update && apt-get install openssl -y
2. Create a self-signed certificate.
Use the below command to create a self-signed certificate.
ams.crt = your certificate file
ams.key = your key file
openssl req -newkey rsa:4096 -x509 -sha256 -days 3650 -nodes -out ams.crt -keyout ams.key
3.Submit the requested
You'll be prompted to enter details for the certificate. Fill in the following fields:
Country Name (2 letter code) [AU]:UK
State or Province Name (full name) [Some-State]:London
Locality Name (eg, city) []:London
Organization Name (eg, company) [Internet Widgits Pty Ltd]:Ant Media
Organizational Unit Name (eg, section) []:Support
Common Name (e.g. server FQDN or YOUR name) []:domain.com
Email Address []: contact@antmedia.io
4. Enable SSL
The certificate and private key will be created at the specified location. Run the enable_ssl.sh script as shown below. Update "ams_server_ip" with your AMS IP address.
/usr/local/antmedia/enable_ssl.sh -f ams.crt -p ams.key -c ams.crt -d ams_server_ip
Enable SSL locally
If you're using a domain name in a local network, add the following entry to the /etc/hosts file:
ams_server_ip domain.com
After adding the domain, re-run the enable_ssl.sh script with the domain name:
/usr/local/antmedia/enable_ssl.sh -f ams.crt -p ams.key -c ams.crt -d domain.com
After running the final command with your domain name, SSL will be enabled for your Ant Media Server. This allows secure connections using HTTPS for the specified domain, ensuring that data transmission is encrypted. Make sure the server's domain is correctly mapped in the /etc/hosts file for local usage, and verify the SSL setup by accessing your server via the secure HTTPS protocol.
How can I install a custom SSL by building a chain certificate?
Uploading your intermediate certificate along with your SSL certificate is crucial because browsers check if your SSL certificate is legitimate by verifying the certificate chain.
You can obtain the intermediate certificates from your certificate provider's website.
The certificate chain should follow this order:
Root Certificate
Intermediate Certificate
For example, for Comodo, you can combine the certificates using the following command:
cat COMODORSAAddTrustCA.crt COMODORSADomainValidationSecureServerCA.crt AddTrustExternalCARoot.crt > chain.crt
Now, your full chain certificate is stored in chain.crt.
How can I change the default HTTP port (5080)?
If you need to run Ant Media Server on a HTTP port that's not the default 5080, you need to update a setting in the server configuration file.
Change the value of the http.port setting in the file located at /AMS-FOLDER/conf/red5.properties. For example, to change the default port of 5080 to 8080, use the below setting.
http.port=8080 // the value has been updated from 5080 to 8080
After the server configuration file has been changed, it's necessary to change the RequestDispatherFilter parameter in the file located at /AMS-FOLDER/webapps/root/WEB-INF/web.xml as shown below:
<servlet>
  <servlet-name>RequestDispatherFilter</servlet-name>
  <servlet-class>io.antmedia.console.servlet.ProxyServlet</servlet-class>
  <init-param>
    <param-name>targetUri</param-name>
    <param-value>http://localhost:8080/{_path}</param-value>  // value has changed from 5080 to 8080
  </init-param>
  <init-param>
    <param-name>log</param-name>
    <param-value>false</param-value>
  </init-param>
  <init-param>
    <param-name>forwardip</param-name>
    <param-value>false</param-value>
  </init-param>
</servlet>
Where can I get WebRTC viewers information?
Ant Media Server does not automatically provide detailed WebRTC viewer data on the server side. However, you can include this information in plain text format for each client within your application, such as a unique ID, IP address, or location.
This data is included in the webrtc-client-stats REST method response and can also be seen in Grafana reports.
To pass this information, you should set the viewerInfo field within the WebRTCAdaptor object in your WebRTC player.
For example, to assign IDs to viewers according to the current time, you can add viewerInfo : "test_"+Date.now() in player.html.
Then make an API request to the REST method to see the result:
http://AMS_URL/APP_NAME/rest/v2/broadcasts/STREAM_ID/webrtc-client-stats/0/5
How to set Apache Reverse Proxy settings for Ant Media Server?
Use the below configuration to setup an Apache virtual host as a reverse proxy.
<VirtualHost *:80>
    RewriteEngine On
    RewriteCond %{HTTP_HOST} ^(.*)$
    RewriteRule ^(.*)$ https://%1$1 [R=Permanent,L,QSA]
</VirtualHost>

<VirtualHost *:443>
    ServerName yourdomain.com
    SSLEngine On
    SSLCertificateFile /etc/apache2/ssl/yourdomain.crt
    SSLCertificateKeyFile /etc/apache2/ssl/server.key
    SSLCertificateChainFile /etc/apache2/ssl/yourchain.crt
    RewriteEngine on
    RewriteCond %{HTTP:Upgrade} =websocket [NC]
    RewriteRule /(.*)           ws://localhost:5080/$1 [P,L]
    RewriteCond %{HTTP:Upgrade} !=websocket [NC]
    RewriteRule /(.*)           http://localhost:5080/$1 [P,L]
    ProxyPass / http://localhost:5080/
    ProxyPassReverse / http://localhost:5080/
</VirtualHost>
How can I install the Ant Media Server on Ubuntu 18.04 with ARM64?
First, build glibc 2.29.
sudo apt install build-essential bison
wget http://ftp.gnu.org/gnu/glibc/glibc-2.29.tar.gz
tar -xf glibc-2.29.tar.gz
cd glibc-2.29/
mkdir build
cd build
../configure --prefix=/opt/glibc-2.29
make
sudo make install
Run the server as an init.d service.
sudo systemctl stop antmedia
sudo systemctl disable antmedia
sudo rm /etc/systemd/system/antmedia.service
sudo cp /usr/local/antmedia/antmedia /etc/init.d/
sudo update-rc.d antmedia defaults
sudo update-rc.d antmedia enable
Add LD_PRELOAD to the init.d script.
sudo nano /etc/init.d/antmedia

# ADD the following line before the line case "$1" in

export LD_PRELOAD="/opt/glibc-2.29/lib/libm.so.6"
Save and exit the editor. Run the following commands.
sudo systemctl daemon-reload
sudo service antmedia stop
sudo service antmedia start
How can I use Web Player or Javascript SDK in Next.js?
Next.js is a server-side rendering React framework. To integrate Ant Media Server JavaScript SDKs into a Next.js project, you must specify that your component should be client-side rendered.
1- Add the line use client at the very beginning of the component where you import the web player or WebRTCAdaptor.
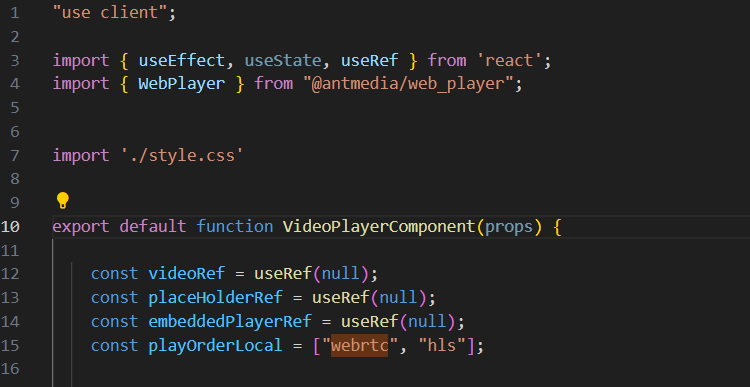
2-When importing a component that uses WebRTCAdaptor or Web Player in a Next.js page or component, use dynamic import with SSR disabled.
import dynamic from "next/dynamic";
const VideoPlayerComponent = dynamic(
   () => import("../videoplayer/VideoPlayerComponent"),
   {
     ssr: false,
   }
 );
Now you shouldnt get any errors and SDK should work as expected.