In this blog post, we’ll explore the best practices for deploying, configuring, and using Media Push. Media Push is a powerful tool that allows you to record conferences, capture any web page, merge video streams, create custom layouts, and much more.
While Media Push is an incredible tool, it does come with a cost—it runs on top of headless Chrome to achieve these advanced functionalities. This means it needs to decode, render, merge, and record videos, which can put a significant load on your CPU.
If Media Push runs on the same server as your primary Ant Media Server, it can lead to high resource usage, causing performance issues or unexpected behavior. To prevent this, a better approach is to deploy Media Push on a separate server.
In this post, we’ll walk through the best way to set up Media Push while ensuring optimal performance and stability.
Table of Contents
Architecture Summary
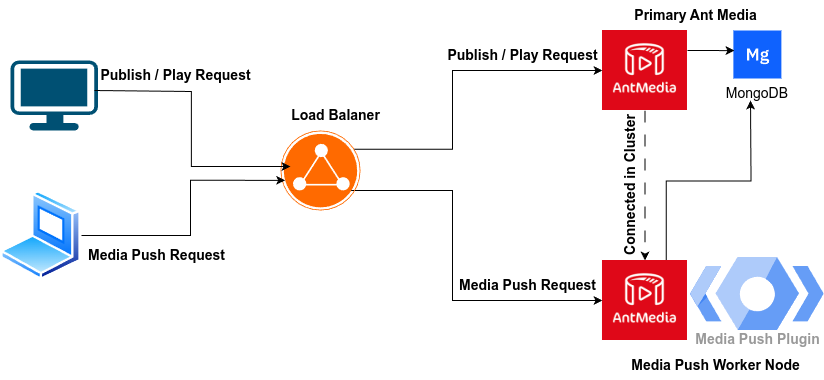
Lets define how will the architecture look like, we already have Ant Media Server running for our streaming workflow, now we will create a new server instance in the same network, we will install Ant Media Server on this new server node, connect it in Cluster Mode and setup Media push Plugin on this node, this node will be responsible for running our media push pipelines for merging / recording etc, so that our main Ant Media Server does not get effected by Media Push CPU consumption, we will also setup a Load Balancer which will be responsible for forwarding the Media Push request to the new server we created for handling media push specific things.
Note: for the sake of this blog post we will refer the node which is responsible to handle our streaming workflow as Primary Node and Node which is responsible to handle Media Push related workflows as Media Push Worker Node.
- Create a new Server Instance, Install Ant Media on New Node and connect both nodes in Cluster Mode
- Install Media Push on Media Push Worker Node.
- Install & Configure Nginx Load Balancer.
- Verify and Test The Setup.
Step 1: Install Ant Media on New Node and Connect in Cluster Mode
Install Ant Media on New Node and connect in Cluster Mode
Lets Start a new EC2 server in AWS, if you are using any other cloud provider please create two new server using your cloud provider’s dashboard. One for Nginx and another for Media Push Worker Node.
I assume you already have one Ant Media Server running on your end (if not please create two servers and install ant media on both by following below instruction ). I have started one more instance with AWS.
Now we have two servers running, one will handle our stream workflow and another will handle our Media push workflow.

Installing Ant Media.
follow this instructions, to Install Ant Media Server, on our newly created machines.
Server ports
Open the Below Ports on all of the Servers.
- TCP: 80 (SSL)
- TCP: 5080 (HTTP)
- TCP: 5443 (HTTPS)
- UDP: 4200 (SRT)
- TCP : 1935 (RTMP)
- UDP: 50000-60000
- TCP: 5000
Setup Cluster
Ant Media Server has option for cluster mode where multiple Ant Media Server Instance can connect with each other and work together to handle high load.
for that We will need to install Mongodb and connect both of our Ant Media instance with mongodb
Install Mongodb
SSH into Primary Ant Media Node, and Install Mongodb by following these instructions. Make sure that Mongodb is bind to all the interfaces by correctly following this instruction.
Switch to Cluster Mode
Now that we have mongodb setup, we are ready to switch to cluster mode.
You will need to switch both Primary Ant Media Node as well as Media Push worker Node into cluster mode, ssh into both of the server which we installed Ant Media, on both the servers cd /usr/local/antmedia , follow the instructions here to switch them into cluster mode.
Now Both the server are connected in the cluster mode, to verify this login into the dashboard and Navigate to Cluster, you should see two node connected here.

Step 2: Install Media Push
SSH into Media Push Worker Node, follow the instructions here to install Media Push on the Worker Node.
Step 3: Install & Configure Nginx for Media Push
Note: Depending on your setup, if you were previously using standalone mode, please continue, otherwise if you were using cluster mode with NGINX already installed and configured, skip this step and proceed to the next section here.
SSH into Load Balancer Node and follow the below documentation for installing Nginx.
wget https://raw.githubusercontent.com/ant-media/Scripts/master/nginx/install_and_configure_nginx.sh && chmod +x install_and_configure_nginx.shWhen you run the script as shown below, it will perform the following tasks: Nginx installation, SSL installation with Let’s Encrypt, and configuration of Origin/Edge. for more option in the script check here.
./install_and_configure_nginx.sh -o "private_ip_of_primary_node" -e "private_ip_of_primary_node" -d example.comConfigure Media Push Node in Nginx
Follow the below steps to configure nginx to forward media push request to correct node, full sample configuration can be found here.
On the Nginx Config file with nano or vim
nano /etc/nginx/nginx.conf Search for http { and add the , below snippet inside the http { section, it should look something like here.
    upstream media_push_worker {
      ip_hash;
      server 172.31.4.78:5080;
    }
Search for listen 4444 ssl; you will see a location directive. We will add one more location directive here which will be responsible for forwarding media push request to Media Push Worker Node. It should look something like here.
location ~* /media-push {
                 proxy_pass http://media_push_worker;
                 proxy_http_version 1.1;
                 proxy_set_header X-Forwarded-For $proxy_add_x_forwarded_for;
                 proxy_set_header Host $host;
                 proxy_set_header Upgrade $http_upgrade;
                 proxy_set_header Connection "Upgrade";
                 proxy_set_header X-Forwarded-Proto https;
             }
Step 4: Verify and Test The Setup
Now that our configuration is done lets test if the media push request get forwarded to correct Node. All of the request related to media push should go to Media Push Worker Node.
Login to Media Push Node’s Dashboard. By going to
https://media_push_worker_node_ip:5443/Go to logs section.
curl -i -X POST -H "Accept: Application/json" -H "Content-Type: application/json" "https://Load_Balancer_IP:4444/LiveApp/rest/v1/media-push/start?streamId=test" -d '{"url": "https://antmedia.io/", "width": 1280, "height": 720}'
You should see logs something like this here, this will confirm that the Media push request is send to correct node.
Check the logs for Media Push you sould see similar logs with the followings.
io.antmedia.plugin.MediaPushPlugin - Creating chrome session for streamId:test and windows wxh:1280x720Related Topics for Media Push Deployments
Separating the Media Push Plugin onto a dedicated worker node isolates headless Chrome’s CPU-intensive decode-render-merge pipeline from your primary streaming workflow. Teams running large-scale conference solution architecture on Ant Media Server see the most significant stability gains from this pattern, because conference recording simultaneously decodes multiple WebRTC tracks before merging them into a single MP4 output — a workload that competes directly with active stream transcoding on a shared CPU.
The cluster setup described in Step 1 relies on horizontal scaling across multiple Ant Media instances. For teams planning to grow beyond two nodes, the AWS CloudFormation scaling guide covers auto-scaling trigger configuration and origin-edge synchronization for WebRTC cluster deployments, which applies directly to the multi-node architecture introduced in this post.
Recording conferences to MP4 through Media Push generates output files that your team will likely store in cloud object storage. The S3-compatible stream recording guide covers real-time upload configuration for AWS S3, Wasabi, and MinIO — all compatible with the Media Push output pipeline without additional post-processing steps.
Media Push captures web pages via headless Chrome, which makes it a natural fit for re-streaming conference calls to social platforms or CDN endpoints. The conference call re-streaming guide details the RTMP ingest endpoint configuration needed to forward a Media Push session output to YouTube Live, Facebook Live, or any RTMP-compatible destination from a single headless Chrome session.
If your deployment uses JWT-based stream authorization, the Media Push REST API calls must include valid token headers to authenticate against the JWT stream security filter on the worker node — otherwise the /media-push/start endpoint returns 401 despite correct Nginx routing, which is the most common post-deployment error for secured cluster configurations.
For teams evaluating whether Media Push or a dedicated encoder plugin better fits their conference recording requirement, the conference call recording overview compares output format, CPU profile, and stream quality across both approaches before committing to the dedicated-node architecture described in this post.
Frequently Asked Questions
What does Media Push use to capture and merge video streams?
Media Push uses headless Chrome to capture, decode, render, and merge video streams. Headless Chrome runs a full browser process without a display, which enables it to capture any web page or conference layout at the pixel level before encoding the merged output as a live stream or MP4 recording.
Why should Media Push run on a separate server from Ant Media Server?
Media Push’s headless Chrome process competes directly with Ant Media Server’s transcoding threads for CPU cycles. Running both on the same instance causes resource contention that degrades stream encoding quality and increases latency. A dedicated Media Push Worker Node isolates this CPU load entirely from the primary streaming workflow.
What ports must be open on the Media Push Worker Node?
The Media Push Worker Node requires TCP 80, 5080, 5443, 1935, 5000 and UDP 4200 and 50000–60000. These match the standard Ant Media Server port configuration. All nodes in the cluster, including the Media Push Worker Node, must have identical port exposure to ensure cluster communication and WebRTC UDP transport operate without packet loss.
How does Nginx route Media Push requests to the correct worker node?
Nginx uses a location ~* /media-push directive with proxy_pass targeting a dedicated upstream block that points to the Media Push Worker Node’s private IP on port 5080. The ip_hash directive in the upstream block ensures session affinity, so all requests for a given stream session reach the same node.
How can you confirm that Media Push requests reach the worker node and not the primary node?
Send a curl POST to /rest/v1/media-push/start via the load balancer IP and then check the Media Push Worker Node’s log for the line Creating chrome session for streamId. If that log line appears on the worker node’s dashboard log section, Nginx is routing correctly. Absence of the log on the primary node confirms isolation.
Does Media Push work in both standalone and cluster mode?
Media Push works in both standalone and cluster mode, but the best-practice deployment described in this guide uses cluster mode. Standalone mode runs Media Push on the same Ant Media Server instance, which is acceptable for low-volume testing but not for production workloads where Media Push CPU load would interfere with active stream encoding.
Conclusion
In this blog post, we explored how to optimize the performance of Ant Media Server by deploying the Media Push Plugin on a separate server. This approach ensures that resource-intensive tasks, such as recording conferences and merging video streams, do not impact the main streaming services. By configuring a load balancer to direct Media Push requests to this dedicated server, we maintain a stable and efficient streaming environment, enhancing the overall reliability of our media services.
Teams deploying Media Push in production cluster environments — where headless Chrome decode-render-merge pipelines run concurrently with multi-track WebRTC encoding — can validate the dedicated-node architecture and origin-edge session affinity behavior with a 14-day Media Push deployment trial on Ant Media Server Enterprise Edition, with full cluster mode and REST API access included from day one.