The live stream viewer count displays how many people are watching the live stream. Its a well known metric that I am quite sure you’ve used to decide whether or not to click through and view the live stream.
Although it can be found in the Ant Media Server web panel next to the live stream, a live stream viewer count has not been implemented on any of the sample application pages.
It’s an important metric and user interface design. It automatically pulls more viewers as each new visitor wants to see what they’re missing.
In this blog post, we’ll delve into why displaying the viewer count on your live streams is important and how it can increase your audiences engagement.
Then we’ll build a web component that will harness the Ant Media Server’s API to fetch real-time statistics to show how many people are watching the live stream at the same time.
Reasons to Display a Viewer Count?
Displaying the view counter on a live stream can offer several benefits and enhance the overall streaming experience.
Here are a few reasons why showing the viewer count is a good idea:
- Social Proof: The viewer count serves as a form of social proof, indicating to new viewers that the live stream is popular and worth watching.
- Trust and Credibility: Displaying the viewer count can help establish trust and credibility. A higher viewer count can indicate that the live stream is trustworthy, reliable, and well-received by the audience.
- Social Connection: The viewer count provides a sense of social connection. When viewers see that they are part of a larger audience simultaneously enjoying the live stream, it can create a feeling of shared experience and connection with others who have similar interests.
Overall, it can attract new viewers and enhance the overall streaming experience.
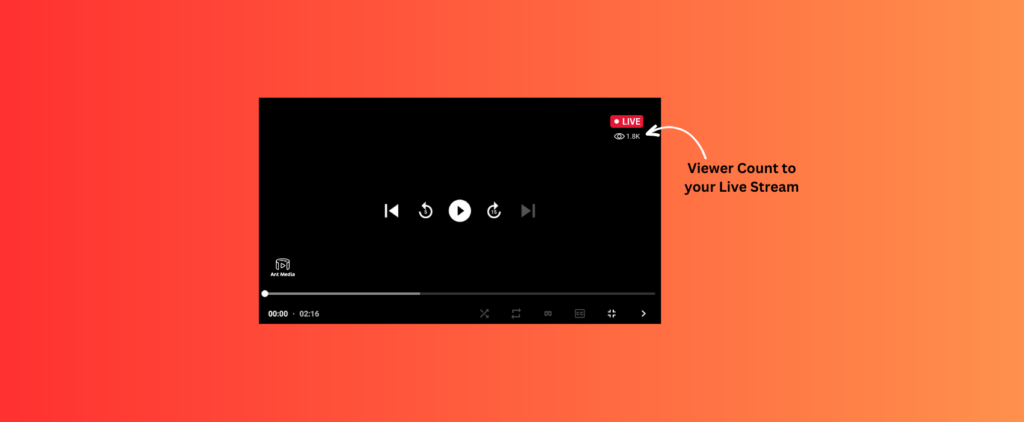
Give us a preview!
Ok, here is what we are going to build and what it looks like. It’s been implemented on the sample page, player.html.
It doesn’t look fantastic, but what we are building is a web component, so you will be able to easily add styling and positioning to make the counter look exactly how you want once we’ve finished building the viewer count.
Lets get Building
The web component will make a GET request to a proxy API service, which is a JSP page on Ant Media Server.
The page will accept one query parameter (streamid) and will make the actual API request to /v2/broadcasts/{id}/broadcast-statistics. The page will then respond with the JSON data that contains the viewer counts.
The reason this proxy page is needed, is because we do not want to allow direct API requests from client side applications. This will open up a security risk which is why by default the API is only accessible by localhost.
Our web component will print out the result and make periodic fetches every 10 seconds to update the counter to provide a real-time experience.
Create the HTML
Lets add the HTML to the player page first and also include the JavaScript file which we’ll create shortly.
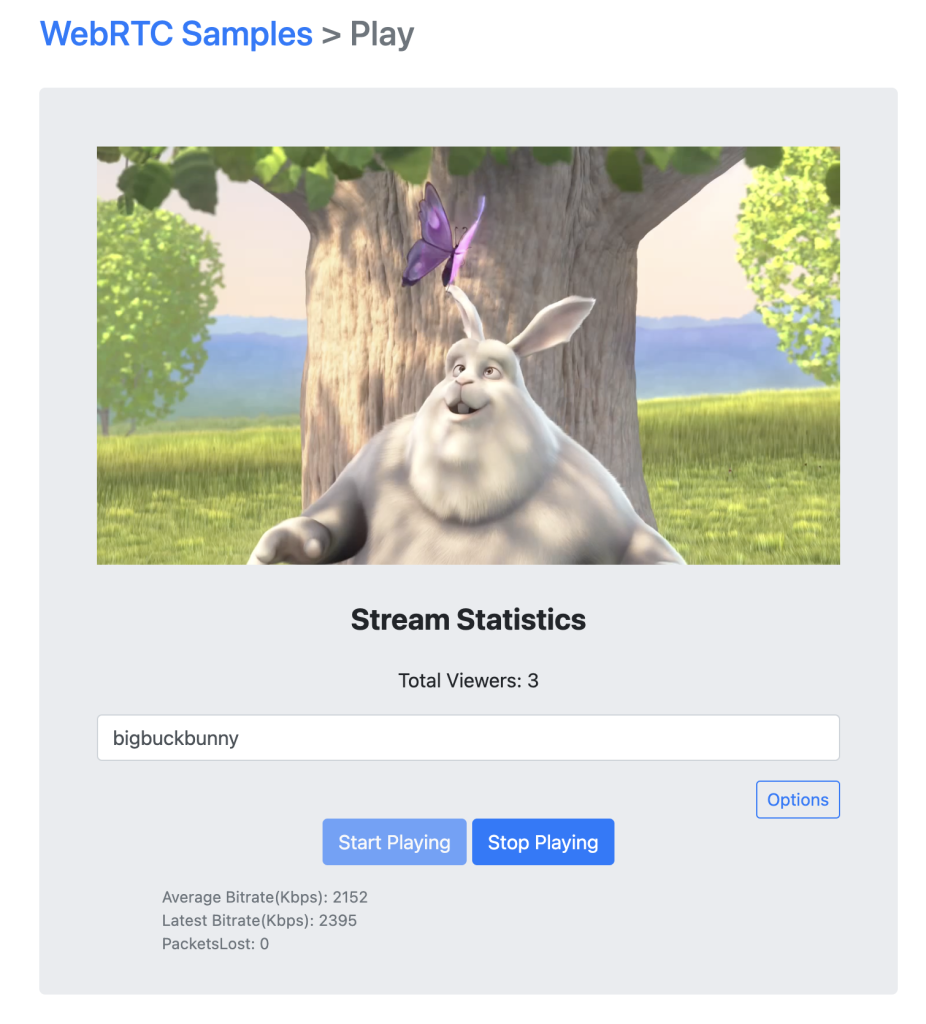
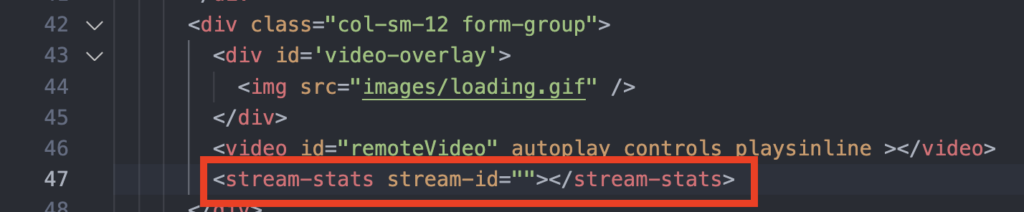
<video id="remoteVideo" autoplay controls playsinline ></video>
<stream-stats stream-id="bigbuckbunny"></stream-stats>
We’ll call our web component <stream-stats> and use an attribute called stream-id. Here we’ll pass in the stream ID of the stream we want the track real-time views for. It means that this component can be embedded anywhere and just requires a streamId.
It doesn’t need to be positioned under the video player, it can be positioned anywhere, thats the point of a web component. It does not rely on anything else on the page. But for our example, its going under the video player.
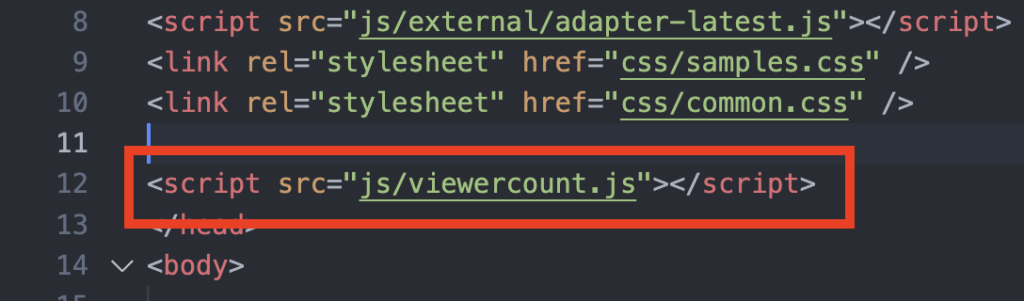
Lets not forget to include the Javascript file that we need to create. This will contain the Javascript to create the web component.
<!doctype html>
<html lang="en">
<head>
<title>WebRTC Samples > Play</title>
<meta name="viewport" content="width=device-width, initial-scale=1">
<meta charset="UTF-8">
<script src="stream-stats.js"></script>
As you can see, we need to create a Javascript file named stream-stats.js. So go ahead and create this now.
Building the Proxy API Service
As explained, before we can build the web component, we’ll need to create a proxy service for making the API request.
If you’ve restricted API access to just localhost, then its necessary to create a custom JSP page that will be served by the built in Tomcat server from your Ant Media Server application.
Otherwise, making API requests from outside of localhost will be blocked. This will result in only being able to use your viewer count web component in your development environment at localhost.
Download the file from Github and upload the file to your required application. For example, in this blog post we’ll be using the LiveApp application which is located at the below location on your server:
/usr/local/antmedia/webapps/LiveApp Now the file is accessible from the following URL:
http://{ant-media-server}:{port}/LiveApp/viewercount.jsp?streamid=viewercountThe below screenshot is an example of the JSP page running on localhost and fetching the viewer counts for the stream id “viewercount”:

Building the Web Component
Now we can get the necessary viewer count data for live streams, let’s start creating the JavaScript class that extends from window.HTMLElement to create the web component and create the HTML that will display the viewer count inside the constructor.
class StreamStatsComponent extends HTMLElement {
  constructor() {
    super();
    this.attachShadow({ mode: 'open' });
    this.shadowRoot.innerHTML = `
      <style>
        /* Add your component styles here */
      </style>
      <div>
        <h2>Stream Statistics</h2>
        <p id="stats-info">Loading...</p>
      </div>
    `;
  }
}
We can add some custom styles to the component using the <style> tag, but for now we’ll keep it simple. We’ve added some default text “loading….” while the data is loaded.
At the moment nothing is happening. We need to add the connectedCallback() method. This method is called as soon as the web component is mounted to the shadow DOM.
  connectedCallback() {
    const streamId = this.getAttribute('stream-id');
    if (streamId) {
      const apiUrl = `http://localhost:5080/LiveApp/viewercount.jsp?streamid=${streamId}`;
      this.fetchStreamStats(apiUrl);

      // Fetch updated data every 15 seconds
      this.intervalId = setInterval(() => {
        this.fetchStreamStats(apiUrl);
      }, 10000);
    } else {
      console.error('Missing "stream-id" attribute.');
    }
  }
ConnectedCallback Explained
First we need to get the stream ID we want the data for. That’s fetched from the stream-id attribute.
Once we have that, we’re building the API request URL and passing that to another method fetchStreamStates() thats making the actual API request.
Notice that the URL is referencing our proxy API service. The actual API request is being done on the server side in the JSP page, we are making a GET request to this JSP page that responds with the data thats required.
Make sure to update const apiUrl variable to reflect where your proxy service is located.
Then, we’re using the setInterval() method to make additional API requests to fetch fresh viewer data for the live stream every 10 seconds.
Let’s take a look at the fetchStreamStats() method and how we are actually making the API request.
 fetchStreamStats(apiUrl) {
    fetch(apiUrl)
      .then(response => response.json())
      .then(data => {
        const viewerTypes = Object.keys(data);
        let sum = 0;

        viewerTypes.forEach(viewerType => {
          const value = data[viewerType];
          sum += value > 0 ? value : 0;
        });

        const statsInfo = this.shadowRoot.getElementById('stats-info');
        statsInfo.textContent = `Total Viewers: ${sum}`;
      })
      .catch(error => {
        console.error('Error fetching stream statistics:', error);
        const statsInfo = this.shadowRoot.getElementById('stats-info');
        statsInfo.textContent = 'Error fetching stream statistics.';
      });
  }
Here, we’re using the JavaScript fetch() method to make a GET request to our API endpoint. With the JSON response, we’re making a loop through the object and aggregating the total viewer count for each viewer type.
Lets remind ourselves what the JSON response looks like.
{
  "totalRTMPWatchersCount": 0,
  "totalHLSWatchersCount": 0,
  "totalWebRTCWatchersCount": 0,
  "totalDASHWatchersCount": 0
}
As you can see, we could support a viewer count for each playback formats. But for now, to keep it simple, we’re just adding up all the viewers.
Finally, we’re getting the HTML element ID stats-info from our template and updating the inner content with the new counts.
Don’t Forget the DisconnectedCallback
We initiated a setInterval() to periodically make API requests to fetch updated viewer data for our live stream.
If the component gets removed from the page, either by Javascript or anything else, there needs to be a mechanism to shut down that process.
So we’ll use the disconnectedCallback function that is triggered if that happens and clear the interval.
  disconnectedCallback() {
    clearInterval(this.intervalId);
  }
As you can see, all it does is trigger a clearInterval().
Handle the changing of the Attribute stream-id
You’ll probably want to dynamically change the value of the stream-id attribute depending on what stream id is playing.
For instance, if you’re using the sample page, player.html to playback all streams, then adding a static stream id is not going to provide the correct viewer stats.
For this reason, its necessary to add two methods to the web component:
- observedAttributes
- attributeChangedCallback
What these do is listen to whenever an attribute of the component changes and trigger a process. In this example, we want to start monitoring a different stream id to fetch updated viewer stats.
These are the methods:
  // defined which attributes to observe
  static get observedAttributes() {
    return ["stream-id"];
  }

  // trigger a process when the attribute value changes
  // in our case, run the connectedCallback method again
  attributeChangedCallback(name, oldValue, newValue) {
    if (oldValue === newValue) {
     return;
   }
   this.connectedCallback();
  }
Define the Name of the Web Component
Now we need to define a name for the web component. This is the name of the custom HTML element we’re building.
You can name it whatever you like, I’ve gone for <stream-stats>.
customElements.define('stream-stats', StreamStatsComponent);That’s it! Our web component is ready to test. Here is the full web component code.
Full Web Component
class StreamStatsComponent extends HTMLElement {
  constructor() {
    super();
    this.attachShadow({ mode: 'open' });
    this.shadowRoot.innerHTML = `
      <style>
        /* Add your component styles here */
      </style>
      <div>
        <h2>Stream Statistics</h2>
        <p id="stats-info">0</p>
      </div>
    `;
  }

  connectedCallback() {
    const streamId = this.getAttribute('stream-id');
    if (streamId) {
      const apiUrl = `http://localhost:5080/LiveApp/viewercount.jsp?streamid=${streamId}`;
      this.fetchStreamStats(apiUrl);

      // Listen for the first play event of the video
      const remoteVideo = document.getElementById('remoteVideo');
      remoteVideo.addEventListener('play', this.handleFirstPlay.bind(this, apiUrl), { once: true });

      // Fetch updated data every 15 seconds
      this.intervalId = setInterval(() => {
        this.fetchStreamStats(apiUrl);
      }, 10000);
    } else {
      console.error('Missing "stream-id" attribute.');
    }
  }

  disconnectedCallback() {
    clearInterval(this.intervalId);
  }

  handleFirstPlay(apiUrl) {
    this.fetchStreamStats(apiUrl);
  }

  static get observedAttributes() {
    return ["stream-id"];
  }

  attributeChangedCallback(name, oldValue, newValue) {
    if (oldValue === newValue) {
     return;
   }
   this.connectedCallback();
  }

  fetchStreamStats(apiUrl) {
    fetch(apiUrl)
      .then(response => response.json())
      .then(data => {
        const viewerTypes = Object.keys(data);
        let sum = 0;

        viewerTypes.forEach(viewerType => {
          const value = data[viewerType];
          sum += value > 0 ? value : 0;
        });

        const statsInfo = this.shadowRoot.getElementById('stats-info');
        statsInfo.textContent = `Total Viewers: ${sum}`;
      })
      .catch(error => {
        console.error('Error fetching stream statistics:', error);
        const statsInfo = this.shadowRoot.getElementById('stats-info');
        statsInfo.textContent = 'Error fetching stream statistics.';
      });
  }
}

customElements.define('stream-stats', StreamStatsComponent);
You can also find this web component on GitHub here.
Brief Summary of the Web Component
Here’s a brief explanation of the entire web component, step by step, to help you understand how it works:
- HTML Structure:
- The web component consists of a
<div>container that holds the stream statistics information. - Inside the container, there is an
<h2>heading with the text “Stream Statistics” and a<p>element with the ID “stats-info” to display the statistics data.
- The web component consists of a
- JavaScript Class:
- The
StreamStatsComponentclass is defined as a subclass ofHTMLElement, representing the custom web component. - In the constructor, the
attachShadow()method is called with{ mode: 'open' }to create a shadow DOM for encapsulation. - The HTML structure and styles for the component are set within the
innerHTMLof the shadow root, including the<style>and<div>elements.
- The
- connectedCallback():
- This method is automatically called when the component is connected to the DOM.
- It retrieves the
stream-idattribute value from the component. - If a valid
stream-idis present, it constructs the URL to the proxy service by replacing the placeholder${streamId}with thestream-id. - The
fetchStreamStats()method is invoked to initially fetch the stream statistics and display them in the component. - A recurring interval is set using
setInterval()to fetch updated stream statistics every 15 seconds.
- static get observedAttributes():
- This is a static method that returns an array of attribute names that the web component wants to observe for changes.
- In our example, we want to observe when the
stream-idattribute changes
- attributeChangedCallback(name, oldValue, newValue):
- This method is called whenever one of the observed attributes changes.
- When the
stream-idattribute changes, its necessary to update the request to fetch the viewer counts for the new stream id.
- fetchStreamStats(apiUrl):
- This method makes an API request to the specified URL using
fetch(). - The response is converted to JSON using
response.json(). - The
dataobject represents the stream statistics. - The
Object.keys()method is used to retrieve an array of viewer types from thedataobject. - The method iterates over each viewer type, checks if the value is greater than 0, and adds it to the
sumvariable. - The total sum of viewers is displayed in the
stats-infoelement using the template string"Total Viewers: ${sum}". - If there’s an error during the API request, an error message is displayed in the
stats-infoelement.
- This method makes an API request to the specified URL using
- disconnectedCallback():
- This method is automatically called when the component is disconnected from the DOM.
- It clears the recurring interval using
clearInterval()to stop fetching updated stream statistics.
- customElements.define():
- The custom web component is registered using
customElements.define(), associating theStreamStatsComponentclass with the tag name'stream-stats'.
- The custom web component is registered using
Add the Web Component to Player.html
Now the component has been created, the proxy API service is running its time to add the viewer counter to the page. We’ll use the sample page player.html.
Include the JavaScript file on the page
Let’s check that the web component JavaScript file has been added to the head section of the page:
If you haven’t uploaded the file to your server, do it now and use the <script> tag to include the component on the page. Here we’ve uploaded it to a js directory.
Add the Component to the Page
Now we can add the actual component to the page where you want to show the viewer counter. Simply add the custom HTML tag as in the example below:
Notes that the stream-id attribute does not have a value. Thats because it will be updated when the “start” button is pressed. This is why its necessary to include the observable attributes methods in the web component.
Update startPlaying Method
A very simple bit of logic needs to be added to the startPlaying method of the player.html page. The method is called when the big “Start Playing” button is pressed.
This will update the web components attribute stream-id whenever the start button is clicked.
So when a new stream id is entered and wanting to be played back, the new stream id will be used to fetch viewer stats.

All the code samples are located here.
Whats Next?
Incorporating a live viewer count on a live stream brings numerous benefits to viewers, but it doesn’t have to stop there.
Video analytics can help to improve the overall experience for your viewers by reducing playback errors, optimise bitrates as well as rich engagement metrics to understand your audience.
Ant Media Server now supports Bitmivin analytics for advanced live streaming data. You can view more details about it here and look forward to our next post which takes a deep dive into video analytics using Bitmovin.


