In this guide, I will explain how to set up Ant Media Server Clustering on Azure. When your load is high, one server instance is not enough for you and you can handle that load with a clustering solution.
For streaming applications, you will need a clustering solution when you have a high number of publishers and viewers. Especially when you require ultra-low latency and adaptive bitrate because they need more processing power. Ultra-low latency is achieved by WebRTC and it is a CPU-intensive protocol. Adaptive bitrate is downgrading video quality in bad networks if needed. It is also CPU intensive because there is video conversion. Luckily, Ant Media Server Enterprise Edition supports clustering, so that you can handle the high load in your streaming applications.
Requirements:
To set up a media server, an Azure account and a ready AntMedia Server Image are needed.
The architecture of the cluster setup could be found here.
Introduction to clustering with AntMedia Server could be found here.
Step 1: Create a Virtual network
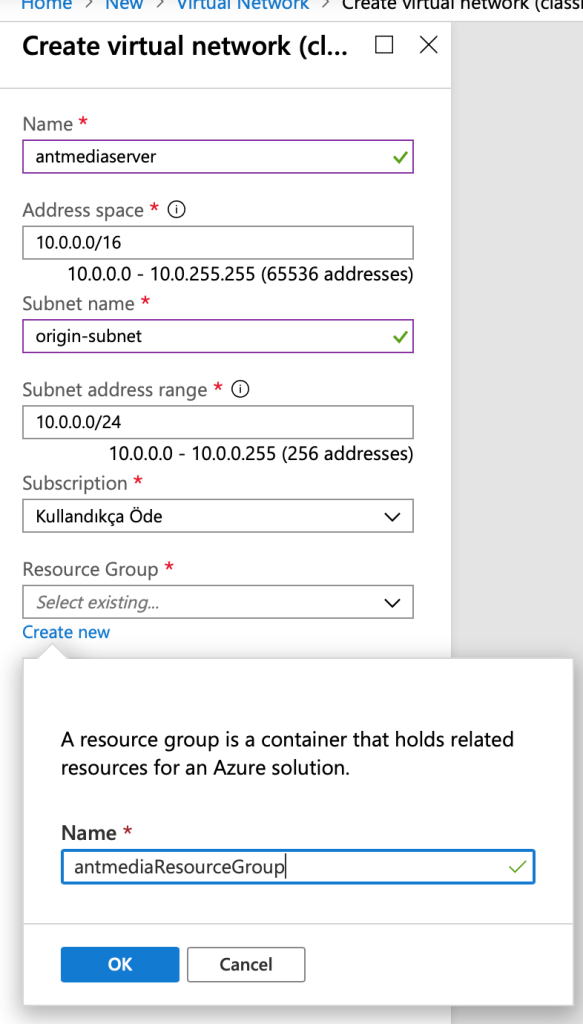
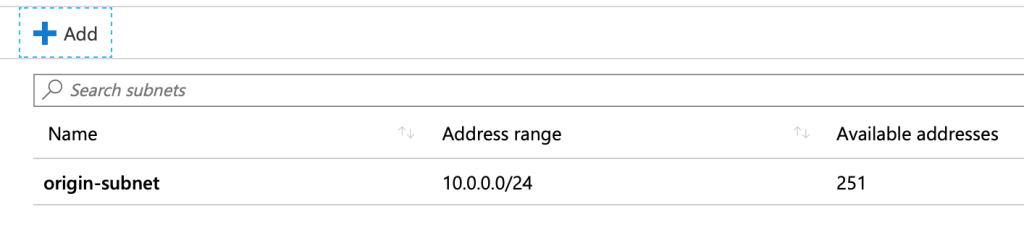
Firstly, we need to create a virtual network named antmediaserver, and then we will add origin-subnet and edge-subnet as described in this doc.
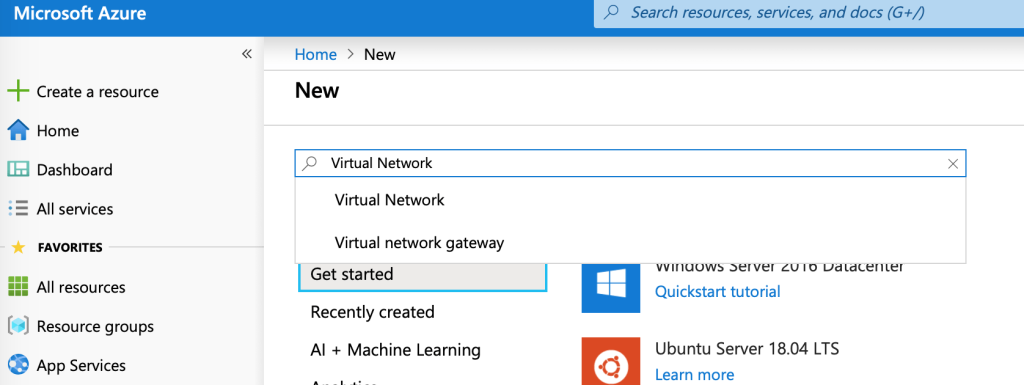
- Click Create a Resource in the portal which is on the upper left.
- Enter Virtual network in the Search the Marketplace box at the top of the New pane that appears. Click Virtual network when it appears in the search results.
- Select Classic in the Select a deployment model box in the Virtual Network pane that appears, then click Create.
- Enter the following values on the Create virtual network (classic) pane and then click Create:
- To create the second subnet, enter antmediaserver in the Search resources box at the top of the page. Click antmediaserver when it appears in the search results.
- Click antmediaserver (in the SETTINGS section) on the Create virtual network (classic) pane that appears.
- Click +Add on the antmediaserver – Subnets pane that appears:
- Enter edge-subnet for Name on the Add subnet pane. Enter 10.0.1.0/24 for Address range. Click OK:
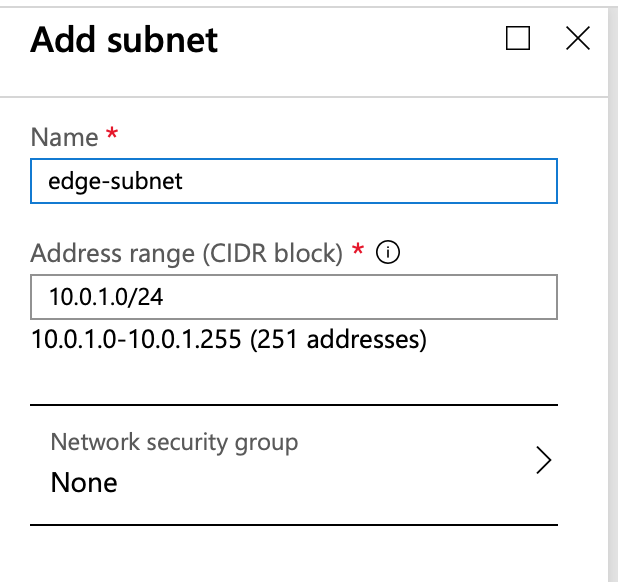
- Now you created origin-subnet and edge-subnet.
- Important Note: You need to open the TCP port range(TCP:5000-65000) for the internal network. It should not be open to the public.
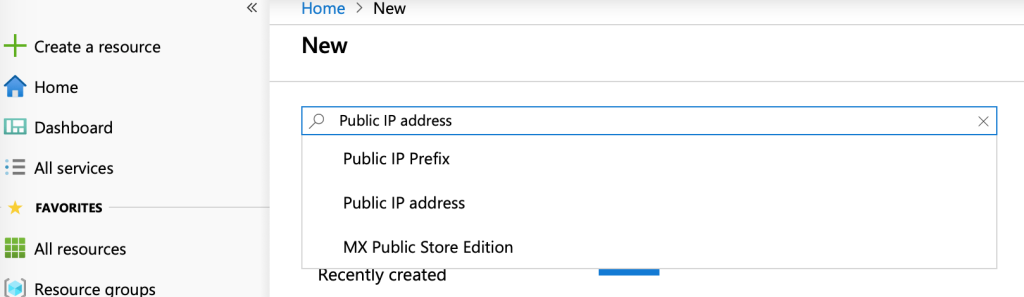
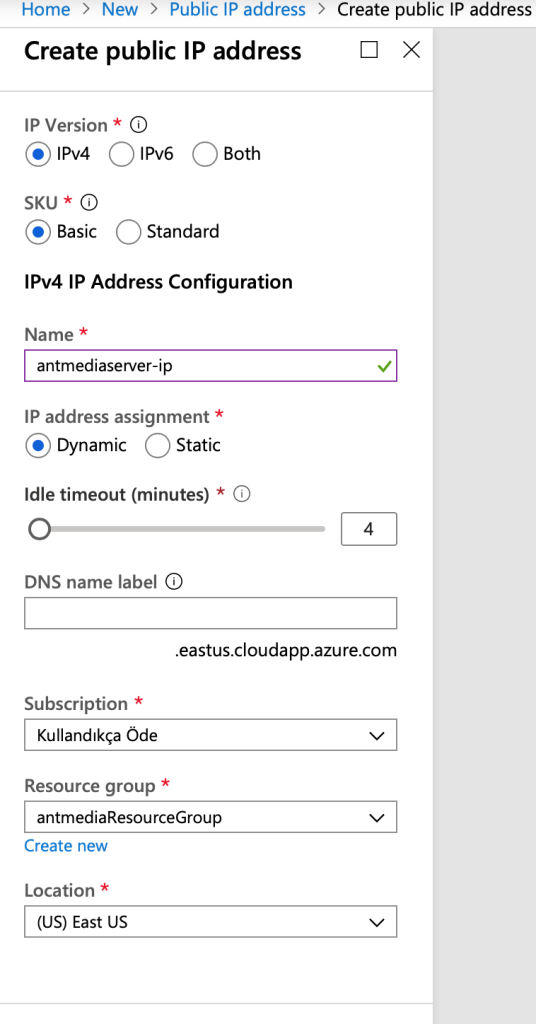
Step 2: Create a Public IP
Create a static public IP address described here. Name it antmediaserver-ip.
- At the top, left corner of the portal, select + Create a resource.
- Enter public ip address in the Search the Marketplace box. When Public IP address appears in the search results, select it.
- Under Public IP address, select Create.
- Enter the following values to the form and click
- This will create the public ip address.:
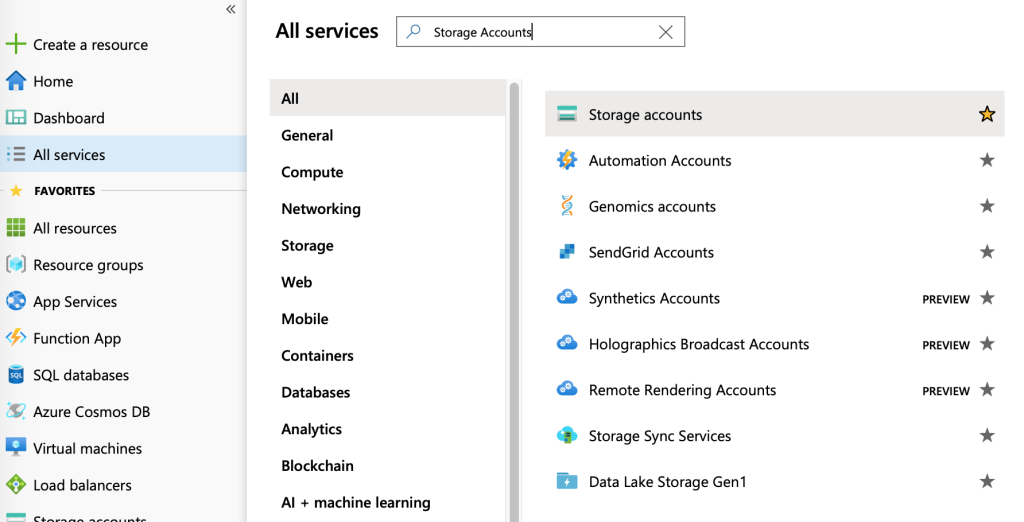
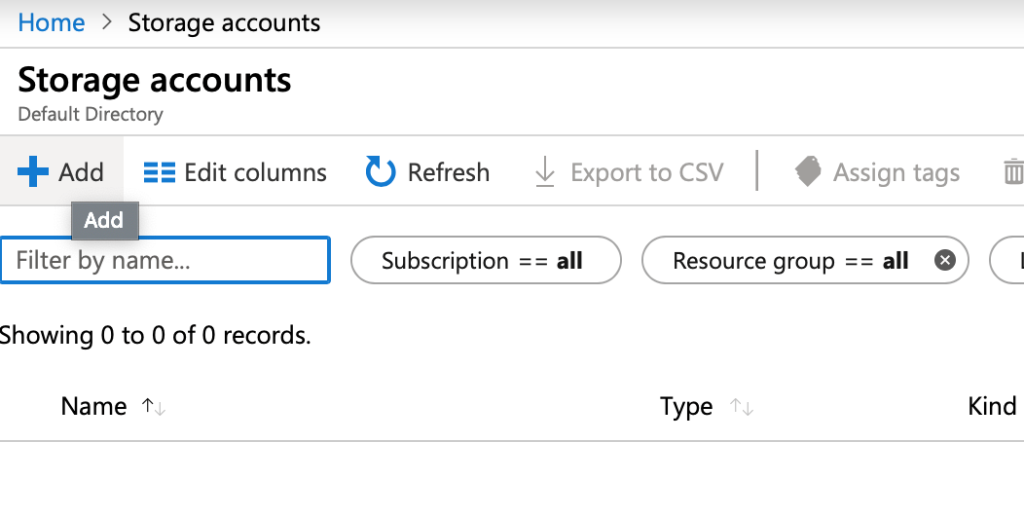
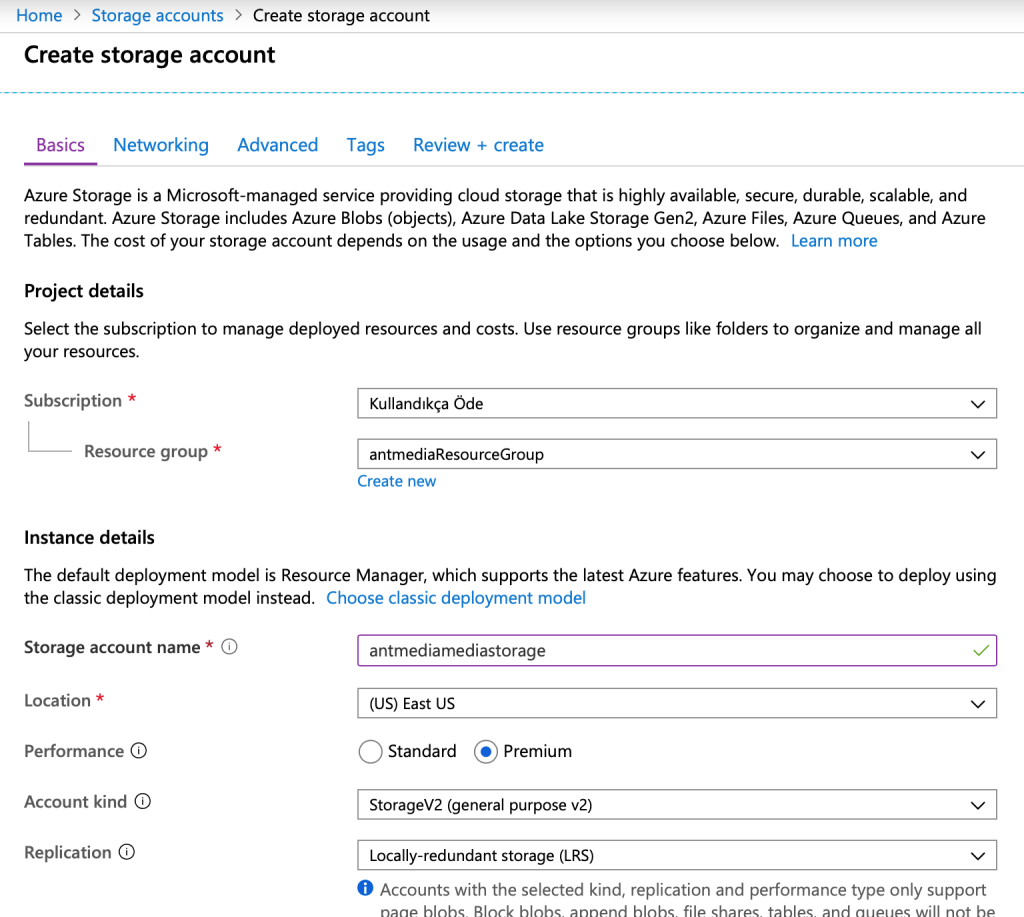
Step 3: Create a Storage Account
Create a storage account as described here. Name it antmediamediastorage.
- In the Azure portal, select All services. In the list of resources, type Storage Accounts. As you begin typing, the list filters based on your input. Select Storage Accounts:
- On the Storage Accounts window that appears, choose Add:
- Enter the following values and select Review + Create to review your storage account settings and create the account:
- Select Create.
Step 4: Create a Virtual Machine for AntMedia
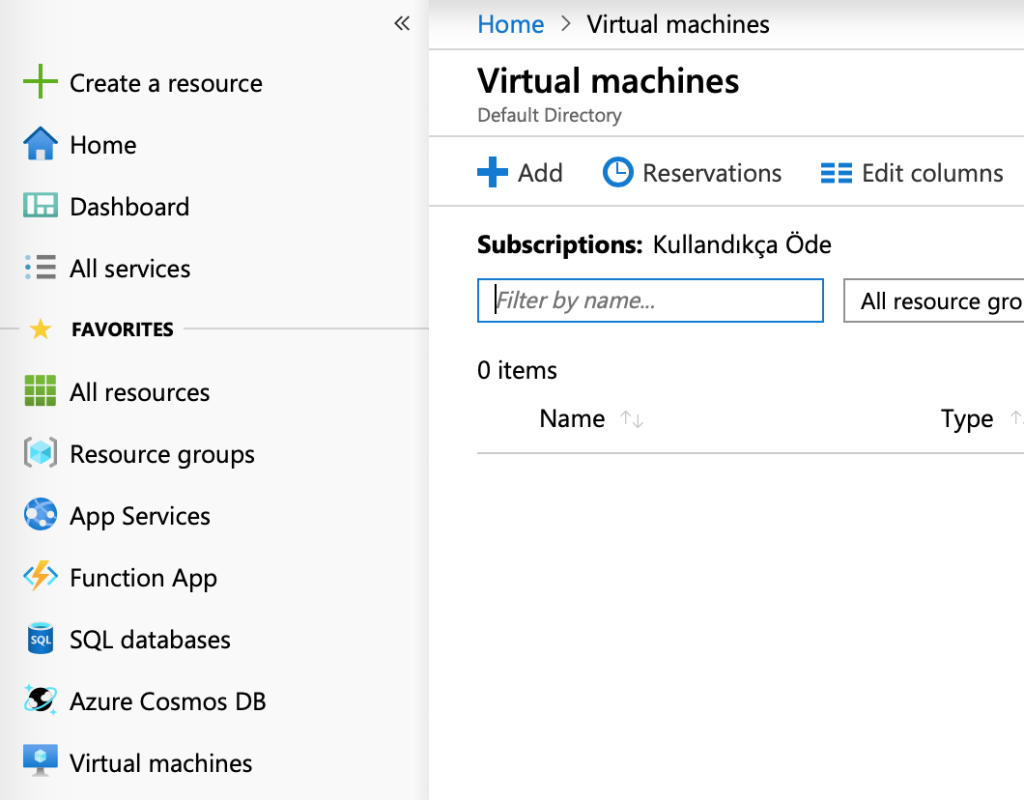
- Click Virtual Machines on the left bar and then click +Add:
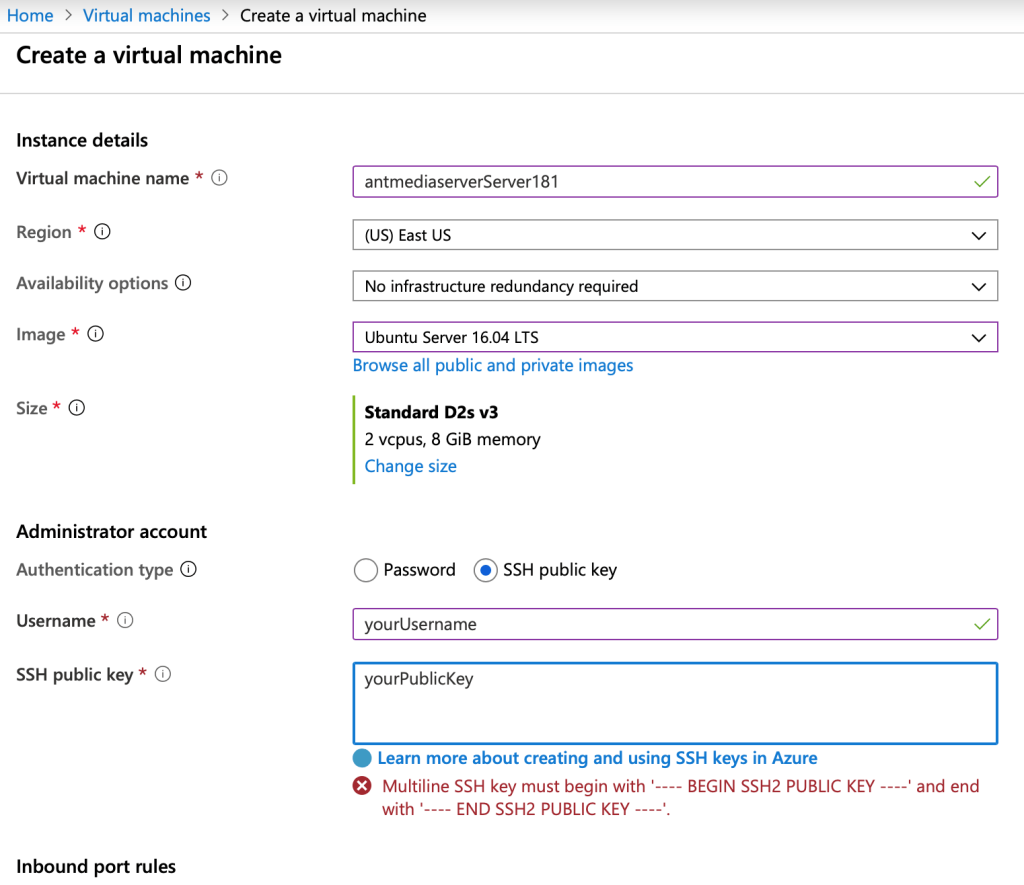
- Enter the following values and click next:
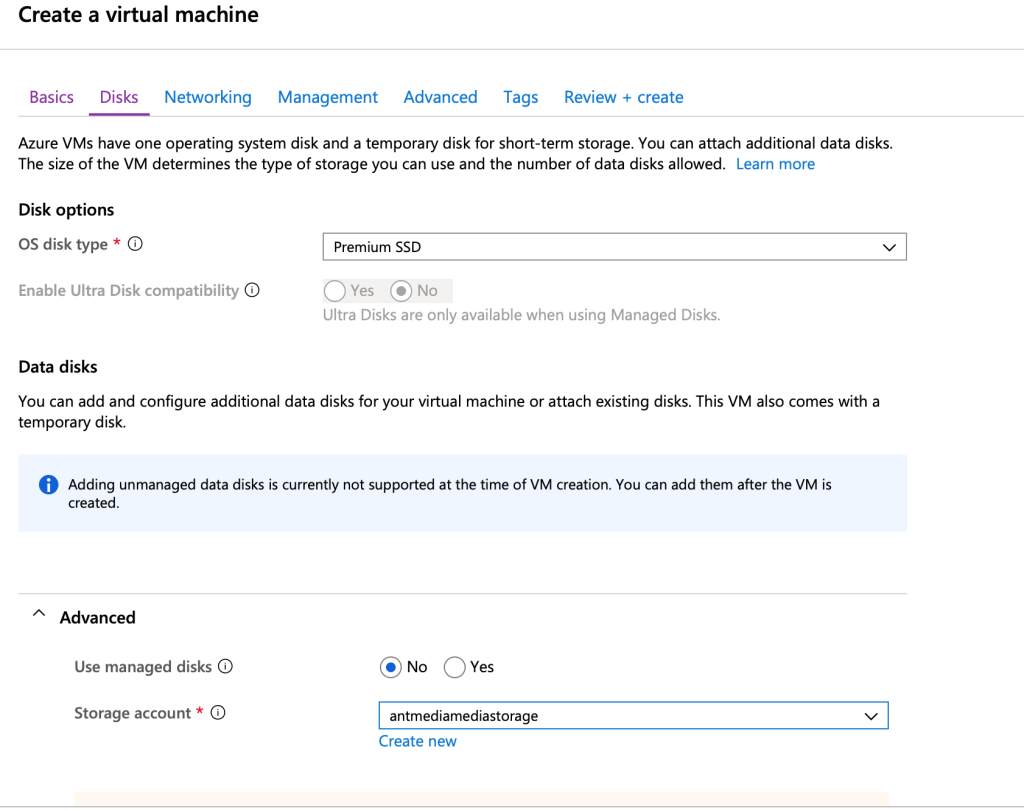
- Enter the following values and click next:
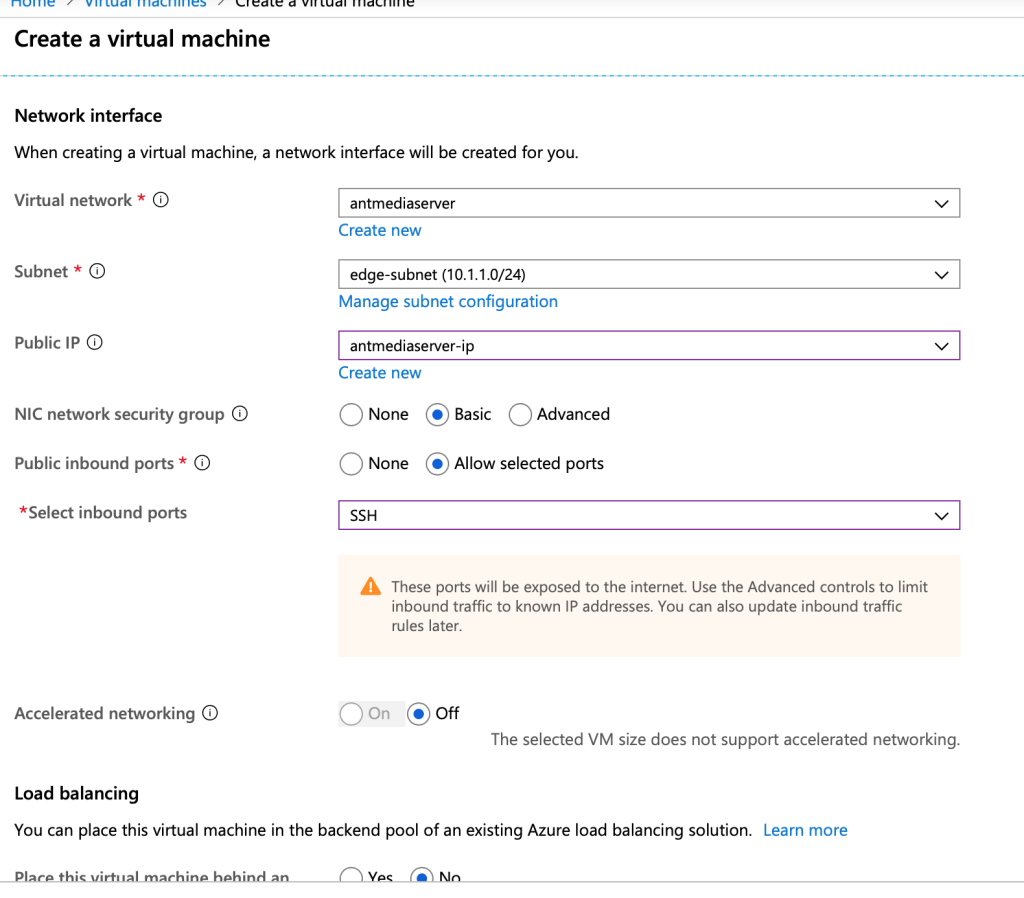
- Enter the following values and click next:
- Enter the following values and click create+review:
- Click create.
Step 5: Setup AntMedia in VM
- Click Virtual Machines on the left bar and choose your virtual machine. Note the public ip address:
- Right now, you should connect to your instance. To Connect your instance, open a terminal and run a command something like. Please change {YOUR_KEY_FILE} and {INSTANCE_PUBLIC_IP} with your own credentials: ssh -i {YOUR_KEY_FILE} username@{INSTANCE_PUBLIC_IP}
- Download the AntMedia Server zip file and setup using this script.
- After setting up MongoDB server as described in Step 6, Run this script. sudo ./change_server_mode.sh cluster <MONGO_SERVER_IP>
- MONGO_SERVER_IP is the private IP and can be learnt from MongoDB server in All Resources. Now server will start in cluster mode.
- Run sudo waagent -deprovision+user
Warning: Be aware that it may take some time for the new VM to start up.
Step 6: Create a MongoDB Virtual Machine
- Create another virtual machine following the Step 5.
- After you get connected, run the following commands in order to install MongoDB to your instance:
$ sudo apt-key adv --keyserver hkp://keyserver.ubuntu.com:80 --recv 9DA31620334BD75D9DCB49F368818C72E52529D4
$ echo "deb [ arch=amd64,arm64 ] https://repo.mongodb.org/apt/ubuntu xenial/mongodb-org/4.0 multiverse" | sudo tee /etc/apt/sources.list.d/mongodb-org-4.0.list
$ sudo apt-get update
$ sudo apt-get install -y mongodb-org
- Open /etc/mongod.conf file with an editor like nano and change bind_ip value to 0.0.0.0 to let MongoDB accept connections in all interfaces and save it: sudo nano /etc/mongod.conf
- Press “Ctrl + X” to save the file.
- Restart mongod and enable service.MongoDB installation is complete after this, just save your MongoDB instance’s local address somewhere. We will use it in later.:
sudo service mongod restart
sudo systemctl enable mongod.service
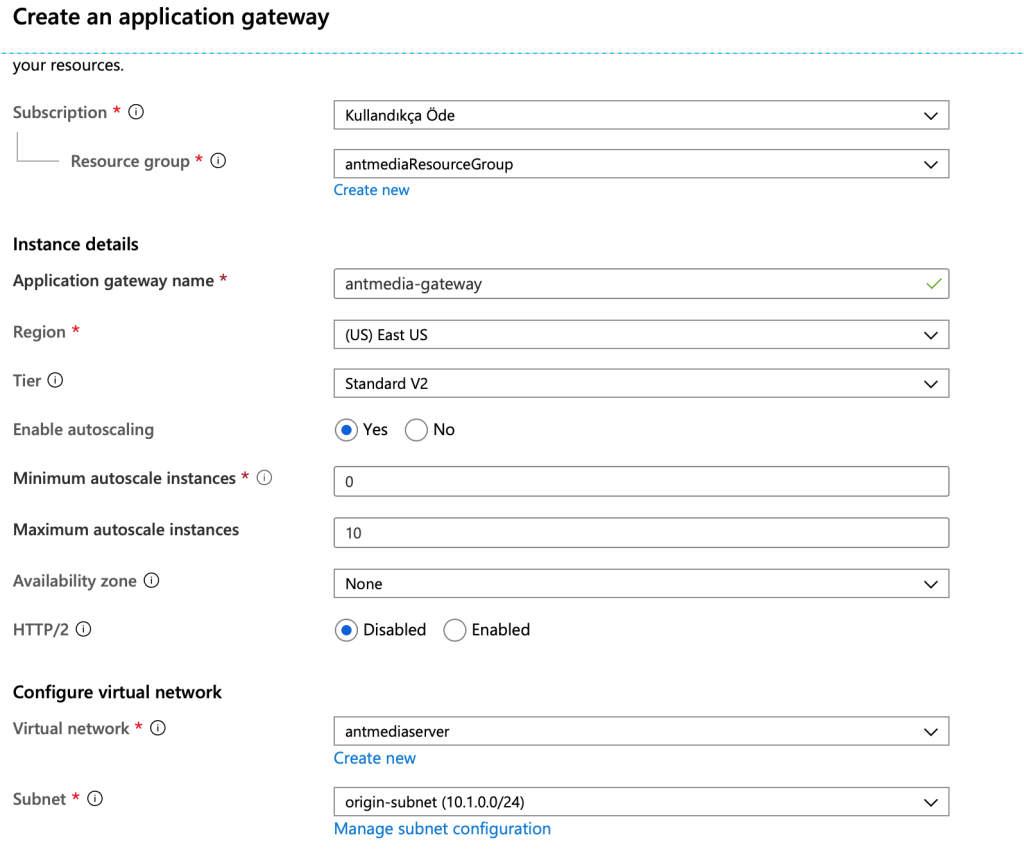
Step 7: Create Application Gateway
-
- Select Create a resource on the left menu of the Azure portal. The New window appears.
- Select Networking and then select Application Gateway in the Featured list.
- Enter the following values and click next:
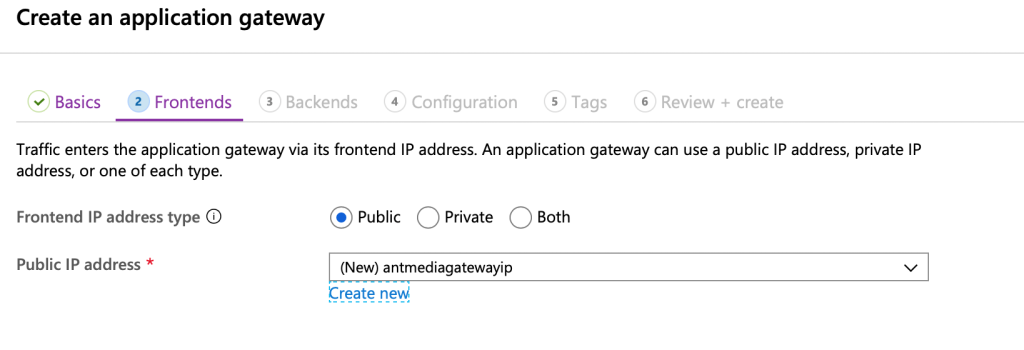
- Enter the following values, create new IP for this and click next:
- Enter the following values for the backend pool and click next:
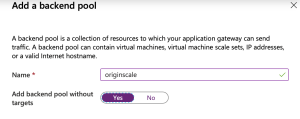
- Add another backend pool for edge scale.
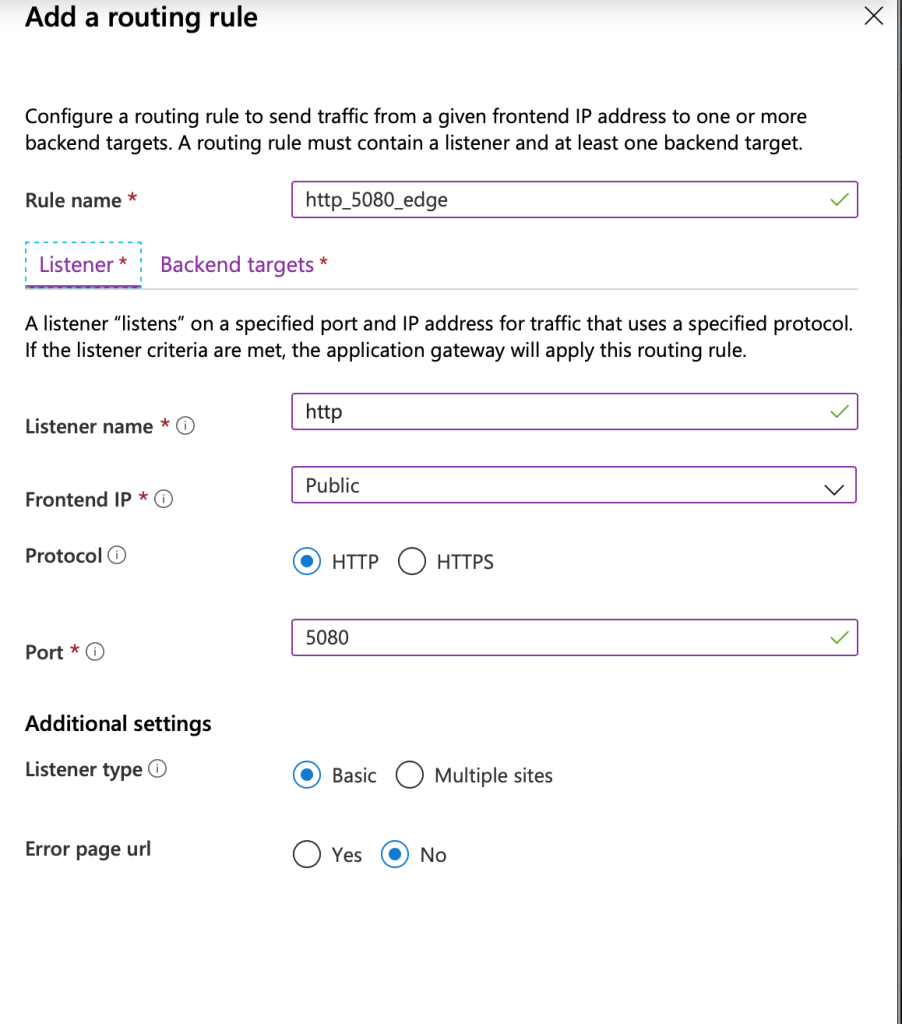
- Click Add a Rule and enter a rule named http_5080_edge for forwarding 5080 HTTP calls to the edge scale group. Enter the values as in the screenshot:
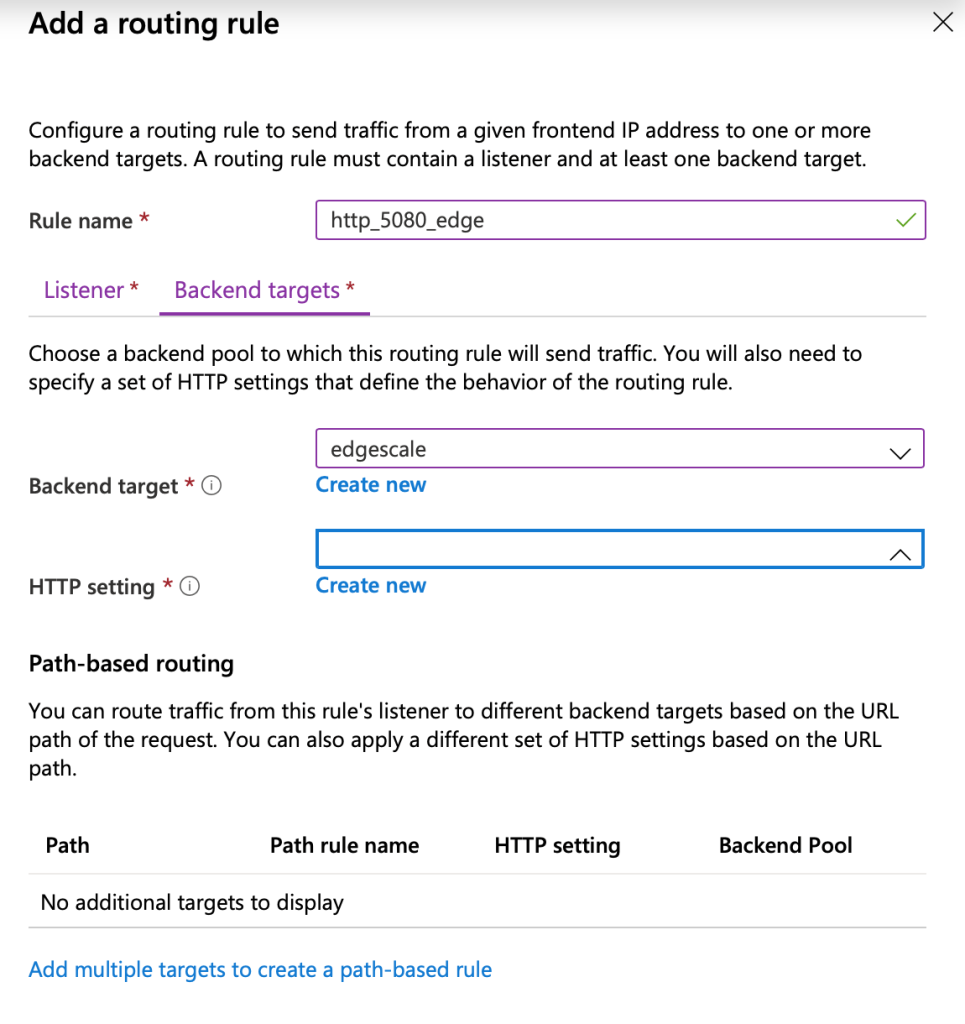
- Click the Backend Targets tab and enter the following values:
- Click Create New for HTTP Setting and enter the following values:
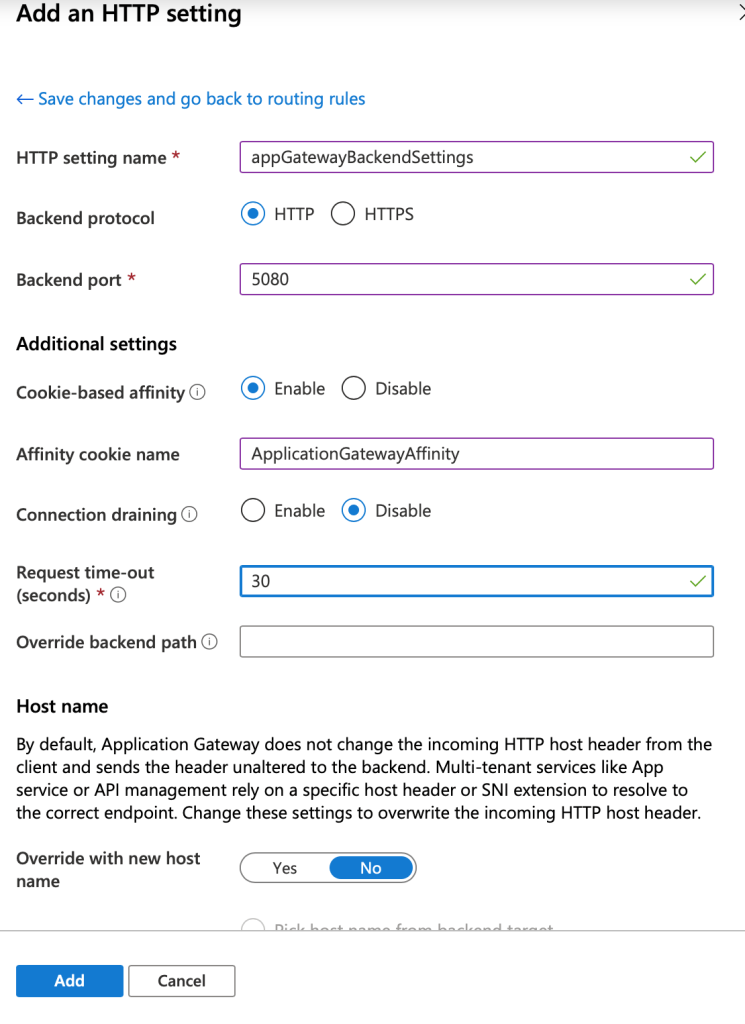
- Click Add and add HTTP Settings.
- Click add and add the rule.
- Add another rule named http_80_origin which forwards 80 port calls to the origin scale. Enter the following values:
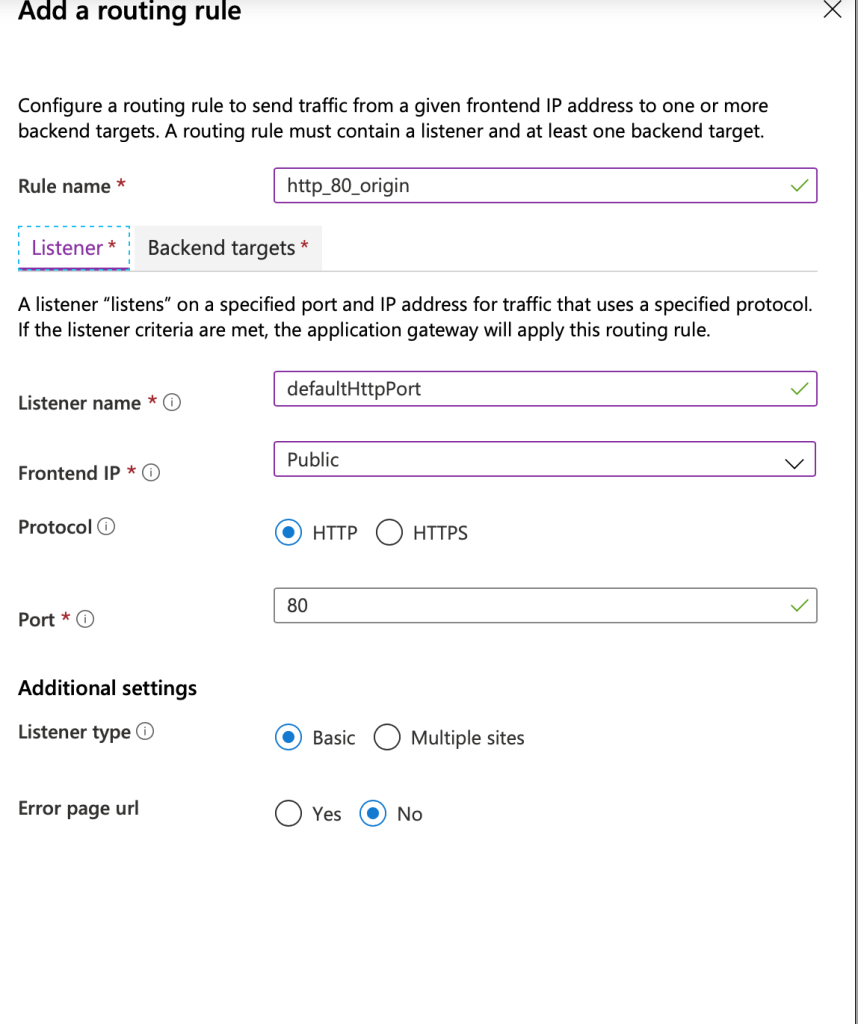
- Click the Backend Targets tab and enter the followings and click add:

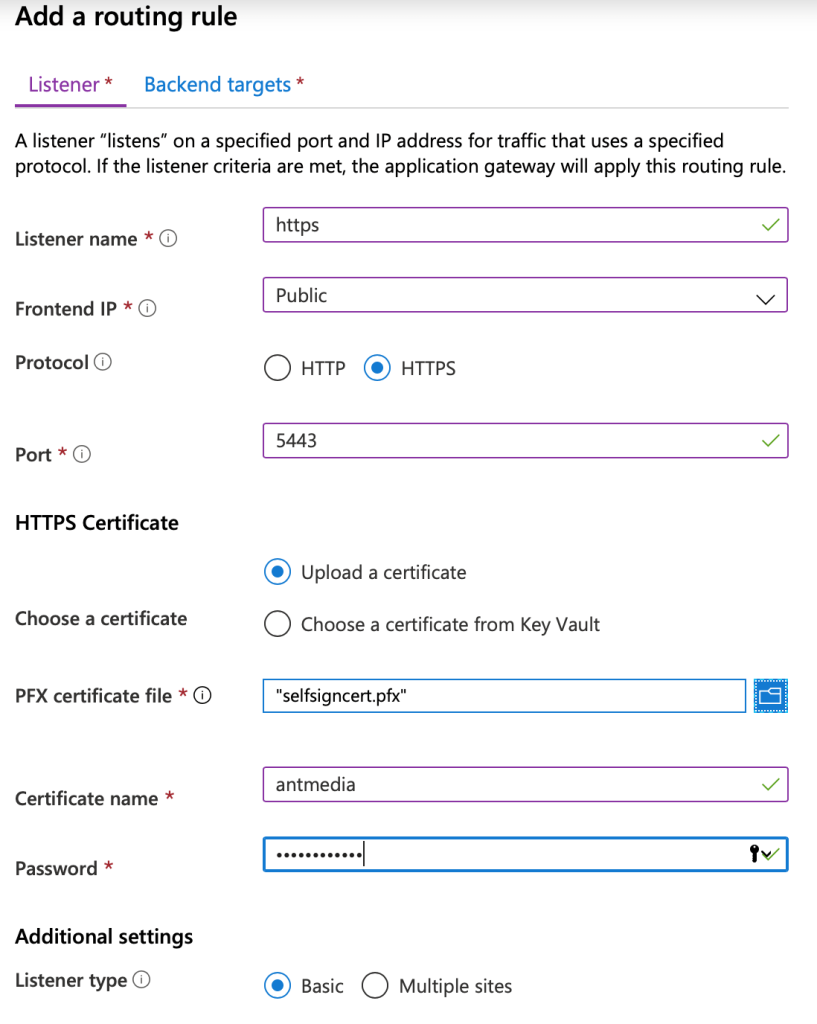
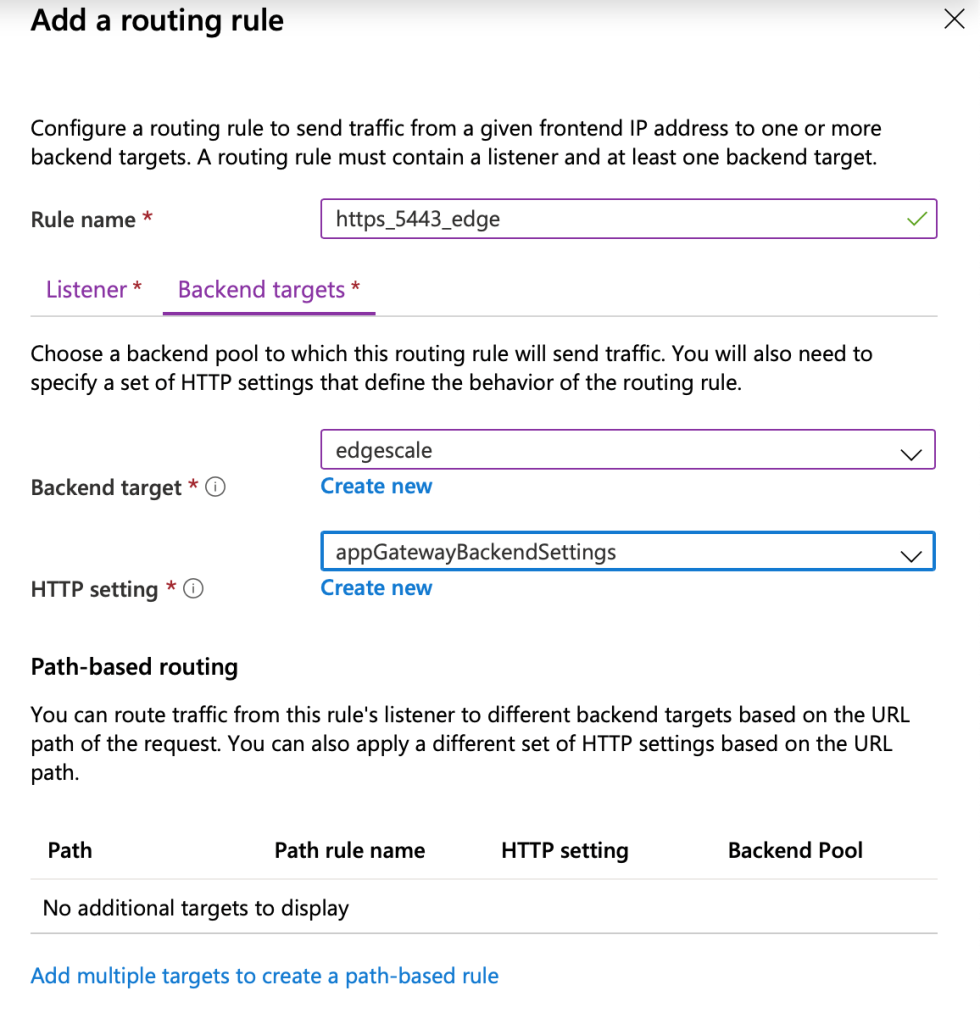
- Add another rule named https_5443_edge with the following values:
-
- Add another rule for https_443_origin
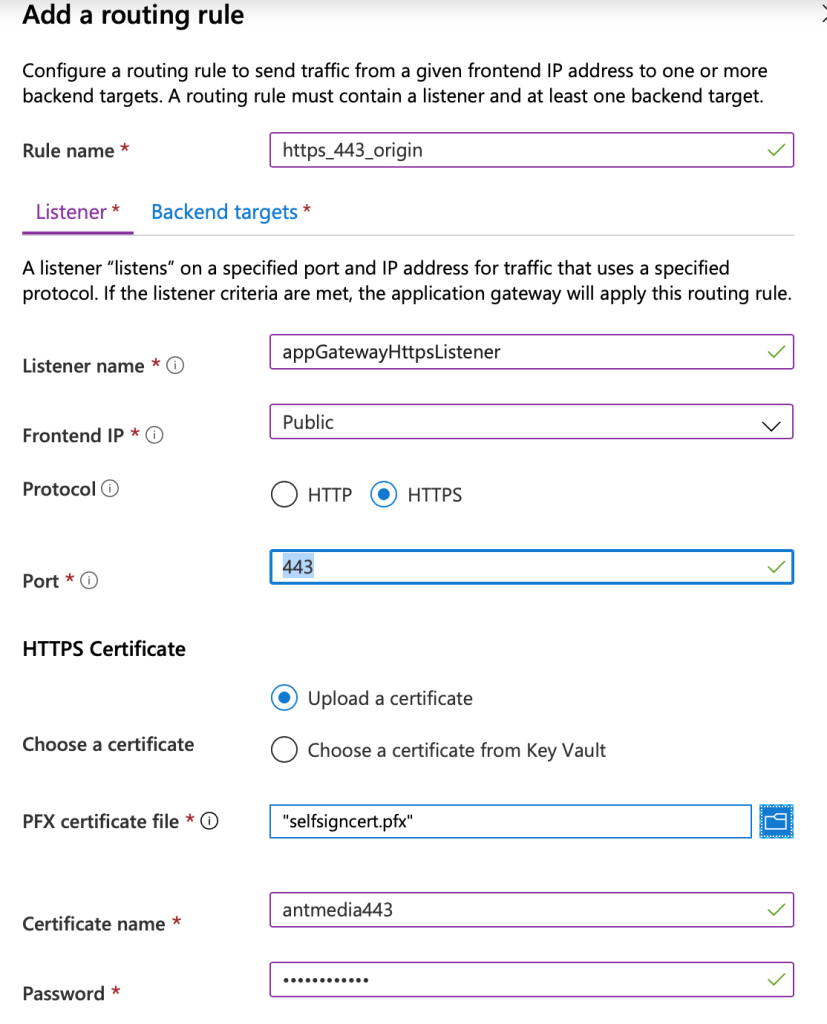
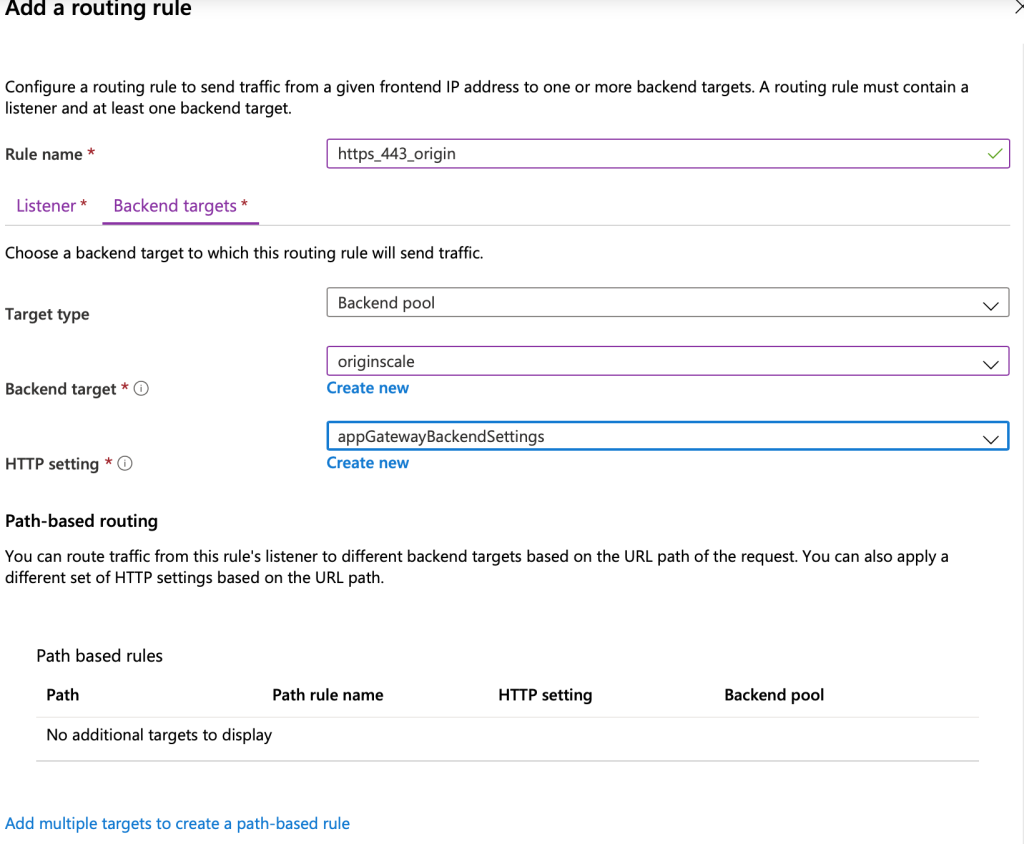
- Add another rule for https_443_origin
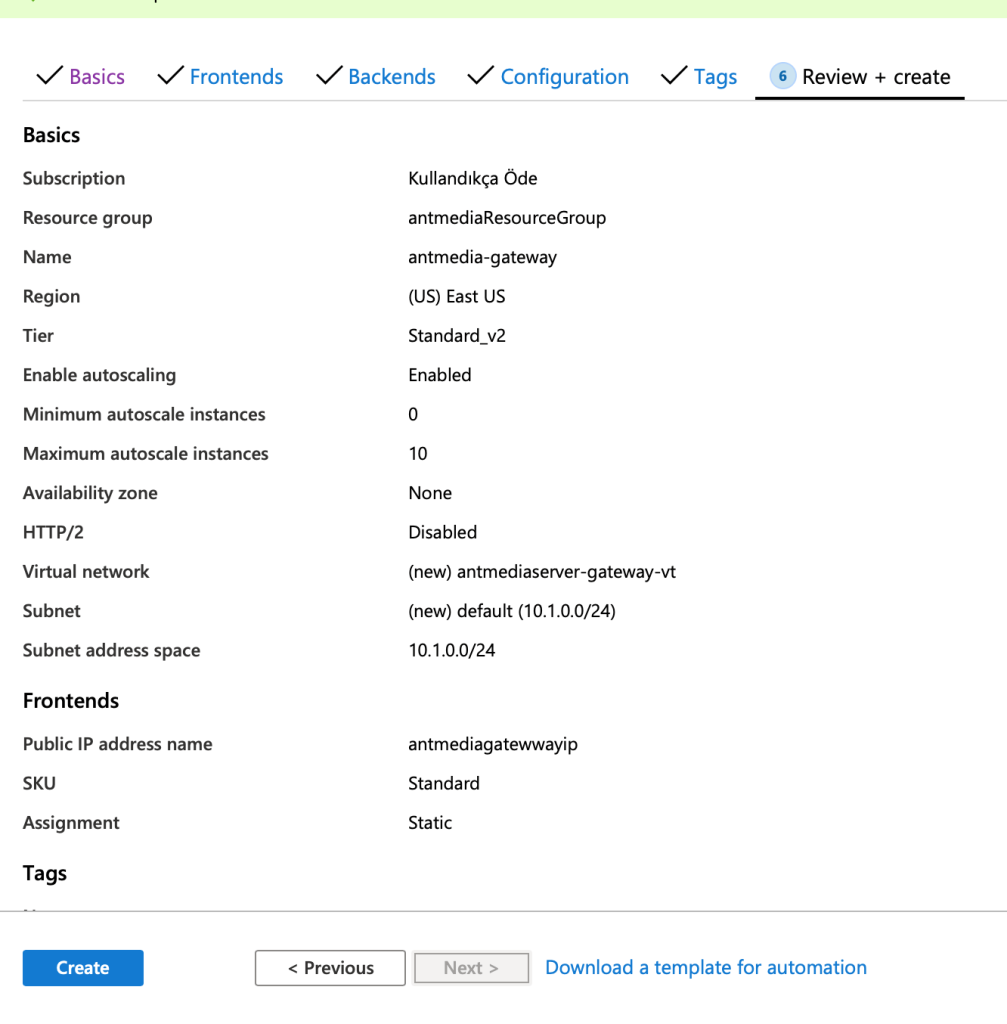
- In the Review+Create section, click Create:
Step 8: Create Scale Sets
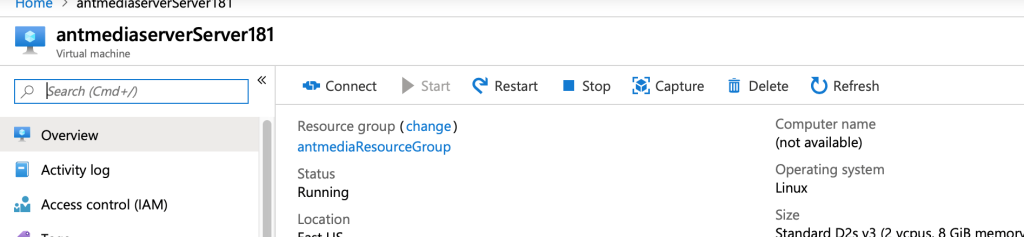
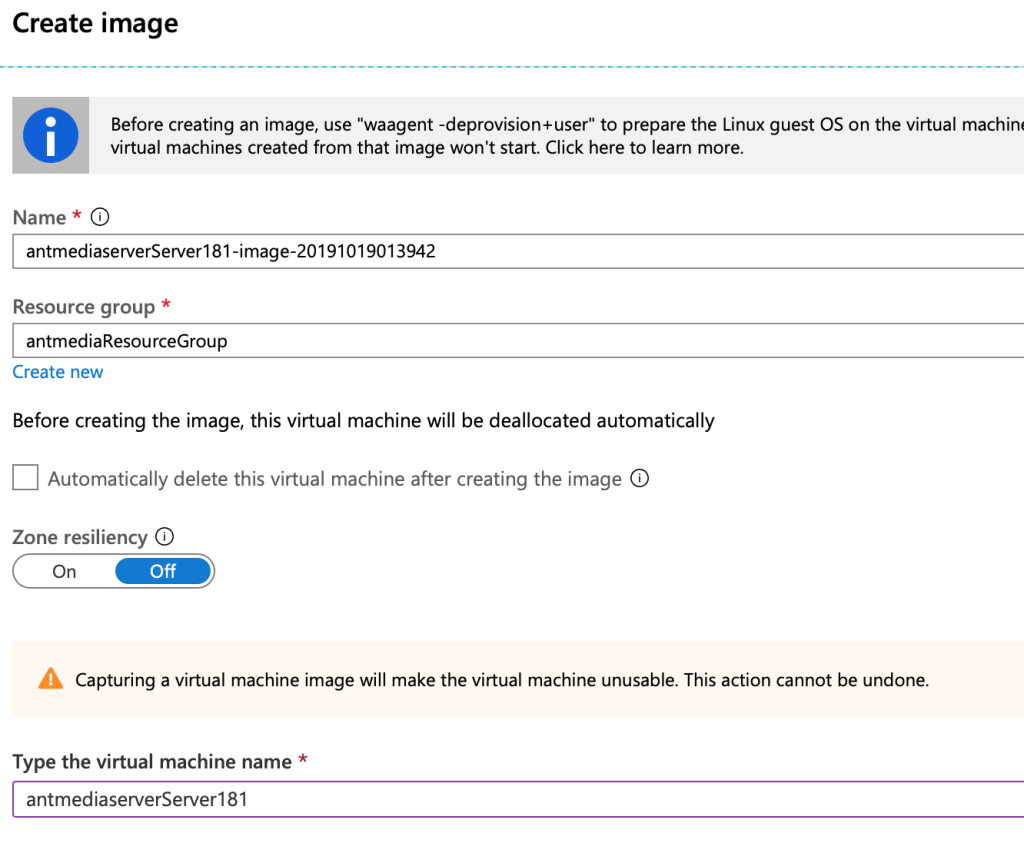
- We need to set up scale sets. Click We need an image for this. So go to VM that you created and click Capture:
- Enter a name and select the resource group that you created before.
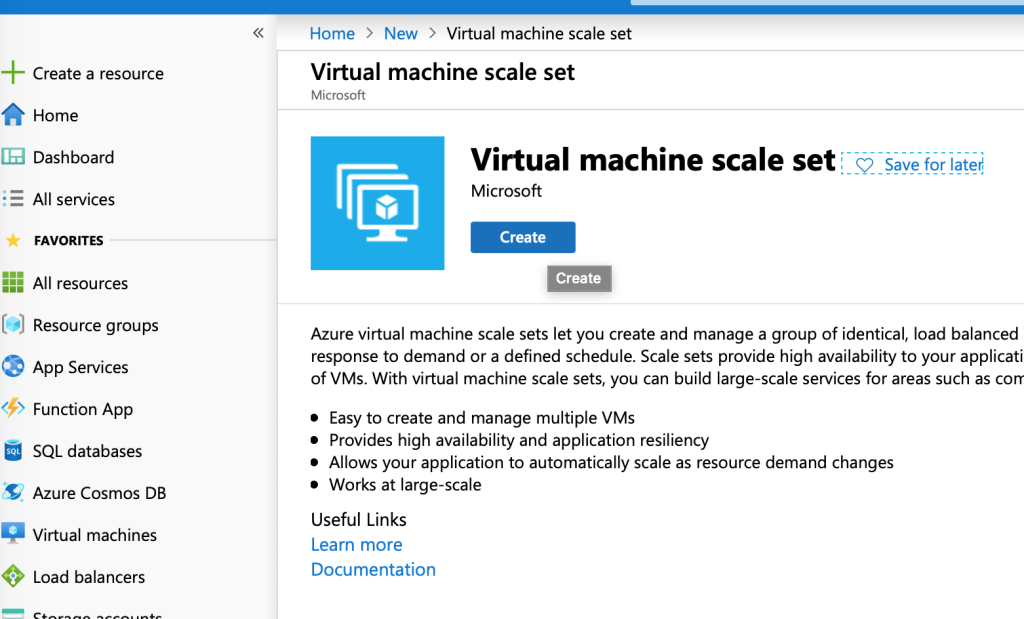
- Click Create a Resource which is on the top left and search for virtual machine scale set. Select the virtual machine scale set in the list and click create.
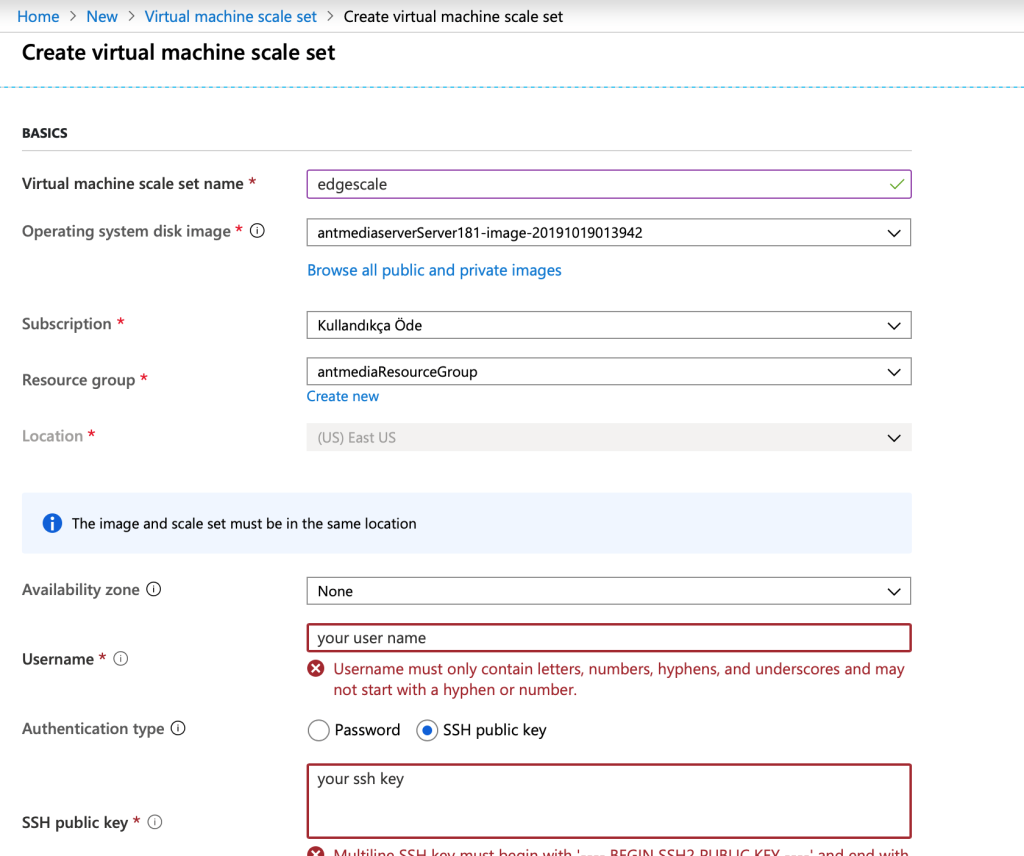
- Create edgescale scale set as in the screenshot:
-
- Enter a scale set name “edgescale”.
- Set Availability zone to None.
- Set username.
- Set SSH public key.
- Set instance count to minimum number that you need.
- Select a VM size.
- Enable AutoScale with min and max instance numbers.
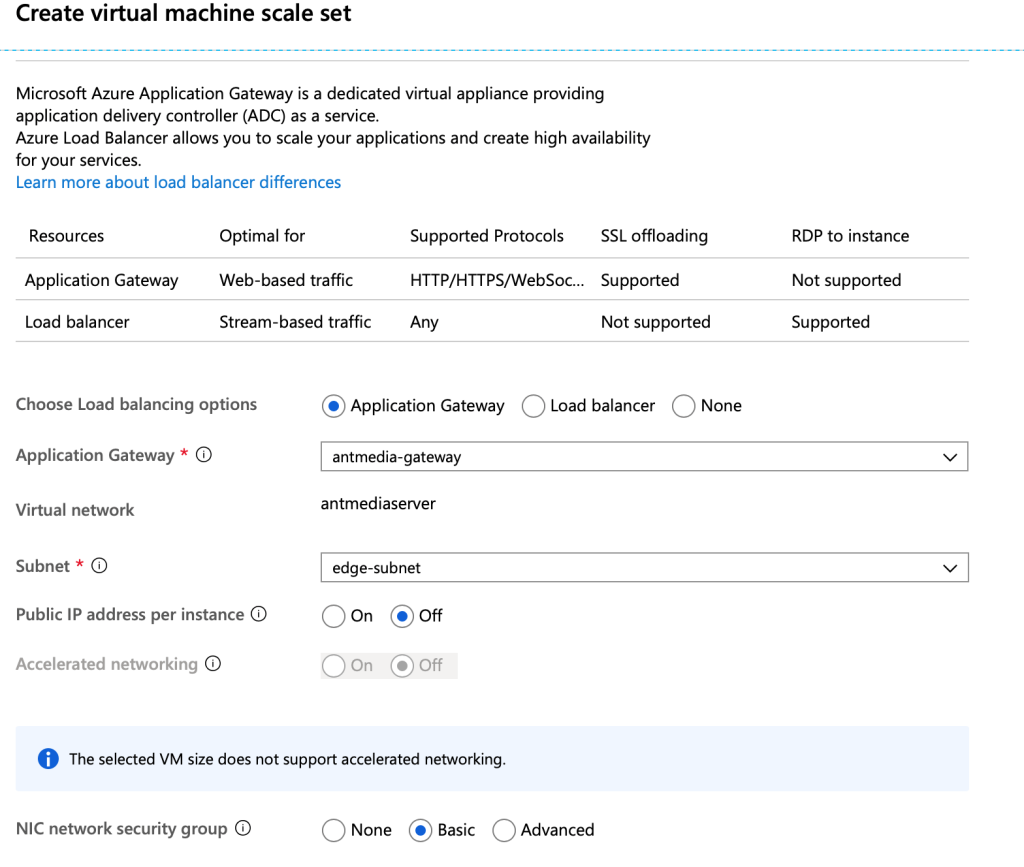
- Select Application Gateway as load balancer.
- Select edge-subnet as subnet which is created before.
- Enable public IP address per instance.
- Click create
- Create a scale set for origin by applying previous steps.:
-
- Enter a scale set name “originscale”
- Click browse all images and in my items tab select the image that you created.
- Set username.
- Set SSH public key.
- Set instance count to 1.
- Select a VM size.
- Enable AutoScale with min and max instance numbers.
- Select Application Gateway as a load balancer.
- Select origin-subnet as a subnet that is created before.
- Enable public IP address per instance.
- Click create.
- Go to the Application Gateway that you created previously and click Backendpools created previously:
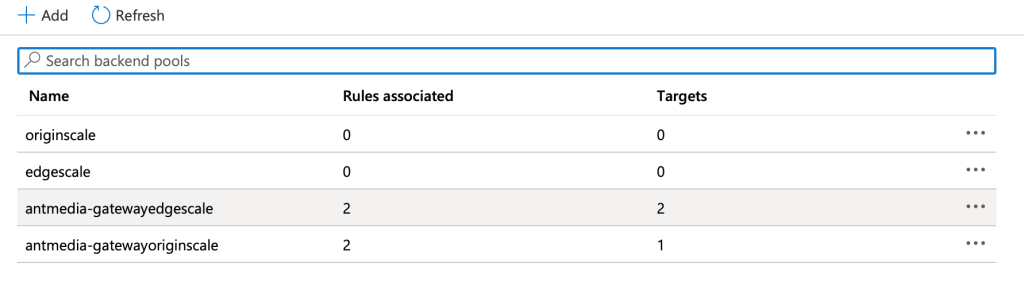
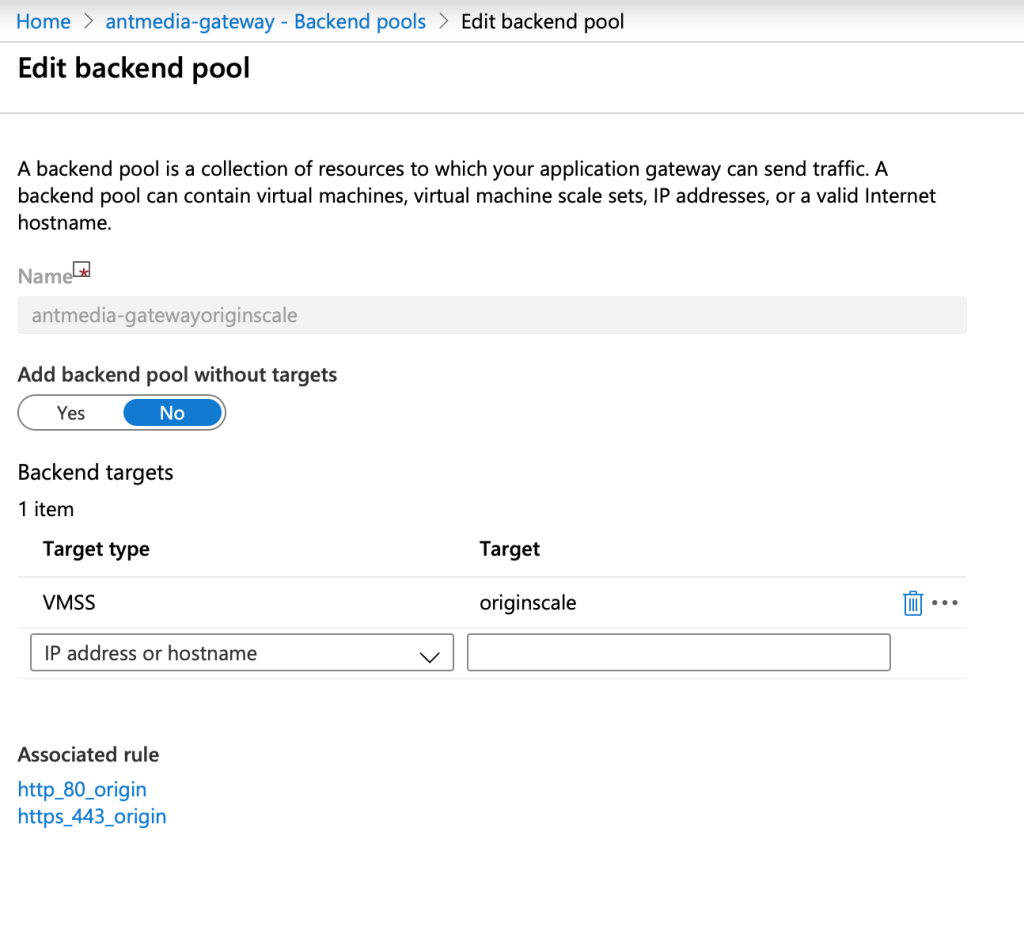
- Click antmedia-gatewayoriginscale and set originscale as VMSS target:
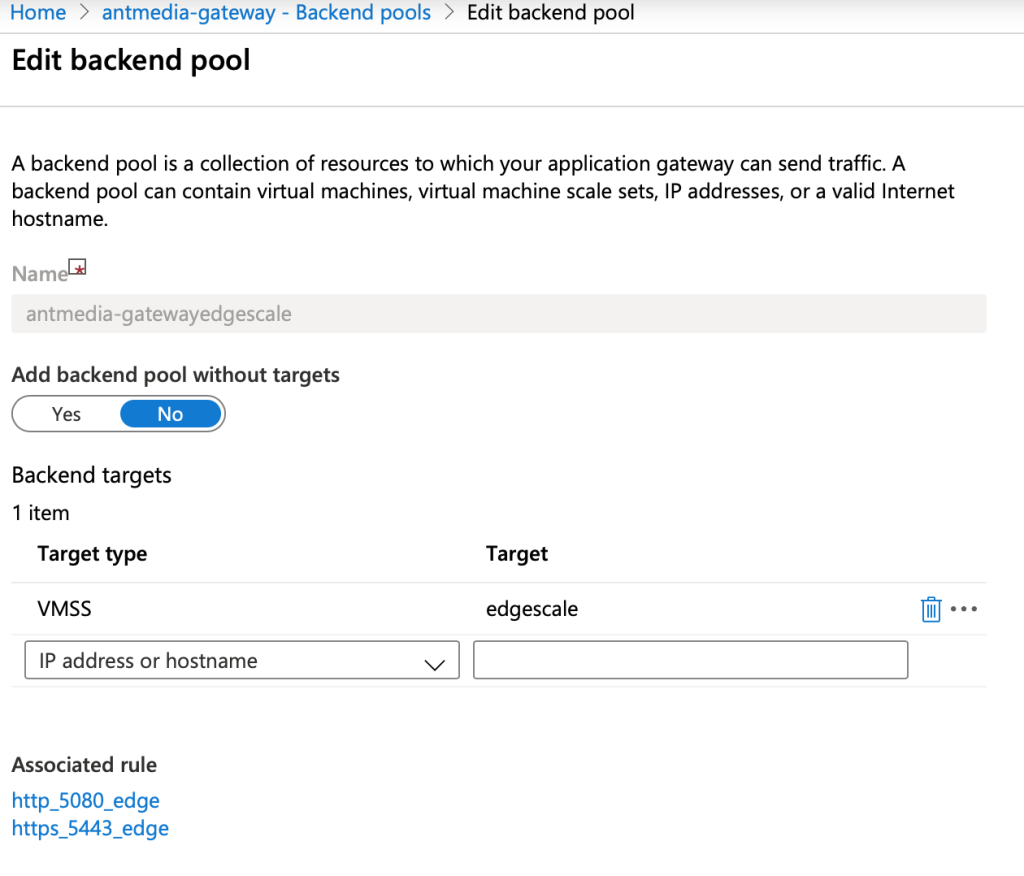
- Then click antmedia-gatewayedgescale in Backend pools and set a target as edgescale as VMSS:
End of Setting up Ant Media Server Clustering on Azure
This completes the setup. Now you can log in to the web panel via the https://application-gateway-ip.
If you want to use an Ant Media Server Enterprise-ready Azure instance, you can get one from Azure Marketplace here.
If you have any questions about how to set up a media server, please send an email to [email protected]