Ant Media’s Flutter WebRTC SDK enables developers to build streaming applications that publish and play WebRTC broadcasts with minimal code. The SDK provides cross-platform support for Android, iOS, Web, and Desktop from a single Flutter codebase.
This tutorial covers complete Flutter WebRTC SDK setup, from environment configuration through implementing publishing, playback, peer-to-peer connections, conference mode, and data channels. Flutter developers gain production-ready streaming capabilities without complex WebRTC protocol implementation.
What Are the Prerequisites for Flutter WebRTC App Development?
Software Requirements
Flutter WebRTC development requires Android Studio for Android, Xcode for iOS, and Flutter SDK installed on your system.
- Android Studio (For Android)
- XCode (For iOS)
Please note, you can also run the projects through the terminal or command-line, however, for better debugging, consider using Android Studio or XCode. This document considers the use of Android Studio for building and running applications.
How Do You Set Up Your First Flutter Application?
Set up your first Flutter application by installing Flutter SDK, configuring Android Studio with Flutter and Dart plugins, and verifying the installation with a sample project.
- Install Flutter: Please follow the installation steps mentioned here to install Flutter.
- Install the Android Studio: Please follow the installation steps mentioned here to install Android Studio.
- Add the Dart language plugins and Flutter extensions to Android Studio. Please follow the below operating system-specific installation instructions.
- For macOS, use the following instructions:
- Start Android Studio
- Open plugin preferences (Preferences > Plugins as of v3.6.3.0 or later)
- Select the Flutter plugin and click Install
- Click Yes when prompted to install the Dart plugin
- Click Restart when prompted
- For Linux or Windows, use the following instructions:
- Start Android Studio
- Open plugin preferences (File > Settings > Plugins)
- Select Marketplace, select the Flutter plugin, and click Install
- Click Yes when prompted to install the Dart plugin
- Click Restart when prompted
- For macOS, use the following instructions:
- To verify the Flutter installation, please create a sample app and build it by following the instructions provided here to create a Flutter project.
How Do You Download and Run the WebRTC Sample Projects?
Download the Sample Flutter WebRTC Projects
Download the sample Flutter WebRTC projects by cloning or downloading the Flutter SDK code from the GitHub repository.
- Clone or download the Flutter SDK code from the Flutter SDK Github repository.
Configuration of the Sample Project
Configure the sample project by opening Flutter WebRTC SDK in Android Studio and verifying Flutter and Dart SDK paths are correctly set.
Open Flutter WebRTC SDK in Android studio, and make sure you have installed the Flutter and Dart plugins.
Make sure that the paths of Flutter and Dart SDK are correctly configured in Android Studio.
File > Settings > Languages & Frameworks
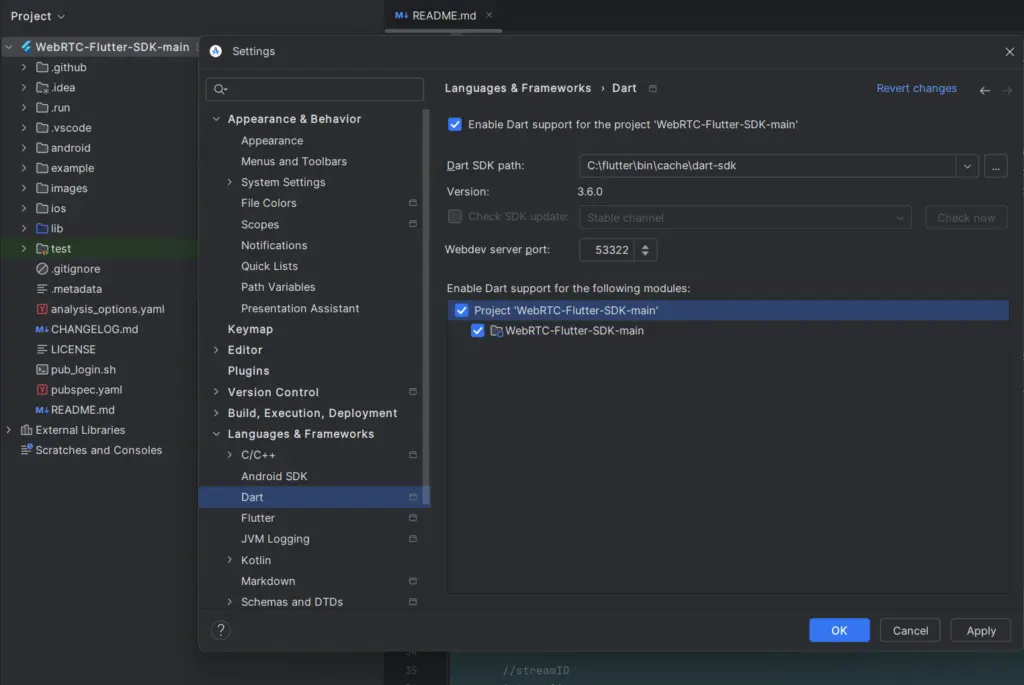
If these plugins have been installed and the locations of Flutter and Dart SDK are configured correctly, then the options to run the samples will appear automatically after source code indexing. Please refer to the screenshot below.

How Do You Install Dependencies and Run Sample Project?
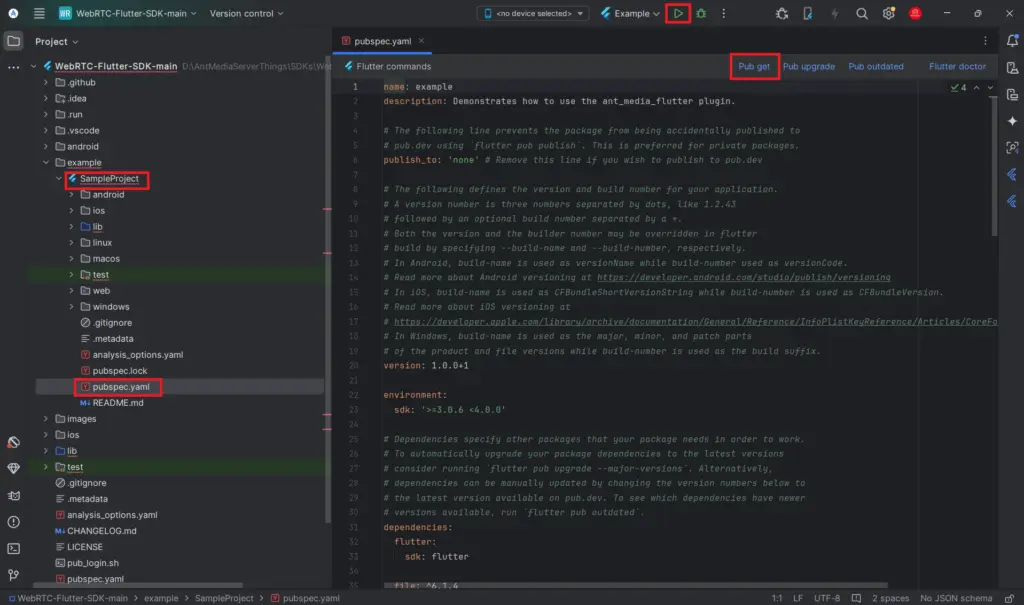
Install dependencies by clicking the Pub get button when the pubspec.yaml file is open in the editor.
In the project navigator, you will find a folder named examples. In the example folder, there is a SampleProject that uses the ant_media_flutter dependency with all options (Publish, Play, P2P, Conference, and DataChannel) to test.
In the same examples folder, there are separate projects to test Publish, Play, Peer, Conference, and DataChannel individually.
All projects use Ant Media Flutter dependency, which is added to the pubspec.yaml file.
Click on the Pub get button to install the dependency in the project. The pub get button appears only when pubspec.yaml file is opened in the editor.
How Do You Run the Sample Flutter WebRTC Apps?
Run the sample apps on Android by connecting your Android device with USB debugging enabled to your workstation. On Android 4.1 and lower, the Developer Options screen is available by default. To get the developer options screen on Android 4.2 and higher, follow the below steps:
- Open the Settings app
- Select System
- Select About phone
- Scroll to the build number and tap it 7 times
- Return to the previous screen to find Developer options near the bottom
- Scroll down and enable USB debugging
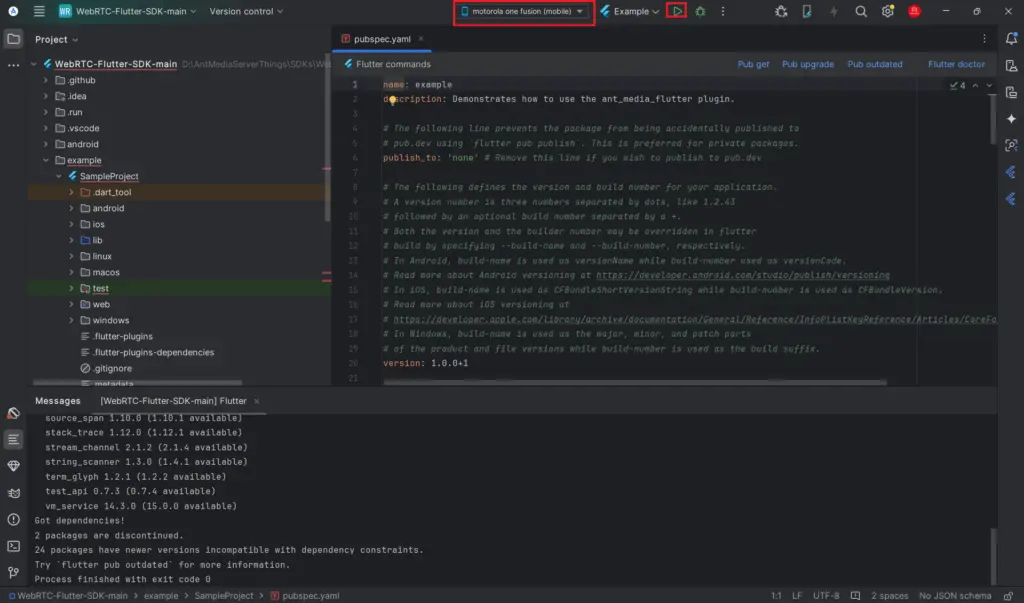
If USB debugging is enabled on your device, then your device name will automatically be available in the list of devices.
Just select the device, select the sample project from the target list, and click on the run button. The Gradle task will start and wait for some time until the app builds. After the building is complete, a confirmation pop-up will come to your device for installation.
Please follow the below instructions for running specific sample apps
How Do You Run the Publish Sample App?
Run the Publish app by selecting it from the target list, clicking Run, and entering your Ant Media Server IP address in the Settings.
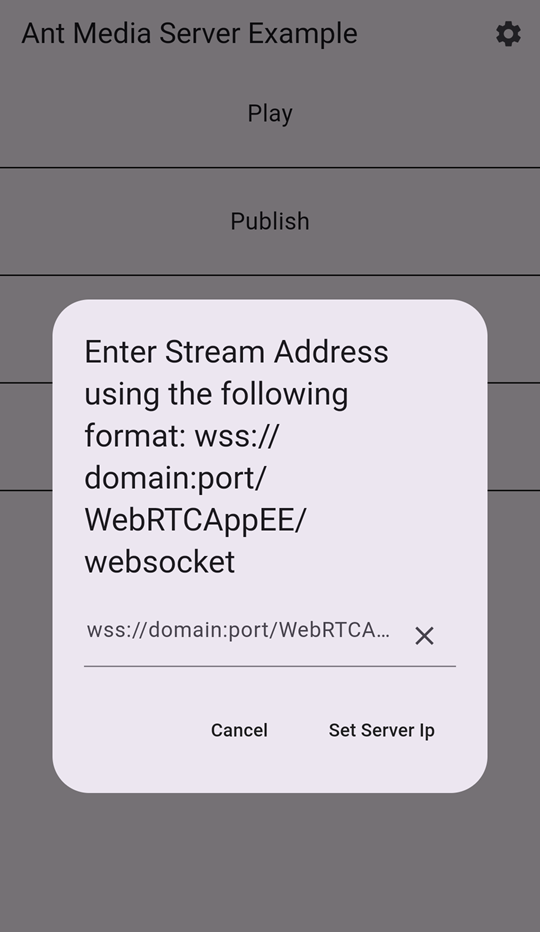
Select the Publish app from the target list and click the Run button. Once the app is running, enter the server IP address. For entering the IP address, please follow the below steps.
- Tap on the Settings icon in the top right corner of the application.
- Enter the Server IP as wss://ant_media_server_address:port/WebRTCAppEE/websocket
- Tap the ‘Set Server Ip’ button.
- Tap the ‘Set Server Ip’ button.
How Do You Publish a WebRTC Stream?
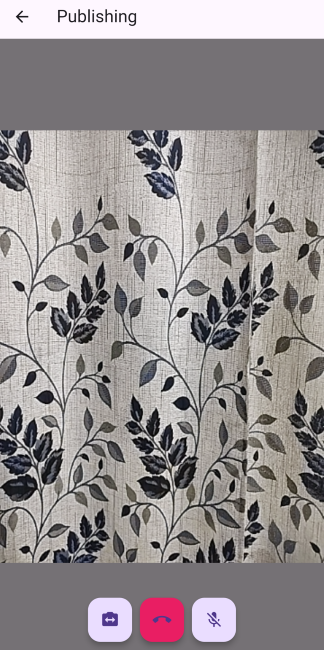
Publish a WebRTC stream by selecting the Publish option, entering your streamId, and choosing your publishing source (camera or screen).
- Select the Publish option from the list & enter the streamId.

- Choose the publishing source. Please note that for iOS, the app screen recording option records the app’s UI only, while the Android app records the complete device screen.

- The WebRTC publish will be started. You can switch between the front & back cameras as well.
- To verify whether the stream was published successfully, open the web panel of your Ant Media Server (e.g., http://server_ip:5080) and view the stream there.
- You can also quickly play the stream via an embedded player. For more details, check this document.
How Do You Run the Play Sample App?
Run the Play sample app by setting the Ant Media Server address, then selecting Play option and entering the streamId of an already publishing stream.
- Set the Server Address: Set the Ant Media Server Address as we did for the publish sample.
- Play the WebRTC stream:
– Before playing, make sure that there is a stream that is already publishing to the server with the same streamId that you want to play.
– Select the Play option from the list & enter the streamId.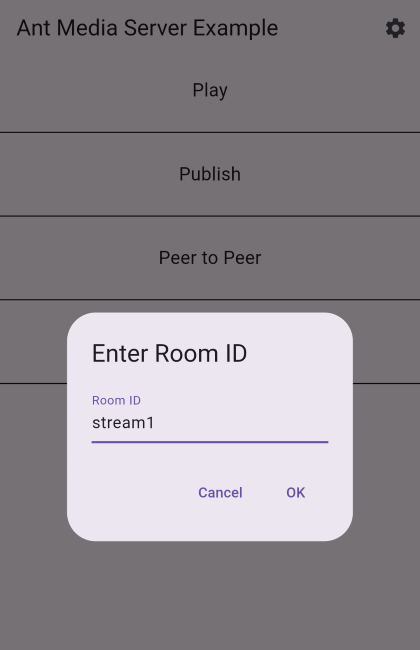
- The WebRTC stream will start to play.

WebRTC Flutter SDK Samples:
Explore additional Flutter SDK samples for Peer-to-Peer, Conference, and Data Channel implementations in the SDK repository. To check more samples, visit the WebRTC Flutter SDK samples.
How Do You Use the WebRTC Flutter SDK?
Use the WebRTC Flutter SDK by installing the ant_media_flutter package from pub.dev, importing it into your project, and calling the connect method with appropriate parameters. Before moving forward with using WebRTC Flutter SDK, we highly recommend using the sample projects to get started with your application. It’s good to know the dependencies and how it works in general.
How Do You Install ant_media_flutter Package from pub.dev?
Install ant_media_flutter package by adding it to your pubspec.yaml dependencies and running pub get.
YAML
ant_media_flutter: ^*.*.* # latest versionHow Do You Initialize Imports and Request Permissions?
Initialize imports and request permissions by importing the ant_media_flutter package and calling requestPermissions method.
Dart
import 'package:ant_media_flutter/ant_media_flutter.dart';AntMediaFlutter.requestPermissions();
if (Platform.isAndroid) {
AntMediaFlutter.startForegroundService();
}How Do You Set Stream ID and Server URL?
Set stream ID and server URL by defining string variables with your server WebSocket endpoint and desired stream identifier.
Dart
// Replace your own domain name and port number with this domain name and port.
String serverUrl = "wss://domain:port/WebRTCAppEE/websocket";

// Set stream id
String _streamId = 'testStream';
What Is the Main Connect Function in the SDK?
The main connect function is a common method used to achieve Publish, Play, Peer, Conference, and DataChannel functionalities by passing streamId, server address, roomId, type of calling, and callback functions as parameters.
There is a common function used in ant_media_flutter.dart to achieve the functionalities of the Publish, Play, Peer, Conference, and DataChannel modules. In this function, we can pass the streamId, server address, roomId, type of calling, and all the callback functions, which are described below as parameters. The method below is used as the common function.
Dart
static void connect(
String ip,
String streamId,
String roomId,
AntMediaType type,
bool userScreen,
bool forDataChannel,
HelperStateCallback onStateChange,
StreamStateCallback onLocalStream,
StreamStateCallback onAddRemoteStream,
DataChannelCallback onDataChannel,
DataChannelMessageCallback onDataChannelMessage,
ConferenceUpdateCallback onupdateConferencePerson,
StreamStateCallback onRemoveRemoteStream) async {
   anthelper = null;
   anthelper ??= AntHelper(
       ip,
       streamId,
       roomId,
       onStateChange,
       onAddRemoteStream,
       onDataChannel,
       onDataChannelMessage,
       onLocalStream,
       onRemoveRemoteStream,
       userScreen,
       onupdateConferencePerson,
       forDataChannel)
      ..connect(type);
}
What Do the SDK Parameters Mean?
The SDK parameters configure WebRTC connection behavior including server IP, stream identification, room joining, connection type, and callback handlers for various stream events. Here is a detailed description of all parameters:
1. Ip: ip is the WebRTC server address that we want to use in our SDK, the format of this server is as follows.
ws://domain:port/WebRTCAppEE/websocket2. streamId: The streamid is ID of the stream that we want to use.
3. roomId: The roomId is the Id of the room in which we want to join our stream. In the case of publishing, the roomId should be passed as a token.
4. type: The type is AntMediaType enum; there are 6 cases in this type.
- Undefined: This is a default type.
- Publish: When we want to publish a stream or want to test data channel examples, we have to pass this type as AntMediaType.Publish.
- Play: When we want to play a stream, we have to pass this type as AntMediaType.Play.
- Peer: When we want to start a peer-to-peer connection, we have to pass this type as AntMediaType.Peer.
- Conference: When we want to start a conference, we have to pass this type as AntMediaType.Conference.
5. UserScreen: This function is used to change the type of publishing source when true screen recording will be published and when it is false, camera recording will be published.
6. forDataChannel: This is a bool type, and this is specifically used in the case of publishing the WebRTC stream without using any recording option to achieve the data channel functionality. If we keep this value true, SDK will not publish any type of recording. The initialization of the data channel will not be affected by this property. data channel will be initialized in all cases (Publish, play, Peer, Conference). Only the publishing of recordings will be affected by this value.
7. OnStateChange: this is a function that uses one parameter of the HelperState type and returns nothing. HelperState type has these subtypes:
- CallStateNew: This type of HelperState function is called when the call is started. We can write the change in the UI code when a call has been started.
- CallStateBye: This HelperState function is called when the peer connection has been closed, or we can say when the call has been finished.
- ConnectionOpen: This HelperState function is called when the web socket has been connected and opened.
- ConnectionClosed: This HelperState function is called when the web socket has been disconnected and closed.
- ConnectionError: This HelperState function is called when there is an error in making a peer connection.
8. onLocalStream: This function is a nonreturn type function that has a MediaStream type parameter. The parameter is a local stream that occurred by our device’s camera or screen recording. We can use this stream to see what we are publishing to the server.
9. onAddRemoteStream: This function is a nonreturn type function that has a MediaStream type parameter. The parameter is a remote stream caused by a connected peer’s device’s camera or screen recording. We can use this stream to see what we are getting from the server.
10. onDataChannel: This function is a no-return type function and uses the RTCDataChannel type parameter, which refers to the data channel initialized.
11. onDataChannelMessage: This function is a no-return type that uses three parameters:
- dc: this is the data channel by which the message is sent or received.
- message: this is the RTCDataChannelMessage type, which is the message that we have received or sent.
- isReceived: This is a bool type. If this is true, a message is received. If false, then a message is sent.
12. onUpdateConferencePerson: This is a no-return type function, and it is used in the case of AntMediaType. Conference-type connection. When the user joins the room and is in the room, other streams are added or removed, so this function will be called. It uses a dynamic type function, which is an array of stream IDs that are joined in the room.
13. onRemoveRemoteStream: This is a no-return function that is called when any remote streams have been removed. It uses a MediaStream type parameter, which is the stream that has been removed. This function is used to add the code to go back when the call has been disconnected.
Understanding WebRTC Architecture
Flutter developers implementing real-time communication features benefit from understanding WebRTC’s underlying architecture including ICE candidate negotiation, STUN server coordination, and peer connection establishment protocols that enable WebRTC protocol fundamentals for optimizing Flutter streaming applications with proper signaling implementation, media stream handling, and network traversal configuration across different mobile network conditions and firewall restrictions.
What Advanced SDK Features Are Available?
Advanced SDK features include custom video processing, encoder configuration, quality adaptation, and platform-specific optimizations. These features enable production-grade streaming applications with fine-tuned performance characteristics.
Production Flutter applications requiring advanced WebRTC functionality including custom video processing pipelines, adaptive bitrate configuration, and encoder parameter optimization benefit from comprehensive SDK documentation providing detailed API reference for connection management, stream lifecycle control, callback implementation, and platform-specific configuration across Android, iOS, Web, and Desktop deployment targets.
How Do You Optimize Streaming Performance?
Optimize streaming performance through codec selection, quality adaptation, bandwidth monitoring, and network-aware configuration. Performance optimization ensures consistent streaming quality across diverse network conditions.
Mobile application developers optimizing Flutter video streaming performance across varying network conditions require understanding codec selection strategies, jitter buffer management, and packet loss recovery mechanisms that characterize WebRTC streaming optimization enabling quality-adaptive streaming with automatic resolution switching, bandwidth estimation algorithms, and forward error correction for maintaining stream stability during network fluctuations.
What Architecture Supports Conference Features?
Conference architecture uses selective forwarding units, audio mixing, and bandwidth management for multi-participant sessions. The architecture scales to support multiple simultaneous participants with optimized resource usage.
Flutter conference applications supporting multi-participant video sessions require proper room management implementation, participant track subscription control, and audio mixer configuration for scalable conferencing with conference architecture guidance detailing participant limit handling, stream composition strategies, selective forwarding unit configuration, and bandwidth distribution algorithms for Flutter multi-user streaming implementations.
Securing Your Streams
Secure streams using JWT token authentication, time-based validation, and role-based access control. Security implementation protects streams from unauthorized access and ensures only authenticated clients can publish or play.
Production Flutter streaming applications requiring authenticated access control implement token-based authorization with time-bound session validation, role-based permission enforcement, and stream identifier verification through JWT security integration providing cryptographic signature validation, expiration timestamp enforcement, and claim-based access filtering for protecting Flutter WebRTC streams from unauthorized publishing or playback attempts.
Adaptive Quality Features
Adaptive quality features adjust stream resolution and bitrate based on network conditions. Adaptation prevents buffering while maximizing visual quality for available bandwidth.
Flutter applications delivering consistent playback quality across heterogeneous mobile networks implement quality adaptation mechanisms with bitrate ladder configuration, resolution switching algorithms, and network condition monitoring that enable adaptive streaming implementation for automatic quality adjustment during bandwidth fluctuations, preventing buffering interruptions while maximizing visual fidelity based on available network throughput in Flutter mobile deployments.
How Do Data Channel Protocols Work?
Data channel protocols enable low-latency bidirectional messaging over WebRTC connections. Protocols support ordered delivery, reliability guarantees, and message size handling for application-layer communication.
Flutter applications requiring bidirectional data communication alongside video streams implement peer-to-peer messaging channels with ordered delivery guarantees, message size handling, and low-latency data transport using data channel protocols enabling real-time metadata exchange, chat functionality, and application-layer signaling without HTTP overhead for Flutter interactive streaming scenarios requiring synchronized data alongside media.
Platform-Specific Considerations
Platform-specific optimizations leverage native capabilities for hardware acceleration and OS integration. Each platform provides unique features for encoder access, camera APIs, and lifecycle management.
Developers building native Android streaming applications alongside Flutter implementations benefit from understanding platform-specific WebRTC optimizations including hardware encoder access, camera API integration, and Android lifecycle management through native Android SDK for comparing cross-platform Flutter approaches with pure Android implementations, evaluating performance trade-offs, and implementing hybrid solutions combining Flutter UI with native streaming modules.
How Do You Deploy Across Multiple Platforms?
Deploy across multiple platforms using Flutter’s single codebase approach with platform-specific build configurations. The SDK supports Android, iOS, Web, and Desktop from unified Flutter code.
Cross-platform Flutter developers requiring validated behavior consistency across Android, iOS, Web, and Desktop targets benefit from testing stream publishing, playback synchronization, and feature parity verification with multi-platform testing infrastructure enabling simultaneous deployment validation across mobile, web, and desktop environments with unified Flutter codebase evaluation for confirming platform compatibility without multi-environment setup overhead.
Next Steps
Begin implementing Flutter WebRTC streaming by downloading the SDK and following this tutorial’s setup steps. The SDK provides complete functionality for publishing, playback, conference, and peer-to-peer features.
Development teams implementing Flutter streaming applications benefit from validating SDK integration against production infrastructure with publishing verification, playback quality measurement, conference mode testing, and cross-platform compatibility assessment using hands-on testing environment providing complete Flutter SDK evaluation access with WebRTC infrastructure, streaming server resources, and technical validation tools for confirming implementation requirements without production deployment commitment.
Frequently Asked Questions
Is Ant Media’s Flutter WebRTC SDK free to use?
Can I use the SDK for both iOS and Android?
Does the SDK support real-time conferencing and data channels?
Do I need Ant Media Server to use the Flutter SDK?
Can I build production-ready apps with this SDK?
Conclusion
With Ant Media’s Flutter WebRTC SDK, building real-time video applications in Flutter becomes fast, flexible, and developer-friendly. From publishing and playing streams to peer-to-peer calls, conferences, and data channel messaging, the SDK gives you all the core building blocks you need for modern, interactive media apps.
By following the setup steps and experimenting with the sample projects, you can quickly understand how the SDK works and start integrating real-time communication into your own products. Whether you’re building live streaming apps, virtual classrooms, video conferencing tools, or interactive platforms, Ant Media’s Flutter SDK helps you move from prototype to production with confidence.
Best of all, with free mobile SDKs and a powerful backend in Ant Media Server, you get a complete, scalable solution for ultra-low latency video, without unnecessary complexity.
Now it’s your turn: clone the samples, start publishing, and build your next real-time Flutter app with Ant Media
Estimate Your Streaming Costs
Use our free Cost Calculator to find out how much you can save with Ant Media Server based on your usage.
Open Cost Calculator

