Integrating AI workflows with media streaming has never been easier! With my newly developed Python plugin for Ant Media Server, you can effortlessly integrate your Python-based AI models, whether for real-time object detection, speech recognition, or any other AI-driven media processing task. This blog post will guide you through setting up and using this plugin to enhance your streaming experience. This tutorial is targeted towards developers who have python and AI experience and want to have an easy integration with media streaming uses cases, such as conferencing, surveillance, assistance, monitoring and assistance.
About Plugin
When a stream is published to an application, LiveApp on Ant Media Server, this plugin intercepts the video stream and processes it frame by frame within a Python callback function onVideoFrame every view frame is received inside this function, these Video Frames can be modified by using any python logic.
By default, the plugin overlays a rectangle on each video frame and then re-streams the modified video back to WebRTCAppEE application
This functionality allows seamless video processing and customization, making it ideal for AI-based enhancements, analytics, and other advanced workflows.
In this blog post we will see how we can modify the plugin to work with face detection model.
Prerequisites
Before diving into the building src code, make sure you have the following:
- Ant Media Should be installed on your local development environment, You can install Ant Media Server referring this document.
- Python 3.8+ & pip3 is installed on your system.
- Install Plugin Download The Python Plugin project, install_dev_dependencies.sh file downloads the development dependencies that are required to build the src code of the project.
git clone https://github.com/ant-media/Plugins.git
cd Plugins
git checkout addNewPythonPlugin
cd PythonPlugin
sudo ./install_dev_dependencies.sh
Add Adaptive Bitrate
- Go to Ant Media Server Web panel.
- Go to LiveApp applicaiton.
- Go to Settings.
- In Adaptive Streaming Section add new bitrate of 720p.
- Save the by clinking save button at bottom of the page.
- it should look like below screenshot.

Building the Plugin
Lets stop the server and run the redeploy script.
sudo systemctl stop antmediasudo ./redeploy.shit should now download dependencies, build the src code and start Ant Media Server on the terminal. Ant Media Server will now start make sure that there are no errors when Ant Media starts.
See the plugin in action.
- go to sample publish page and publish a WebRTC stream.
http://IP_ADDRESS:5080/LiveApp/ - go to web panel in WebRTCAppEE application.
- now you should see a new video stream in WebRTCAppEE application.
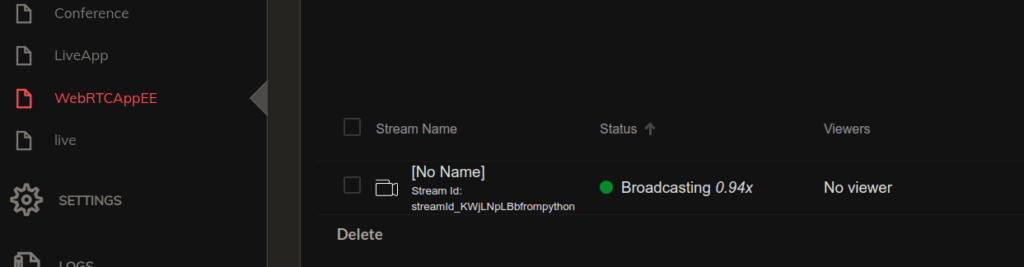
You should See a Rectangle drawn on top of the Video when Playing the stream from WebRTCAppEE.
Troubleshooting
1 .make sure that ant media is not running already, if its running stop the server and try redeploy command again.
 sudo systemctl status antmedia
 sudo systemctl stop antmedia
2. if the process is somehow running in the background you can kill it with fuser
sudo fuser -k 5080/tcp
sudo fuser -k 1935/tcp
if any of the above condition does not match you should try redeploy again and see if there is any errors.
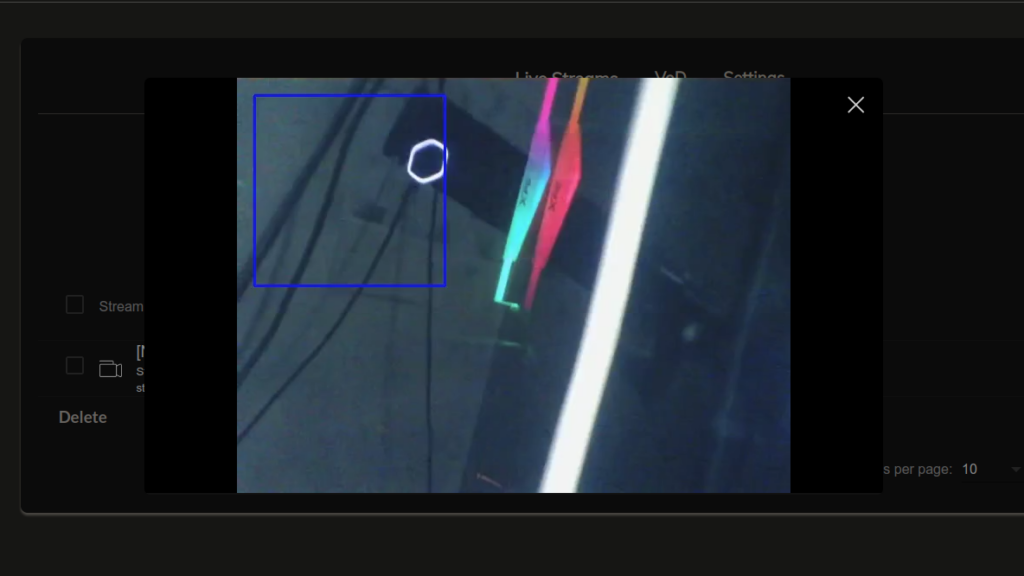
Integrating Face Detection
open python_plugin.py, you will see various functions implemented there like streamStarted, onVideoFrame etc. Now we will modify the plugin to run face detection AI model on the video stream, then the video will be annotated and the face highlighted stream will be available in WebRTCAppEE.
Lets start modifying the src code to integrate Face Detection.
- open python_plugin.py
- find the below lines in the file and uncomment it by removing #
#import Examples.facedetection as facedetection
#facedetection.onVideoFrame()
go to sample publish page and publish a WebRTC stream. http://IP_ADDRESS:5080/LiveApp/
publish a new stream with sample page to server in LiveApp and play the stream from WebRTCAppEE, like we did before and you will see the face detection in action.
Integrating Your Own AI Model
- init_python_plugin_state will be called when the server starts and the plugin is loaded, this function will only be called once. Model initialization or other initialization logic can be added here.
- Once you make changes to the src code python_plugin.py file you you just need to stop the streaming and start streaming again your changes will reflect in the new streams. When making changes to init_python_plugin_state server will needed restart since this function is only called once , you can run the redeploy again to restart the server.
- Any extra python libraries that you might need to install you should install with sudo pip install package_name, it will not work without sudo (libraries will not be visible in python plugin if sudo is not used)
- In python_plugin.py file
mode="debug"is set , when this option is set python_plugin.py file is reloaded every time a new stream is sent to the server. When running in productionmode=""so that the file dose not reload with each stream.
Conclusion
With this Python plugin, integrating AI workflows with Ant Media Server has never been easier. You can now apply real-time AI processing to your media streams, including face recognition, speech-to-text, background removal, and security monitoring & analysis.
Give it a try and let me know your thoughts! 🚀
💡 Get Involved
Check out the GitHub Repository for more information or to contribute!