We have started a series of blog posts that explains how to do WebRTC chat and file transfer with Ant Media Server. This is the second part which is about Image Transfer using WebRTC. You could reach the first part from here.
Image Transfer

Sending photos or any kind of picture is an integral part of a chat application now and we added image transfer functionality to our application to demonstrate this use case but the methods used here can be also applied to transfer any type of large binary file through WebRTC Data Channels.
Sending Images
File transfer is a more complex use case than text messaging because the transferred file can be really large. So they don’t fit the buffer of the Data Channel. They should be divided into chunks on the sender side which then should be merged into the receiver side.
For correctly merging the data chunks, the receiver needs to know the total size of the transferred data. Consequently, headers have to be added to these chunks or for simple use cases at least to the first chunk where you specify the total length of the data which will be sent.
On the receiver side, first, this information in the header should be parsed, and based on it receiver should decide to wait for more data or process all the received data in order to store or display it to the user. Ordering of messages is taken care of by the Data Channel but for a production-ready setup, timeout and error cases during data transfer should be addressed by the developer.
To make developing these kinds of applications easier and in order to have modular and customizable samples for our customers, we created BinaryDataSender and BinaryDataReceiver utility classes both in Java and Javascript. These classes work on the raw byte data and take care of cumbersome tasks of reading headers, sending/receiving the chunks, and dividing and merging them. Our customers can adapt them easily to handle more complex data with more information in their headers dependent on their needs.
First, the user needs to select which image to send. On the Android side to pick an image from the image gallery we create an ACTION_PICK intent like this:
Intent i = new Intent(
Intent.ACTION_PICK,
android.provider.MediaStore.Images.Media.EXTERNAL_CONTENT_URI);
startActivityForResult(i, REQUEST_GET_IMAGE);
Then, the Android system starts a new Image Gallery Activity and the user selects the image he wants to send. After that, onActivityResult method is called where we get the path for the selected image. We create a FileInputStream with the given path to read bytes of these images and we attempt to send it with our BinaryDataSender like in this code excerpt:
FileInputStream inputStream = new FileInputStream(imageFile);
inputStream.read(imageBytes, 0, imageBytes.length);
inputStream.close();
String imageHeaderInJson = Message.createJsonMessage(computeMessageId(), new Date());
binaryDataSender.startSending(imageBytes, imageHeaderInJson);
After that, onMessageSent method from IDataChannelObserver is called after each chunk is sent. Here we check if the data sending is complete and if otherwise, we send the next chunk:
if(!binaryDataSender.isDataSendingComplete()) {
 binaryDataSender.sendNextChunk();
} else {...}
In the Web side we use an input with type file to allow the user to select the images he wants to send:
<input id="file-input" type="file" name="name" onchange="send_image()" accept="image/x-png,image/gif,image/jpeg" style="display: none;" />
Then like in the Android case, we get the file path from the input and read it using a FileReader. Soon after, the startSending method of the BinaryDataSender object is called and data chunks are sent successively.
var imageURL = file_input.files[0];
var reader = new FileReader();
reader.onload = function(e) {
var arrayBuffer = this.result;
var dateTime = new Date().getTime();
var messageHeader = { messageId:createId() , messageDate:dateTime };
binaryDataSender.startSending(arrayBuffer, JSON.stringify(messageHeader));
send_image_chunkwise();
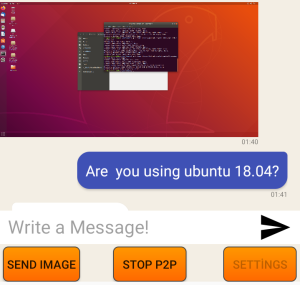
Screenshot of Android Chat Image Transfer
One thing to mention on the Web site is that different browsers support the different maximum numbers of data bytes that can be sent in one go. For Chrome currently, this is limited to 256kb, and for Firefox up to 100MB but we will restrict our chunk size to 64kb to limit our memory usage. This parameter can be adjusted in the BinaryDataSender class dependent on your needs.
Receiving and Displaying Images
BinaryDataReceiver receives the data chunk by chunk, parses the header information from the chunks, and merges them.
In Android, onMessage is called for each chunk but this time received data is binary. We use BinaryDataReceiver object to merge the chunks like this:
if (buffer.binary) {
 binaryDataReceiver.receiveDataChunk(buffer.data);
 if(binaryDataReceiver.isAllDataReceived()) {
 Bitmap bmp=BitmapFactory.decodeByteArray(binaryDataReceiver .receivedData.array(),0,binaryDataReceiver.receivedData.capacity());
 final ImageMessage message = new ImageMessage();
 message.parseJson(binaryDataReceiver.header.text);
 message.setImageBitmap(bmp);
 messageAdapter.add(message);
 // scroll the ListView to the last added element
 messagesView.setSelection(messagesView.getCount() - 1);
 binaryDataReceiver.clear();
 }
}
When all the data is received, we decode the image using a BitmapFactory and create a ImageMessage which will be added to our ListView in the MessageAdapter mentioned in the section above:
ImageMessage imageMessage = (ImageMessage) message;
ImageView imageBody;
if (message.isBelongsToCurrentUser()) {
 convertView = messageInflater.inflate(R.layout.my_image_message, null);
 // this message was sent by us
 imageBody = convertView.findViewById(R.id.image_body_my);
 messageDate = convertView.findViewById(R.id.message_date);
 messageDate.setText(imageMessage.getMessageDate());
 imageBody.setImageBitmap(imageMessage.getImageBitmap());
} else {
// this message was sent by someone else
 convertView = messageInflater.inflate(R.layout.their_image_message, null);
 ...
}
We create an ImageView for each bitmap and dependent on if the image sent by us or received, we display the image differently using a different layout for each case.
In the Web side at present, we have again some browser differences. The default expected type for binary data is Blob in the WebRTC standard. Firefox supports it currently but Chrome does not support it and sets the type of received data internally to ArrayBuffer for binary messages. To overcome these differences we handled both cases in our code and converted Blobs to more generic type ArrayBuffer whenever possible.
In the Javascript using our BinaryDataReceiver object we handle received image data chunks like this:
function handleImageData(data) {
 binaryDataReceiver.receiveDataChunk(data);
 if (binaryDataReceiver.isAllDataReceived()) {
 var jsonHeader = JSON.parse(binaryDataReceiver.headerText);
 var date = new Date(jsonHeader.messageDate);
 var bytes = new Uint8Array(binaryDataReceiver.receivedData);
 var blob = new Blob([bytes.buffer]);
 // create image URL
 var urlCreator = window.URL || window.webkitURL;
 var imageUrl = urlCreator.createObjectURL(blob);

 createImageMessage(imageUrl, false);
 imageReceiver.clear();
 }
}
When all of the image data chunks are received, we parse metadata about the image from the header and then create an Object URL from it. Finally, we display it using <img/> HTML tag in our chat window.
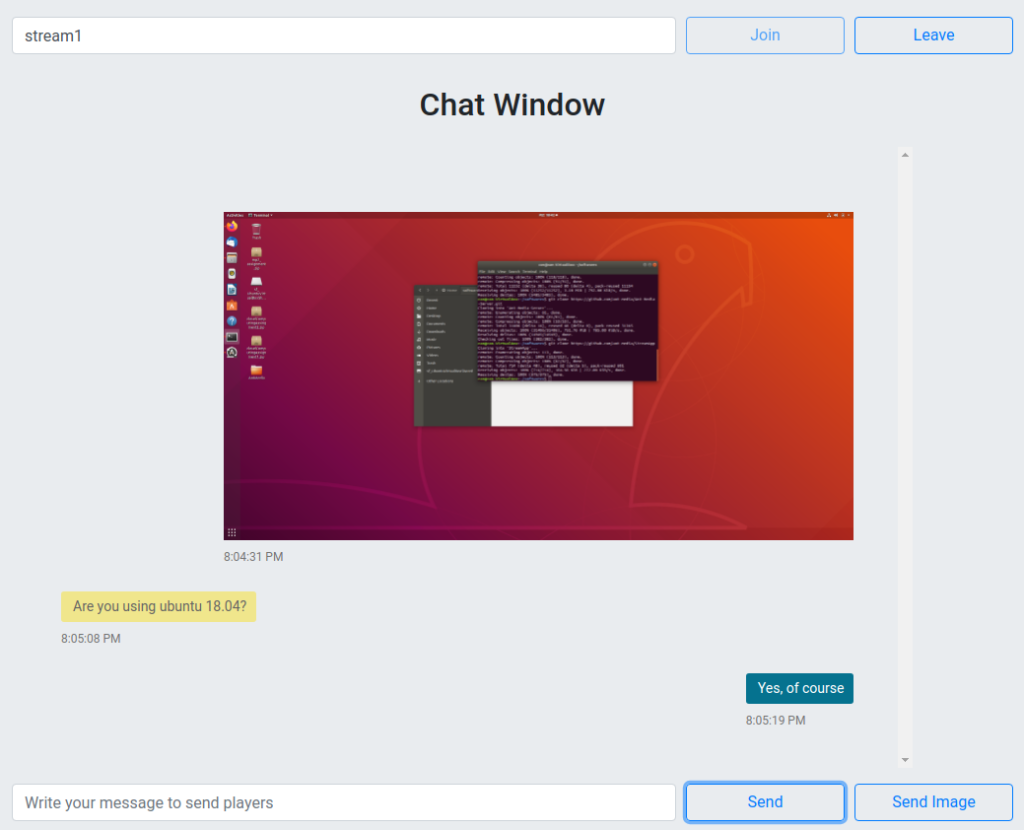
Screenshot of Web Chat Image Transfer
In this blog post, we implemented a simple but practical video chat application using Ant Media Server WebRTC Data Channels without using any complicated frameworks specialized for this purpose. WebRTC Data Channels makes building many more exciting projects possible and the full source code of this sample project is included in our SDKs to guide our customers when implementing feature-rich, creative and amazing applications.
WebRTC Data Channels are available to our customers with our Web, Android and IOS SDKs in version 2.0. If you have any questions, please drop a line to [email protected] .
If you want to download our new and latest release 2.0, please visit us here and kindly request.
References:
1- Image File Transfer has taken from: https://www.goanywhere.com/blog/2018/10/10/what-is-managed-file-transfer-(mft)


