- What is Ant Media Server WebRTC SDK
- Where to get samples, documentation, and help on using the SDK
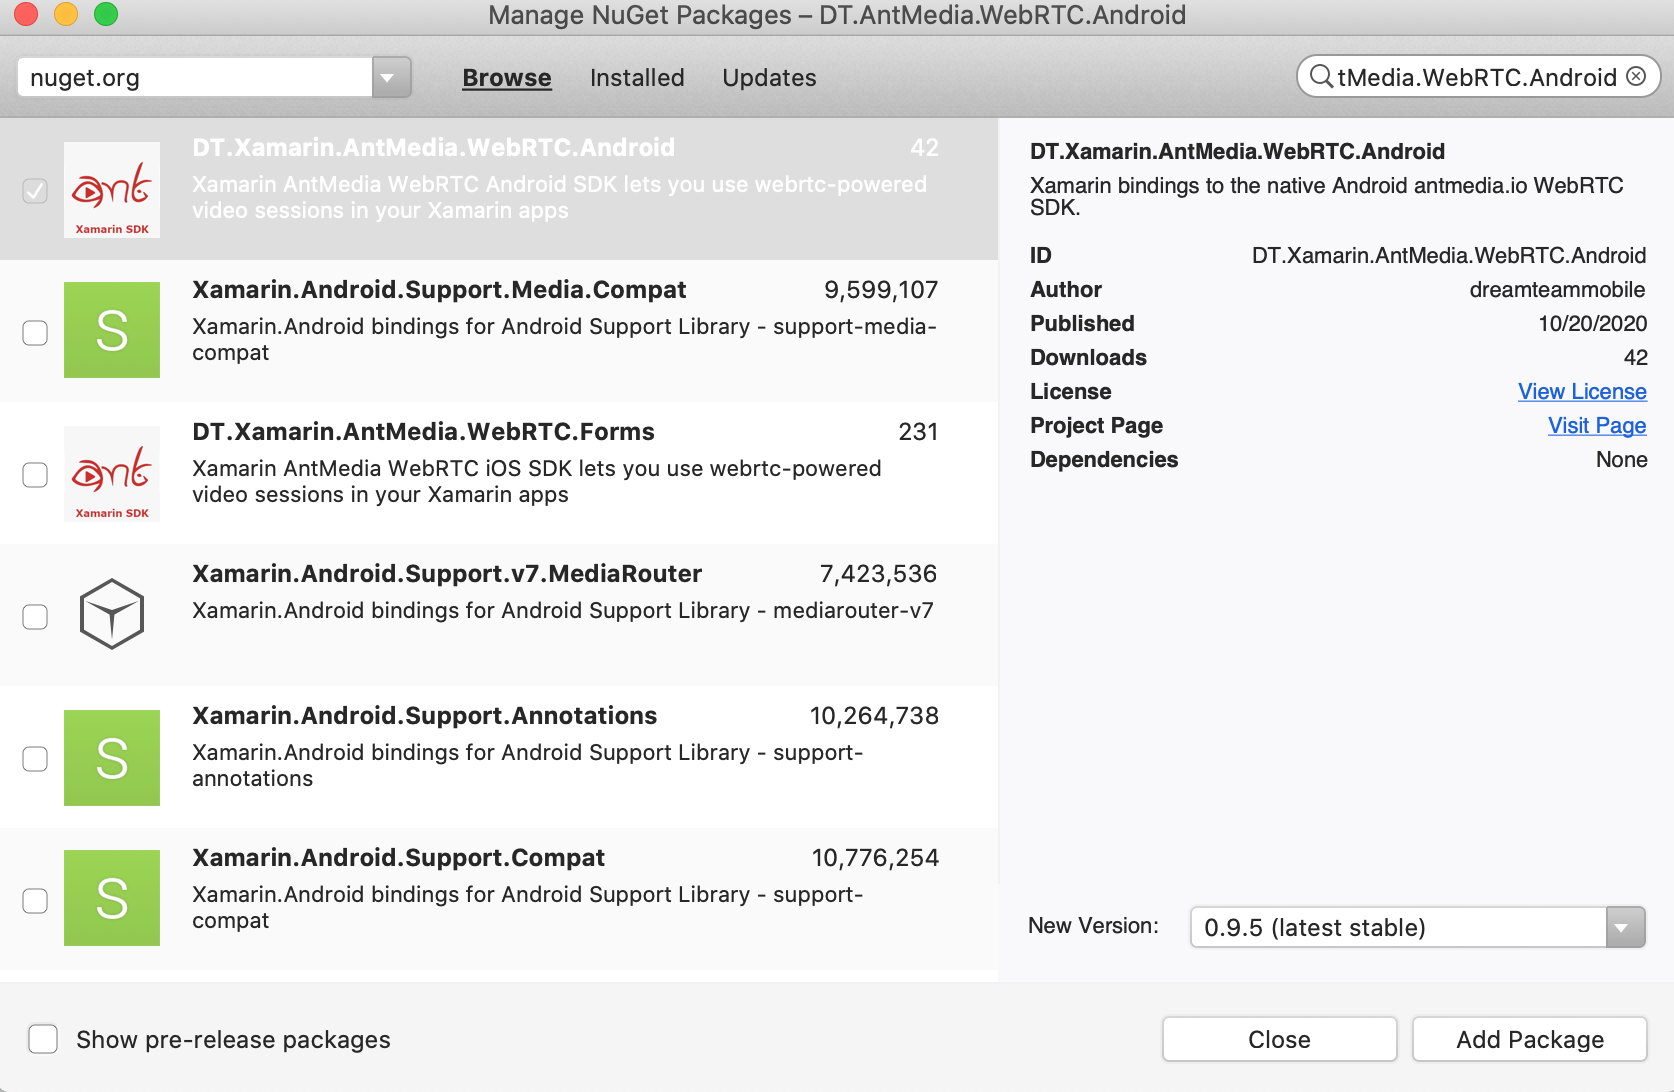
- How to easily use it on Xamarin Android
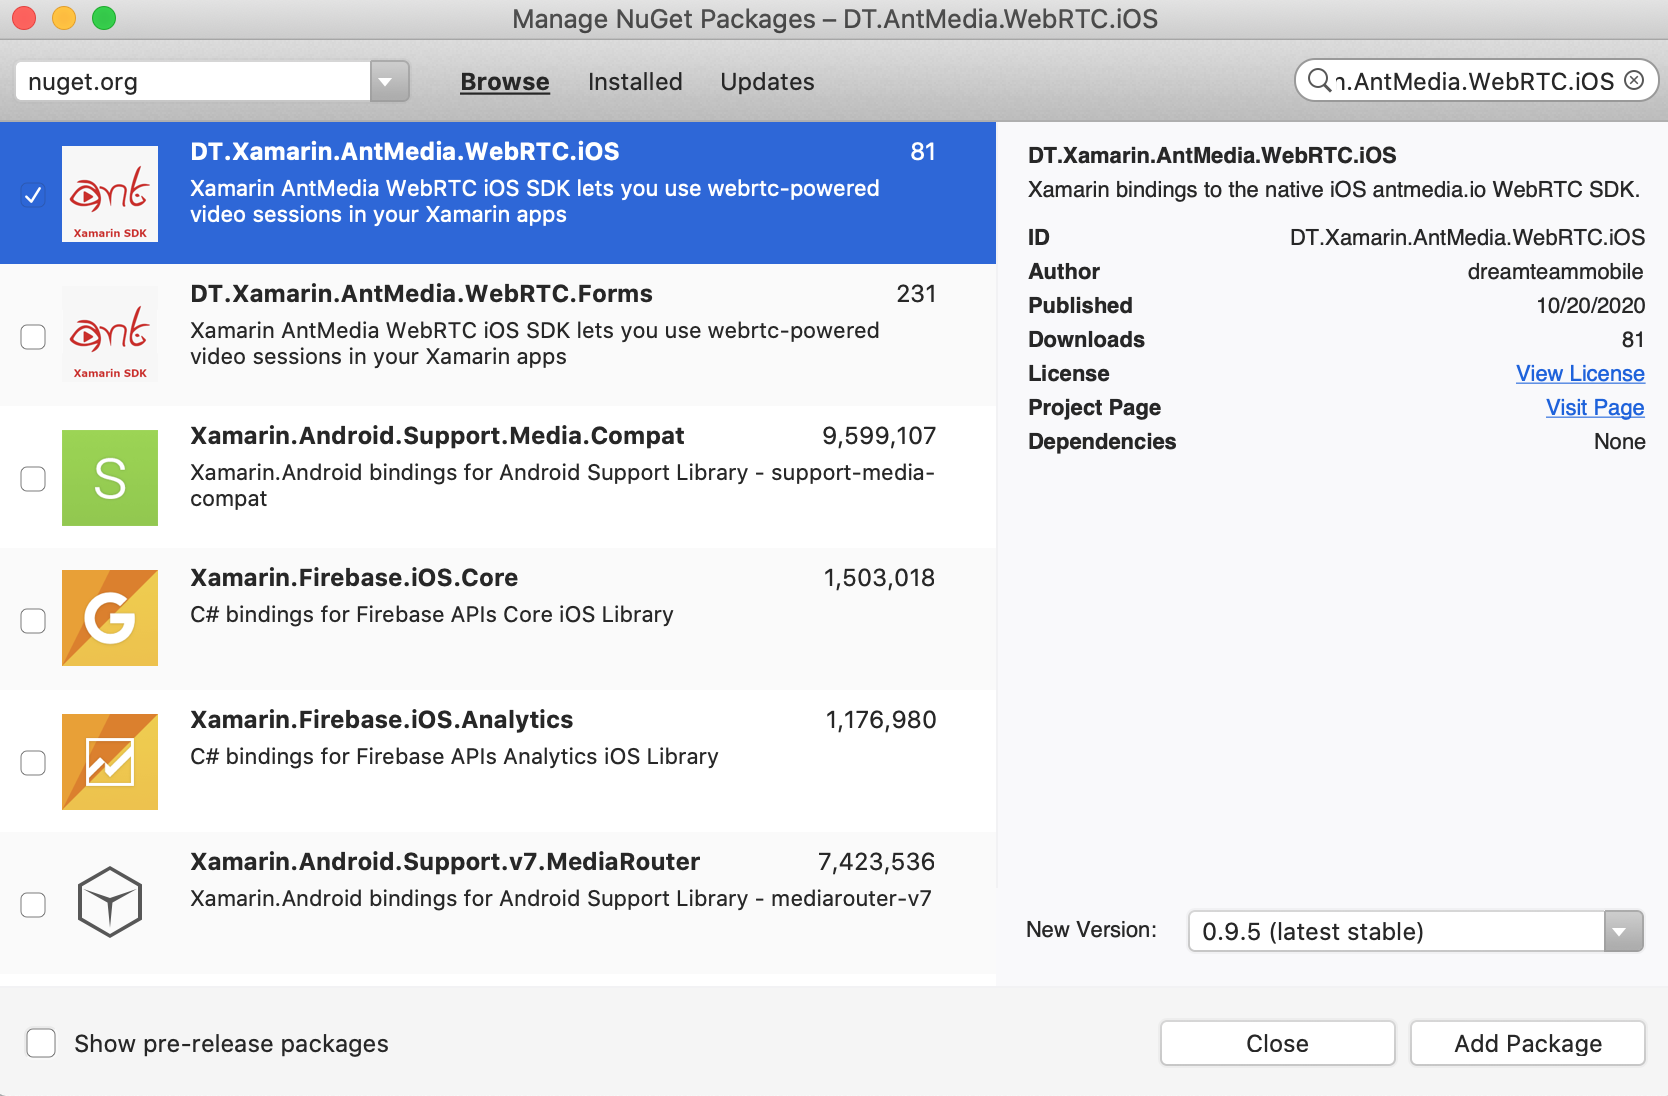
- How to easily use it on Xamarin iOS
- How to easily use it on Xamarin Forms
Small Hint
All information about Ant Media Server available on the creators Ant Media wiki here. We are an independent team and we are not related to Ant Media Server, we just can help to set up a server, write any cross-platform apps, or with Xamarin bindings to native frameworks.
Where to get Nugets
We release packages with simple samples for them on Xamarin:
- Ant Media WebRTC for Xamarin Android
this is a full binding on native Android Ant Media Free WebRTC SDK, same namespaces so you can use Ant Media documentation for that nuget
- Ant Media WebRTC for Xamarin iOS
this is a full binding on native iOS Ant Media Free WebRTC SDK, same namespaces so you can use Ant Media documentation for that nuget
- Ant Media WebRTC for Xamarin Forms
this is more complicated, we make Xamarin.Forms package which has their own classes and special for Forms usage, visit our wiki for a full description
What is Ant Media Server
Ant Media Server is software that can stream live and VoD streams. It supports scalable, ultra-low latency (0.5 seconds) adaptive streaming and records live videos in several formats like HLS, MP4, etc.
Here are the fundamental features of Ant Media Server:
- Ultra-Low Latency Adaptive One to Many WebRTC Live Streaming in Enterprise Edition.
- Adaptive Bitrate for Live Streams (WebRTC, MP4, HLS) in Enterprise Edition.
- SFU in One to Many WebRTC Streams in Enterprise Edition.
- Live Stream Publishing with RTMP and WebRTC.
- WebRTC to RTMP Adapter.
- IP Camera Support.
- Recording Live Streams (MP4 and HLS).
- Restream to Social Media Simultaneously(Facebook and Youtube in Enterprise Edition).
- One-Time Token Control in Enterprise Edition.
- Object Detection in Enterprise Edition.
- H.264, H.265 and VP8
- WebRTC Data Channels
Mobile WebRTC SDKs are Free
Ant Media Server has two versions. One of them is the Community Edition(Free) and the other one is Enterprise Edition. Community Edition is available to download on Github. Enterprise Edition can be purchased on antmedia.io. For more information visit antmedia.io
Prerequisites
To start any work with Ant Media WebRTC Mobile SDKs you need AntMedia Server on the web, how to set up that server is described in Ant Media Documentation
if you have a server on some domain address we recommend a valid SSL certificate on the domain to start work
domain-name.com:5080
Typical URLs to work in SDK:
public const string SERVER_ADDRESS = "domain-name.com:5080";
public const string SERVER_URL = "ws://" + SERVER_ADDRESS + "/WebRTCAppEE/websocket";
public const string REST_URL = "https://" + SERVER_ADDRESS + "/WebRTCAppEE/rest/v2";
Ant Media Server has samples for demonstrating different use-cases. You can review these sample pages to see Ant Media Server in action.
Default applications in Enterprise Edition are LiveApp and WebRTCAppEE. Default applications in Community Edition are LiveApp and WebRTCApp.
You can publish a video with WebRTC from the following URL:
https://domain-name.com:5443/WebRTCAppEE
WebRTC playing page is available in Enterprise Edition
https://domain-name.com:5443/WebRTCAppEE/player.html
Here you can find all the most usable links on the server with a description.
Keep in Mind
AntMedia WebRTC SDK can:
- Play and publish streams.
- 1 WebRTCClient is just a 1 connection, usually, every video on a screen is 1 WebRTCClient
- WebRTCClient has Modes, which can be Join, Play or Publish:
- Play – client play and render 1 stream to 1 view
- Publish – client publishes and render 1 stream to 1 view, it can be video from a camera or screen sharing
- Join – in 1 connection 2 streams, incoming and outgoing – typical for 1 to 1 call. In that mode, you set 2 views and client rendering to the incoming and outgoing streams, the outgoing stream you start manually so can control
- Data channel inside WebRTC connection allows you to send from 1 user to all connected participants binary or text message, just enable DataChannel on the server and on clients Init.
Xamarin Android Usage
Shortlist of useful links:
- Android Sample app
- Native Ant Media Server Android Sample documentation
- Our Wiki and Step by Step Xamarin Android Tutorial on Github
Ok, now if you want to use cool video streaming in your app follow these steps.
Add NuGet package DT.Xamarin.AntMedia.WebRTC.Android to your project
Modify Properties/AndroidManifest.xml (Add permissions)
<?xml version="1.0" encoding="utf-8"?>
<manifest xmlns:android="http://schemas.android.com/apk/res/android" android:versionCode="1" android:versionName="1.0" package="com.dreamteammobile.antmedia.dt_antmedia_webrtc_android">
    <uses-sdk android:minSdkVersion="21" android:targetSdkVersion="28" />
    <application android:label="DT.AntMedia.Tutorial.Forms.Android" android:theme="@style/MainTheme"></application>
    <uses-feature android:name="android.hardware.camera" />
    <uses-feature android:name="android.hardware.camera.autofocus" />
    <uses-feature android:glEsVersion="0x00020000" android:required="true" />
    <uses-permission android:name="android.permission.CAMERA" />
    <uses-permission android:name="android.permission.CHANGE_NETWORK_STATE" />
    <uses-permission android:name="android.permission.MODIFY_AUDIO_SETTINGS" />
    <uses-permission android:name="android.permission.RECORD_AUDIO" />
    <uses-permission android:name="android.permission.BLUETOOTH" />
    <uses-permission android:name="android.permission.INTERNET" />
    <uses-permission android:name="android.permission.WRITE_EXTERNAL_STORAGE" />
    <uses-permission android:name="android.permission.ACCESS_NETWORK_STATE" />
    <uses-permission android:name="android.permission.READ_PHONE_STATE" />
    <uses-permission android:name="android.permission.READ_EXTERNAL_STORAGE" />
</manifest>
Add view to XML layout
<?xml version="1.0" encoding="utf-8"?>
<FrameLayout xmlns:android="http://schemas.android.com/apk/res/android"
    xmlns:app="http://schemas.android.com/apk/res-auto"
    xmlns:tools="http://schemas.android.com/tools"
    android:layout_width="match_parent"
    android:layout_height="match_parent"
    tools:context=".MainActivity">

    <org.webrtc.SurfaceViewRenderer
        android:id="@+id/camera_view_renderer"
        android:layout_width="wrap_content"
        android:layout_height="wrap_content"
        android:layout_gravity="center" />

    <FrameLayout
        android:id="@+id/call_fragment_container"
        android:layout_width="match_parent"
        android:layout_height="match_parent" />
</FrameLayout>
In your Activity add code to init WebRTCClient and start streaming. You should add SERVER_URL according to your Ant Media Server address. Secondly, the third parameter in the last line of the code below is WebRTCClientConsts.ModePublish that publishes the stream to the server. You can use WebRTCClientConsts.ModeJoin for playing stream and WebRTCClientConsts.ModeJoin for P2P communication. If token control is enabled, you should define tokenId parameter.
    [Activity(MainLauncher = true)]
    public class MainActivity : Activity, IWebRTCListener
    {
        /**
         * Mode can Publish, Play or P2P
         */
        private String webRTCMode = WebRTCClientConsts.ModePlay;
        private CallFragment callFragment;

        private WebRTCClient webRTCClient;

        private Timer timer;
        private String SERVER_URL = "ws://192.168.1.21:5080/WebRTCAppEE/websocket";
        protected override void OnCreate(Bundle savedInstanceState)
        {
            base.OnCreate(savedInstanceState);
            // Set window styles for fullscreen-window size. Needs to be done before
            // adding content.
            RequestWindowFeature(WindowFeatures.NoTitle);
            Window.AddFlags(WindowManagerFlags.Fullscreen | WindowManagerFlags.KeepScreenOn
                    | WindowManagerFlags.DismissKeyguard | WindowManagerFlags.ShowWhenLocked
                    | WindowManagerFlags.TurnScreenOn);
            SetContentView(Resource.Layout.activity_main);

            // Check for mandatory permissions.
            foreach (String permission in CallActivity.MandatoryPermissions)
            {
                if (this.CheckCallingOrSelfPermission(permission) != Andr.Content.PM.Permission.Granted)
                {
                    Toast.MakeText(this, "Permission " + permission + " is not granted", ToastLength.Short).Show();
                    return;
                }
            }
            //Init and start AntMedia
            InitWebRTC();
        }

        protected void InitWebRTC()
        {
            if(webRTCClient != null)
            {
                webRTCClient.StopStream();
                webRTCClient.Disconnect();
                webRTCClient.Dispose();
            }
            webRTCClient = new WebRTCClient(this, this);
            //configure
            Intent.PutExtra(CallActivity.ExtraCapturetotextureEnabled, true);
            Intent.PutExtra(CallActivity.ExtraVideoFps, 30);
            Intent.PutExtra(CallActivity.ExtraVideoBitrate, 2500);
            Intent.PutExtra(CallActivity.ExtraCapturetotextureEnabled, true);
            SurfaceViewRenderer cameraViewRenderer = FindViewById<SurfaceViewRenderer>(Resource.Id.camera_view_renderer);
            SurfaceViewRenderer pipViewRenderer = FindViewById<SurfaceViewRenderer>(Resource.Id.pip_view_renderer);
            var streamId = "DefaultStream";
            var tokenId = "";
            webRTCClient.SetVideoRenderers(null, cameraViewRenderer);
            webRTCClient.SetOpenFrontCamera(webRTCMode.Equals(WebRTCClientConsts.ModePublish));
            webRTCClient.Init(SERVER_URL, streamId, webRTCMode, tokenId, Intent);
            //start
            webRTCClient.StartStream();
        }
   }
WebRTCClient Usage Hints
void WebRTCClient.setOpenFrontCamera(boolean openFrontCamera)

      Camera open order
      By default front camera is attempted to be opened at first,
      if it is set to false, another camera that is not front will be tried to be open
      @param openFrontCamera if it is true, the front camera will be tried to be opened
                             if it is false, another camera that is not front will be tried to be opened
void WebRTCClient.startStream()

      Starts the streaming according to the mode
void WebRTCClient.stopStream()

      Stops the streaming
void WebRTCClient.switchCamera()

      Switches the cameras
void WebRTCClient.switchVideoScaling(RendererCommon.ScalingType scalingType)

      Switches the video according to type and its aspect ratio
      @param scalingType
boolean WebRTCClient.toggleMic()

      toggle microphone
      @return Microphone Current Status (boolean)
void WebRTCClient.stopVideoSource()

      Stops the video source, it can be a camera or screen share. opponent will not receive a video stream and will see just a black rectangle.
void WebRTCClient.startVideoSource()

      Starts or restarts the video source
void WebRTCClient.setSwappedFeeds(boolean b)

      Swapped the fullscreen renderer and pip renderer, used only for Join(P2P) mode when 2 streams per 1 connection
      @param b
void WebRTCClient.setVideoRenderers(SurfaceViewRenderer pipRenderer, SurfaceViewRenderer fullscreenRenderer)

      Set's the video renderers,
      @param pipRenderer can be nullable, for Play and Publish you don't need to set it to something, for Join mode please set to view where you want to render your stream
      @param fullscreenRenderer cannot be nullable, rendering one stream for Play mode or Publish mode, and rendering opponent stream for Join(P2P) mode
That’s all! You can now make Android apps with Ant Media Server streaming, here you can find sources of the simple Android Sample app.
Xamarin IOS Usage
Shortlist of useful links:
- IOS Sample app
- Native Ant Media Server IOS Sample documentation
- Our Wiki and Step by Step Xamarin iOS Tutorial on Github
Steps to run in your solution and hints:
Add NuGet package DT.Xamarin.AntMedia.WebRTC.iOS to project
Add IOS Permissions to Info.plist
    <key>NSCameraUsageDescription</key>
    <string>Camera access is required for video chat</string>
    <key>NSMicrophoneUsageDescription</key>
    <string>Microphone access is required for video chat</string>
Add Camera and Microphone Permissions usage description to Info.plist

Add view to Layout
Add UIView with specified size or constraints to Your.storyboard or create UIView from code behind.
In your ViewController add code to init AntMediaClient and start streaming. You should add SERVER_URL according to your Ant Media Server address. Secondly, the third parameter in the last line of the code below is AntMediaClientMode.Publish that publishes the stream to the server. You can use AntMediaClientMode.Play for playing stream and AntMediaClientMode.Join for P2P communication. If token control is enabled, you should define tokenId parameter. dataChannelEnabled parameter allows sending data messages to throw WebRTC client between connected users if set to “true”.
    public partial class ViewController : UIViewController, IAntMediaClientDelegate
    {
        protected AntMediaClient webRtcClient = new AntMediaClient();
        public bool IsStreamActive = false;

        /**
        * Mode can Publish, Play or P2P
        */
        protected AntMediaClientMode clientMode = AntMediaClientMode.Publish;

        public ViewController(IntPtr handle) : base(handle)
        {
        }

        public override void ViewDidLoad()
        {
            base.ViewDidLoad();
            refreshButtons();
            ReInitWebRTC();
        }

        protected void ReInitWebRTC()
        {
            if(webRtcClient != null)
            {
                Stop();
            }
            webRtcClient.Init();
            webRtcClient.WeakDelegate = this;
            webRtcClient.SetDebug(true);
            var token = "";
            var streamId = "stream1";
            webRtcClient.SetOptionsWithUrl(SERVER_URL, streamId, token, clientMode, enableDataChannel: true);

            switch (clientMode)
            {
                case AntMediaClientMode.Play:
                    webRtcClient.SetRemoteViewWithRemoteContainer(fullscreen_UIView, UIViewContentMode.ScaleAspectFit);
                    break;
                case AntMediaClientMode.Publish:
                    webRtcClient.SetCameraPositionWithPosition(AVFoundation.AVCaptureDevicePosition.Front);
                    webRtcClient.SetLocalViewWithContainer(fullscreen_UIView, UIViewContentMode.ScaleAspectFit);
                    webRtcClient.SetVideoEnableWithEnable(true);
                    break;
                case AntMediaClientMode.Join:
                    var small = new UIView(new CoreGraphics.CGRect(0, 0, 160, 240));
                    secondaryHeight.Constant = 240;
                    secondaryContainer.AddSubview(small_pip_UIView);
                    webRtcClient.SetLocalViewWithContainer(small_pip_UIView, UIViewContentMode.ScaleAspectFit);
                    webRtcClient.SetRemoteViewWithRemoteContainer(fullscreen_UIView, UIViewContentMode.ScaleAspectFit);
                    break;
            }

            webRtcClient.InitPeerConnection();
            webRtcClient.Start();
        }
   }
AntMediaClient Usage Hints
void AntMediaClient.SetCameraPositionWithPosition(AVFoundation.AVCaptureDevicePosition position);

      change Current Camera to front or back
      @param position is enum contains Front or Back camera value
void AntMediaClient.Start()

      Starts the streaming according to the mode
void AntMediaClient.Stop()

      Stops the streaming
void AntMediaClient.SwitchCamera()

      Switches the cameras
void AntMediaClient.ToggleAudio()

      toggle microphone
void AntMediaClient.ToggleVideo()

      toggle video mute, if muted - no video data sending, a black rectangle will be rendered
void AntMediaClient.SetLocalViewWithContainer(UIVIew view, UIViewContentMode mode);

      Used to set the view for rendering local video stream from user camera
      @param view - UIView for rendering
      #param mode - content rendering mode, Fill, AspectFit, and others.
void AntMediaClient.SetRemoteViewWithRemoteContainer(UIVIew view, UIViewContentMode mode);

      Used to set the view for rendering opponent stream video (received from network stream)
      @param view - UIView for rendering
      #param mode - content rendering mode, Fill, AspectFit, and others.
Also, there is IAntMediaClientDelegate interface, which contains events that you can handle (connect, disconnect, error). Most interesting is receive data-message event, here is how you can handle it to show a message:
public void DataReceivedFromDataChannelWithStreamId(string streamId, NSData data, bool binary)
{
    BeginInvokeOnMainThread(() =>
    {
        var controller = UIAlertController.Create("DataReceived on " + streamId, data.ToString(NSStringEncoding.UTF8), UIAlertControllerStyle.Alert);
        controller.AddAction(UIAlertAction.Create("Ok", UIAlertActionStyle.Destructive, null));
        PresentViewController(controller, true, null);
    });
}
That’s all! You can now make IOS apps with Ant Media Server streaming, here you can find sources of the simple IOS Sample app.
Xamarin Forms Usage
Short list if useful links:
Steps to run in your solution and hints:
Add Forms WebRTC SDK NuGet package
Add nuget package DT.Xamarin.AntMedia.WebRTC.Forms to Forms core project

Configure IOS
Add AntManagerIos.Init(); to AppDelegate.cs
public override bool FinishedLaunching(UIApplication app, NSDictionary options)
{
   AntManagerIos.Init();
   global::Xamarin.Forms.Forms.Init();
   LoadApplication(new App());
   return base.FinishedLaunching(app, options);
}
Add IOS permissions to Info.plist
    <key>NSCameraUsageDescription</key>
    <string>Camera access is required for video chat</string>
    <key>NSMicrophoneUsageDescription</key>
    <string>Microphone access is required for video chat</string>
Add Camera and Microphone Permissions usage description to Info.plist

Configure Android
Open MainActivity.cs Add code to OnCreate
protected override void OnCreate(Bundle savedInstanceState)
{
    TabLayoutResource = Resource.Layout.Tabbar;
    ToolbarResource = Resource.Layout.Toolbar;

    base.OnCreate(savedInstanceState);

    //Begining of Inserted
    AntManagerDroid.Init(Intent);
    //End of Inserted

    global::Xamarin.Essentials.Platform.Init(this, savedInstanceState);
    global::Xamarin.Forms.Forms.Init(this, savedInstanceState);
    LoadApplication(new App());
}
Modify permissions for Android project, Properties/AndroidManifest.xml
<?xml version="1.0" encoding="utf-8"?>
<manifest xmlns:android="http://schemas.android.com/apk/res/android" android:versionCode="1" android:versionName="1.0" package="com.dreamteammobile.antmedia.dt_antmedia_tutorial_forms">
    <uses-sdk android:minSdkVersion="21" android:targetSdkVersion="28" />
    <application android:label="DT.AntMedia.Tutorial.Forms.Android" android:theme="@style/MainTheme"></application>
    <uses-feature android:name="android.hardware.camera" />
    <uses-feature android:name="android.hardware.camera.autofocus" />
    <uses-feature android:glEsVersion="0x00020000" android:required="true" />
    <uses-permission android:name="android.permission.CAMERA" />
    <uses-permission android:name="android.permission.CHANGE_NETWORK_STATE" />
    <uses-permission android:name="android.permission.MODIFY_AUDIO_SETTINGS" />
    <uses-permission android:name="android.permission.RECORD_AUDIO" />
    <uses-permission android:name="android.permission.BLUETOOTH" />
    <uses-permission android:name="android.permission.INTERNET" />
    <uses-permission android:name="android.permission.WRITE_EXTERNAL_STORAGE" />
    <uses-permission android:name="android.permission.ACCESS_NETWORK_STATE" />
    <uses-permission android:name="android.permission.READ_PHONE_STATE" />
    <uses-permission android:name="android.permission.READ_EXTERNAL_STORAGE" />
</manifest>
Finally, modify Forms Core shared code. Now, we ready to Add ant:AntWebRTCView to a page, will use from xaml but you can easily create same from code behind
Add reference to framework on page xaml
xmlns:ant="clr-namespace:DT.Xamarin.AntMedia.WebRTC.Forms;assembly=DT.Xamarin.AntMedia.WebRTC.Forms"
and use special control ant:AntWebRTCView. We are adding 2 – for Playing and for Publishing, typical One to One call app, if you need more – add more AntWebRTCView to your layout WebRTCMode is configuring what view will do, publish or play stream
  <?xml version="1.0" encoding="utf-8"?>
  <ContentPage
    xmlns="http://xamarin.com/schemas/2014/forms"
    xmlns:x="http://schemas.microsoft.com/winfx/2009/xaml"
    xmlns:ant="clr-namespace:DT.Xamarin.AntMedia.WebRTC.Forms;assembly=DT.Xamarin.AntMedia.WebRTC.Forms"
    x:Class="DT.AntMedia.Tutorial.Forms.MainPage">
    <Grid>
        <Grid.RowDefinitions>
            <RowDefinition/>
            <RowDefinition/>
        </Grid.RowDefinitions>
        <ant:AntWebRTCView
            x:Name="AntFrame1"
            Grid.Row="0"
            RenderingMode="ScaleAspectFit"
            WebRTCMode="Publish"
            Camera="Front"
            StreamID="stream1"
            ShowDebugLogs="True"
            InitMode="InitAndStartOnViewRender"
            />

        <ant:AntWebRTCView
            x:Name="AntFrame2"
            Grid.Row="1"
            RenderingMode="ScaleAspectFit"
            WebRTCMode="Play"
            StreamID="stream2"
            ShowDebugLogs="True"
            InitMode="InitAndStartOnViewRender"
            />
    </Grid>
  </ContentPage>
Add to Code Behind server url and token
public partial class MainPage : ContentPage
{
   public MainPage()
   {
      InitializeComponent();
      AntManager.Current.DefaultServer = InitialData.SERVER_URL;
      AntManager.Current.DefaultToken = InitialData.Token; //"" if not set
   }
And thats all! If you use simply form and InitMode=”InitAndStartOnViewRender” for AntWebRTCView – you can run app and all start-stop and init native events was called on create and on leave page, but you can still stop manually by calling AntWebRTCView.Stop();
Forms Usage Hints
AntWebRTCView – view that control 1 WebRTC connection, that view is an extended interface to get all functionality of native AntMediaClient (IOS) and WebRTCClient (Android)
bool AntWebRTCView.EnableDataChannel

  set this property to enable messages throw data channel fro current user
void AntWebRTCView.Init()

      Init connection and start preview from camera into view if in publish mode.
void AntWebRTCView.Start()

      Starts the streaming according to the mode
void AntWebRTCView.Stop()

      Stops the streaming
void AntWebRTCView.SwitchCamera()

      Switches the cameras
void AntWebRTCView.ToggleAudio()

      toggle microphone
void AntWebRTCView.ToggleVideo()

      toggle video mute, if muted - no video data sending, black rectangle will be renderred
AntManager – singleton, manager class for all created clients and connections, you can setup default values for server url, token and then override them in AntWebRTCView If you need. Furthermore, AntManager can give you access to all native events of android and IOS, for example:
//subscribe to receive message with exact AntWebRTCView ad it's webrtc connection on all platforms
AntFrame.DataReceived += AntFrame_DataReceived;

//subscribing to receive message on iOS from all active webrtc connections
AntManager.Current.Ios_IAntMediaClientDelegate_DataReceivedFromDataChannelWithStreamId += Current_Ios_IAntMediaClientDelegate_DataReceivedFromDataChannelWithStreamId;

//subscribing to receive message on Android from all active webrtc connections
AntManager.Current.Android_IDataChannelObserver_OnMessage += Instance_Android_IDataChannelObserver_OnMessage;
Sample of handling incoming data-message
private void AntFrame_DataReceived(object sender, DataEventArgs e)
{
    //receive for all Platforms message routed from AntView by special StreamId
    Dispatcher.BeginInvokeOnMainThread(async () =>
    {
        await DisplayAlert("DataReceived", e.IsBinary ? "[Binary]" : e.Message, "ОK");
    });
}
AntWebRTCView.InitMode
Manually – means that developer need to call Init() and Start(), Stop() methods manually from code
InitOnViewRender – most common cases need to use this mode – init of view happens on create, that means in publish mode picture start rendering from camera just when it’s rendered on screen. Start() and Stop() should be called manually from code behind
InitAndStartOnViewRender – 100% automatically mode, start publishing or playing when view rendered. code behind needed to stop and restart only.
All variants of usages for AntWebRTCView can be found in Wiki.
That’s all! You can now make Android, IOS, Forms-Android and Forms-IOS apps with Ant Media Server streaming SDK, here you can look to extended sources of the simple Sample app, it contains Android, IOS and Forms apps.


