Enabling SSL on Ant Media Server is essential for securing communications and supporting modern browser requirements. While SSL is not mandatory for all streaming use cases, it is required for accessing microphones and cameras, and for running WebRTC and WebSocket-based applications in browsers such as Google Chrome.
Ant Media Server provides multiple ways to enable SSL, including automatic certificate generation with Let’s Encrypt, free subdomain support for Enterprise users, and the ability to import custom certificates. Depending on your setup, SSL can be enabled either through the Web Panel or via command-line tools.
Prerequisites for SSL Configuration
Ant Media Server uses Let’s Encrypt to generate free SSL certificates. Before enabling SSL, ensure that the following requirements are met.
1. Port 80 Must Be Available
Let’s Encrypt uses port 80 to verify domain ownership. If another service is running on this port, SSL certificate generation will fail.
If Apache is running, stop it temporarily:
sudo service apache2 stopImportant: Make sure that your domain points to your server’s public IP address in the DNS records before running enable_ssl.sh script.
2. Domain Must Point to the Server
If you are using your own domain, make sure that the domain’s DNS A record points to your server’s public IP address before running the SSL script. DNS changes must be fully propagated before proceeding.
SSL Configuration Methods
Option 1: Enabling SSL from the Web Panel
Starting with Ant Media Server version 2.6.2, SSL can be enabled directly from the Web Panel without using the command line. This is the recommended method for most users.
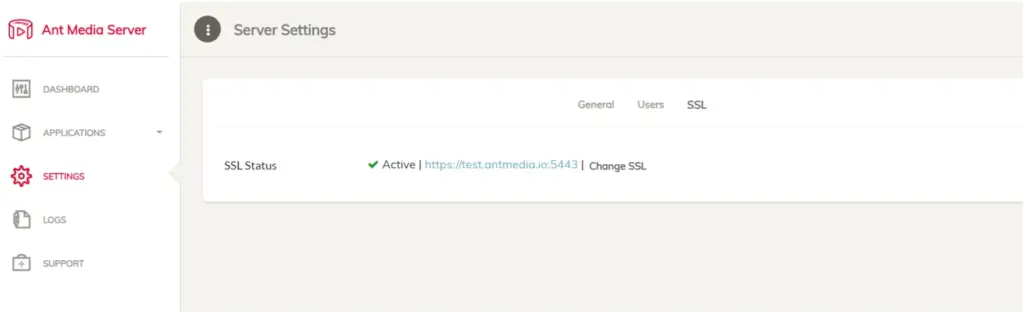
Steps to Enable SSL from the Web Panel
- Open the Ant Media Server Web Panel in your browser.
- Navigate to Settings → SSL.
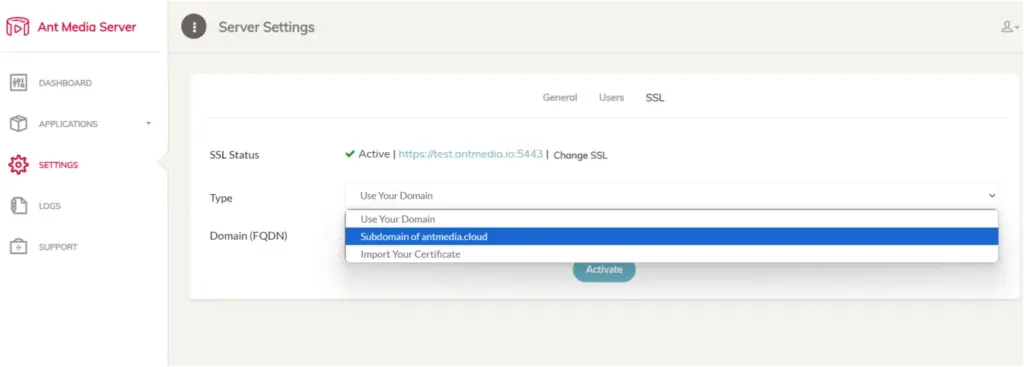
- In the Type drop-down menu, select the SSL option that matches your setup:
- Use your own domain with Let’s Encrypt
- Get a free subdomain (
*.antmedia.cloud) - Import your own SSL certificate
- Click Activate to enable SSL.
Once activated, SSL is applied automatically. No server restart is required. Simply refresh your browser and log in again using HTTPS.
Option 2: Get a Free Subdomain and Install SSL with Let’s Encrypt
Ant Media Server Enterprise provides the ability to obtain a free subdomain and automatically install a Let’s Encrypt SSL certificate using a single command. This option is useful if you do not already own a domain name.
This feature is available for Enterprise Edition users starting from version 2.5.2 and later.
When enabled, Ant Media Server assigns a subdomain in the following format:
ams-<id>.antmedia.cloudSteps to Enable Free Subdomain SSL
Navigate to the Ant Media Server installation directory:
cd /usr/local/antmediaRun the SSL enablement script without any parameters:
sudo ./enable_ssl.shThe script will:
- Request a free subdomain
- Generate a Let’s Encrypt SSL certificate
- Configure Ant Media Server to use HTTPS and WSS
Note: The free subdomain option is not accessible for Ant Media Server marketplace images on AWS, Azure, or Alibaba as it requires a license key.
Option 3: Create a Let’s Encrypt Certificate with Your Domain
Use this option if you already own a domain name and want to secure Ant Media Server with a Let’s Encrypt SSL certificate for that domain.
Prerequisites
- Your domain’s DNS A record points to the server’s public IP address
- Port 80 is available and not used by another service
Installation Steps
Navigate to the Ant Media Server installation directory:
cd /usr/local/antmediaRun the SSL enablement script with your domain name:
sudo ./enable_ssl.sh -d example.comAfter successful completion, access Ant Media Server securely using HTTPS on port 5443:
https://example.com:5443Option 4: Use Your Own SSL Certificates
Use this option if you already have an SSL certificate issued by a third-party certificate authority and want to configure Ant Media Server with your own certificate files.
Required Certificate Files
Make sure you have the following files available in PEM format:
fullchain.pem– Full certificate chainprivkey.pem– Private keychain.pem– Certificate chain
Installation Command
Navigate to the Ant Media Server installation directory:
cd /usr/local/antmediaRun the SSL enablement script with your certificate files:
sudo ./enable_ssl.sh -f {FULL_CHAIN_FILE} -p {PRIVATE_KEY_FILE} -c {CHAIN_FILE} -d {DOMAIN_NAME}Example usage:
sudo ./enable_ssl.sh -f yourdomain.crt -p yourdomain.key -c yourdomainchain.crt -d yourdomain.comImportant Considerations
- Port 80 must be available during certificate generation
- DNS records must be properly configured and propagated
- Free subdomain option requires a valid Enterprise license
- Marketplace images on AWS, Azure, or Alibaba Cloud do not support free subdomains
- After SSL enablement, HTTPS traffic is served on port 5443 by default
Frequently Asked Questions
Is SSL mandatory for Ant Media Server?
Which Ant Media Server editions support free SSL and subdomains?
Why must port 80 be open when enabling SSL?
Which HTTPS port does Ant Media Server use after SSL is enabled?
Can I use my own SSL certificate instead of Let’s Encrypt?
Conclusion
Enabling SSL on Ant Media Server is a critical step for securing communications and meeting modern browser requirements, especially for WebRTC and WebSocket-based applications. Depending on your setup, SSL can be enabled through the Web Panel, automatically with a free subdomain, by generating a Let’s Encrypt certificate for your own domain, or by importing custom SSL certificates.
Ant Media Server provides flexible SSL configuration options to accommodate different deployment scenarios, from quick setups to enterprise-grade environments. By selecting the appropriate SSL method and ensuring required prerequisites such as port availability and DNS configuration, SSL can be enabled reliably and with minimal effort.
Proper SSL configuration not only improves security but also ensures compatibility with modern browsers and real-time streaming technologies, providing a solid foundation for production-ready streaming deployments. Please let us know if you have a question or need help with this issue or any other one.
Estimate Your Streaming Costs
Use our free Cost Calculator to find out how much you can save with Ant Media Server based on your usage.
Open Cost Calculator

