Ant Media Server is a flexible streaming platform that supports autoscaling on the fly. This allows you to ensure your streaming infrastructure continuously adapts itself according to the user traffic of your streaming project.
Currently, there are multiple methods supported by Ant Media Server to scale your environment. Kubernetes is one of the methods you can use to scale your Ant Media Server cluster.
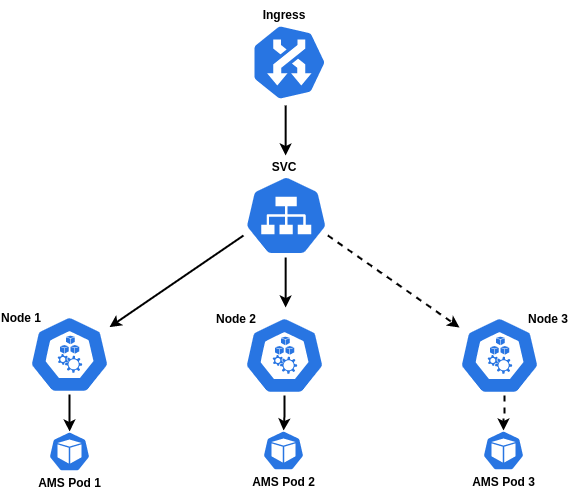
Ant Media Server can run on Kubernetes with a pod on each node. In this post, I will guide you about how to create autoscaling nodes on cloud providers.
How to create autoscaling nodes on cloud providers with Kubernetes?
In order to create such a configuration, we utilize the Cluster Autoscaler tool that automatically adjusts the size of the Kubernetes cluster. Because of Kubernetes’ Autoscaler feature, if the pod is pending, a new node is created and the pending pod is deployed on the new node.
This feature is integrated into the following providers – you can enable it on those platforms:
- AliCloud
- Azure
- AWS
- BaiduCloud
- Brightbox
- CloudStack
- HuaweiCloud
- Hetzner
- Equinix Metal
- IonosCloud
- OVHcloud
- Linode
- OracleCloud
- ClusterAPI
- BizflyCloud
- Vultr
Let’s use Autoscaler on a cloud provider called OVH as an example.
1. Let’s create a node pool by OVH > Public Cloud > Managed Kubernetes Services > Create a Kubernetes Cluster, enable the Autoscaling at step 5 and create the cluster. At the end of this process, Autoscaling is activated in our Nodes.
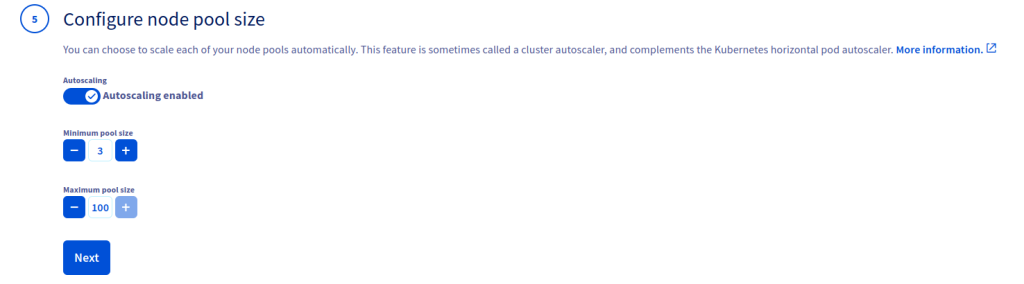
You can activate the Autoscaling by setting up a node pool with the Terraform files as shown below.
2. Download the kubeconfig file from OVH and define it as an environment.
export KUBECONFIG=./kubeconfig.yml
3. When you look at the status of the cluster with the kubectl get nodepool command, you will see that our cluster is configured as AUTOSCALED “true” for a minimum of 2 nodes and maximum of 10 nodes.
![]()
Check the output of the kubectl get nodes command for the status of the nodes. It seems that we have two active nodes.

4. Now, deploy YAML files as follows:
kubectl create -fhttps://raw.githubusercontent.com/ant-media/Scripts/master/kubernetes/ams-k8s-mongodb.yaml
First, you should organize your image field since you are going to change images. Here are the steps to organize your image field:
wget https://raw.githubusercontent.com/ant-media/Scripts/master/kubernetes/ams-k8s-deployment.yamlkubectl create -f ams-k8s-deployment.yamlkubectl create -f https://raw.githubusercontent.com/ant-media/Scripts/master/kubernetes/ams-k8s-hpa.yamlkubectl create -f https://raw.githubusercontent.com/ant-media/Scripts/master/kubernetes/ams-k8s-rtmp.yamlwget https://raw.githubusercontent.com/ant-media/Scripts/master/kubernetes/ams-k8s-ingress.yaml
5. We are going to use Nginx as Ingress and install it via Helm as follows.
curl https://baltocdn.com/helm/signing.asc | sudo apt-key add -
sudo apt-get install apt-transport-https --yes
echo "deb https://baltocdn.com/helm/stable/debian/ all main" | sudo tee /etc/apt/sources.list.d/helm-stable-debian.list
sudo apt-get update
sudo apt-get install helm
helm repo add ingress-nginx https://kubernetes.github.io/ingress-nginx
helm repo update
helm install ingress-nginx ingress-nginx/ingress-nginx
Once the changes on the ams-k8s-ingress.yaml file are done, let’s create our ingress.
kubectl create -f ams-k8s-ingress.yaml
We can access the dashboard after we complete the DNS definition according to the output of the kubectl get ingress command as you can see below:
Now, we can send a load to the Ant Media Server to check if the cluster works as intended or not. You might prefer using the WebRTCTest tool for this process.
To summarize briefly, we configured our cluster with 2 nodes as a minimum of 2 and a maximum of 10 nodes.
bash run.sh -m player -n 15 -i stream1 -s cluster.antmedia.cloud -p 443 -q true -u false
Note that we configured the CPU average as 30% for testing in the hpa.yaml file.
We can see that one pod is pending when we check it with the kubectl get pods command.

Let’s take a look at the status of nodes by using the kubectl get nodes command. As expected, the third node was installed for 3 Ant Media Server pods and the pod in the pending state has started to be created.
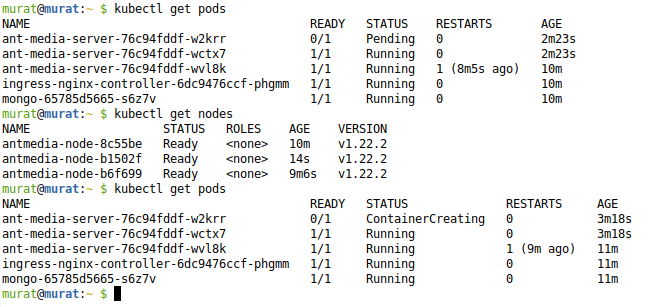
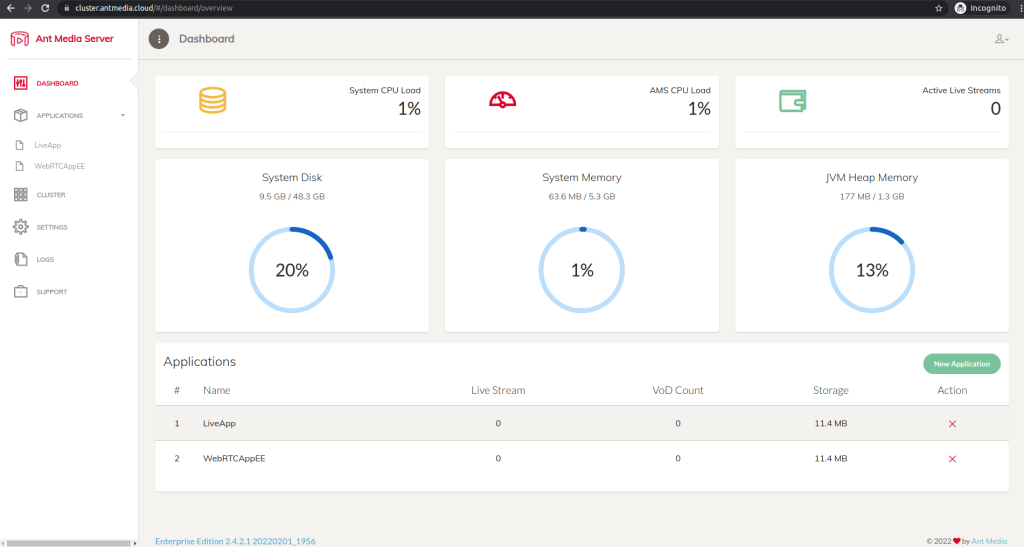
When we check the AMS dashboard, we can see that 3 nodes have joined the cluster.

Now, let’s stop sending the load, and since there is no load on the pods and we configured our Kubernetes to be a minimum of 1 pod, we will have 1 AMS pod and 2 nodes in total.
As we can see from the outputs of kubectl get pods and kubectl get nodes commands, the pods have been terminated and the nodes have started to scale down. The cluster works perfectly and we are ready to stream with our Auto-Scaling cluster using Kubernetes and Ant Media Server.

That’s all folks! To sum everything up, we discussed how to configure Kubernetes Autoscaling on OVH and how to configure Ant Media Server to be scalable on Kubernetes. Ant Media Server is a great solution when you need autoscaling to provide the best streaming experience for your users.
Try Ant Media Server for Free
Explore Ant Media Server now to provide viewers with a unique experience.
Try Ant Media Server for free with its full features including Flutter and other WebRTC SDKs.
Please do not hesitate to get in contact with us if you have any questions about deployment, scaling, and maintaining your AMS platform.