Ant Media Server has been released with a built-in filtering plugin since v2.4.0.2. The Filter Plugin lets you make Real-time Audio/Video Manipulation on the server-side. The main application of the filtering plugin is the MCU with which you can merge video/audio into a single stream for a conference room. You may read more from this blog post.
In this blog post, we will focus on other possible applications of Filter Plugin. You can use any filters that FFmpeg supports. Here is the list of the filters that are supported by FFmpeg. Instead of telling the details of all filters, we chose some of them and tell how to use them with Ant Media Server. This doesn’t mean the ones that aren’t listed here are useless. Even, they may be what you need in your application. But we should limit the number for this post.
Lastly, Filter Plugin is an open-source project that is implemented as a plugin for Ant Media Server. Its source code is here. You may also consider this project as a basis for your own plugins.
Before the filters, let me introduce the REST API of the Filter Plugin that we will use in the blog post.
General Information About Filter Plugin
You can apply a filter to one or multiple streams according to the filter type. For example, you can apply an edge detection filter to a single stream. But if you want to use merging streams you need multiple streams.
If the filter you want to use as a parameter of floating-point numbers, don’t try to pass parameters as decimal numbers instead use rational numbers. I mean that if you need to pass a filter parameter as x=0.25, you should pass it as x=1/4
You can apply video and audio filters to a stream with a single REST method call.
Filter Plugin REST API
In the filter plugin, there are REST methods for creating, listing, and deleting the filters. Also, there are some other ones but they are related to the MCU, so I won’t tell them here. You can find the source code of the REST API here.
Create:
Type: POST
URL: SERVER_URL/APP_NAME/rest/v2/filters/create
Json Parameters:
- filterId: Any string as an ID for the filter you want to create
- inputStreams: The list of the AMS streams that will be used in the filter
- outputStreams: Stream IDs of the output(filtered) streams
- videoFilter: The video filter definition, define inputs and outputs in the filter definition as [in0], [in1] …[out0][out1] …
- audioFilter: The audio filter definition, define inputs and outputs in the filter definition as [in0], [in1] …[out0][out1] …
- videoEnabled: Set true if the video will be filtered
- audioenabled: Always true
- type: You can determine the plugin type as one of the asynchronous, synchronous, lastpoint. It is asynchronous by default. You can find more about plugin types here. Note that if you set it synchronous and make the output stream name the same as the input name, then filtered frames will be streamed.
Return:
- success: The success of the operation
- message: The error message in case of error
curl Example:
curl -i -X POST -H "Accept: Application/json" -H "Content-Type: application/json" "http://localhost:5080/WebRTCAppEE/rest/v2/filters/create" -d '{"filterId":"filter1","inputStreams":["stream1"],"outputStreams":["test"],"videoFilter":"[in0]vflip[out0]","audioFilter":"[in0]acopy[out0]","videoEnabled":"true","audioEnabled":"true"}'Delete:
Type: DELETE
URL: SERVER_URL/APP_NAME/rest/v2/filters/delete/{FILTER_ID}
Return: Same as create
curl Example:
curl -i -X DELETE -H "Accept: Application/json" "http://localhost:5080/WebRTCAppEE/rest/v2/filters/filter1"List:
Type: GET
URL: SERVER_URL/APP_NAME/rest/v2/filters/list/{offset}/{size}
Return: The list of the Filter Configurations
curl Example:
curl -i -X GET -H "Accept: Application/json" "http://localhost:5080/WebRTCAppEE/rest/v2/filters/list/0/10"Applications of The Video Filters
After REST API documentation, now we are ready to have fun with filters. I will provide curl commands for each filter as an example. But of course, you can use your REST method call tool like Postman, Insomnia, etc.
Please note that, as an audio filter, we will use acopy filter for single input filters and amix filter for multiple inputs. Since this is the video filter part I don’t discuss them in this part.
1. Scale and Pad Filters:
You can use a scale filter to scale the stream to different resolutions. Also adding a pad you may set the position or background color. Generally, you may need to scale your streams before using other filters.
curl command:
curl -i -X POST -H "Accept: Application/json" -H "Content-Type: application/json" "http://localhost:5080/WebRTCAppEE/rest/v2/filters/create" -d '{"filterId":"scaledemo","inputStreams":["stream1"],"outputStreams":["test"],"videoFilter":"[in0]scale=360:240:force_original_aspect_ratio=decrease,pad=720:480:(ow-iw)/2:(oh-ih)/2:color=blue[out0]","audioFilter":"[in0]acopy[out0]","videoEnabled":"true","audioEnabled":"true","type":"asynchronous"}'Input streams: stream1
Output streams: test
Video Filter Text:
[in0]scale=360:240:force_original_aspect_ratio=decrease,pad=720:480:(ow-iw)/2:(oh-ih)/2:color=blue[out0]
Explanation: We scale stream1(in0) to 360:240 resolution by keeping the aspect ratio and then adding a pad to place it 720×480 frame. We set the pad color to blue. Then obtain the output stream test(out0).
I want to emphasize two points here.
- We use some variables in our filter like ow (output width), iw (input width). Some filters let us do.
- Between the scale and pad filters, we used comma(,) because they can be applied to the input as filter chain. Please read FFmpeg Filter Syntax for more information.
Output:

Scale and Pad Filters
2. Overlay Filter:
You can use an overlay filter to add a stream over another one as an overlay.
curl command:
curl -i -X POST -H "Accept: Application/json" -H "Content-Type: application/json" "http://localhost:5080/WebRTCAppEE/rest/v2/filters/create" -d '{"filterId":"overlaydemo","inputStreams":["stream1","stream2"],"outputStreams":["test"],"videoFilter":"[in0]scale=240:160[s0];[in1][s0]overlay[out0]","audioFilter":"[in0][in1]amix=inputs=2[out0]","videoEnabled":"true","audioEnabled":"true","type":"asynchronous"}'Input streams: stream1 and stream2
Output streams: test
Video Filter Text:
[in0]scale=240:160[s0];[in1][s0]overlay[out0]","audioFilter":"[in0][in1]amix=inputs=2[out0]
Explanation: We scale stream1(in0) to 240×160 and obtain a hidden stream(s0). The we apply it to the stream2(in1) and obtain the output stream test(out0).
Output:
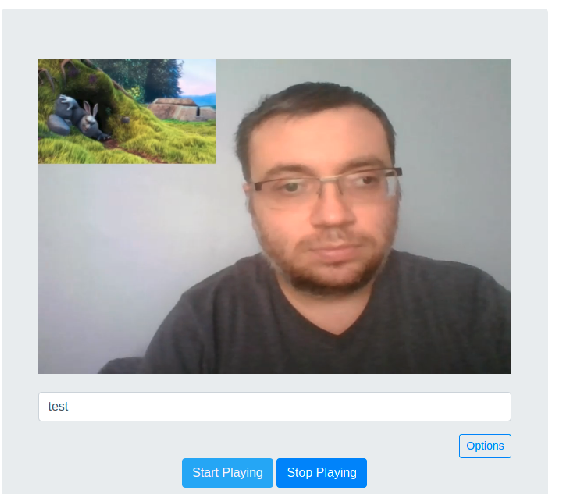
Overlay Filter
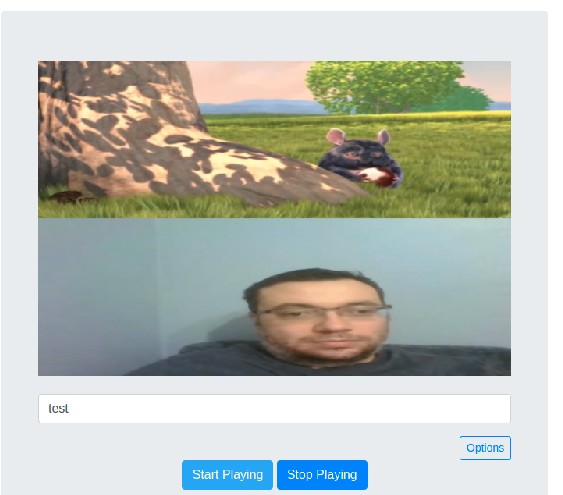
3. Movie Filter and Adding Logo:
You can use a movie filter to create a stream from an image. If you create a stream from a logo image and add it as an overlay to another stream you will have an output stream with the logo.
curl command:
curl -i -X POST -H "Accept: Application/json" -H "Content-Type: application/json" "http://localhost:5080/WebRTCAppEE/rest/v2/filters/create" -d '{"filterId":"logodemo","inputStreams":["stream1"],"outputStreams":["test"],"videoFilter":"movie=/home/burak/antmedia.png[logo];[in0][logo]overlay[out0]","audioFilter":"[in0]acopy[out0]","videoEnabled":"true","audioEnabled":"true","type":"asynchronous"}'Input streams: stream1
Output streams: test
Video Filter Text:
movie=/home/burak/antmedia.png[logo];[in0][logo]overlay[out0]
Output:
Logo Adding
4. Text Filter and Adding Text:
You can use a movie filter to create a stream from an image. If you create a stream from a logo image and add it as an overlay to another stream you will have an output stream with the logo.
curl command:
curl -i -X POST -H "Accept: Application/json" -H "Content-Type: application/json" "http://localhost:5080/WebRTCAppEE/rest/v2/filters/create" -d '{"filterId":"textdemo","inputStreams":["stream1"],"outputStreams":["test"],"videoFilter":"[in0]drawtext=fontfile=/usr/share/fonts/truetype/ubuntu/Ubuntu-B.ttf:fontsize=56:fontcolor=green:text=Hello[out0]","audioFilter":"[in0]acopy[out0]","videoEnabled":"true","audioEnabled":"true","type":"asynchronous"}'Input streams: stream1
Output streams: test
Video Filter Text:
[in0]drawtext=fontfile=/usr/share/fonts/truetype/ubuntu/Ubuntu-B.ttf:fontsize=56:fontcolor=green:text=Hello[out0]
Output:
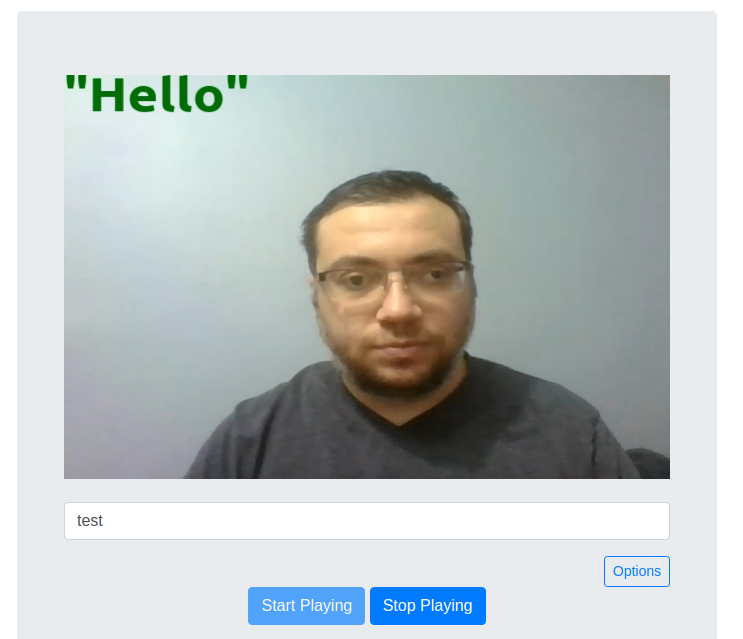
Text Adding
5. vstack, hstack, xstack Filter:
You can use these filters to merge streams into one frame. We also use these in the MCU feature.
curl command:
curl -i -X POST -H "Accept: Application/json" -H "Content-Type: application/json" "http://localhost:5080/WebRTCAppEE/rest/v2/filters/create" -d '{"filterId":"stackdemo","inputStreams":["stream1","stream2"],"outputStreams":["test"],"videoFilter":"[in0]scale=360:240[s0];[in1]scale=360:240[s1];[s0][s1]vstack=inputs=2[out0]","audioFilter":"[in0][in1]amix=inputs=2[out0]","videoEnabled":"true","audioEnabled":"true"}'Input streams: stream1 and stream2
Output streams: test
Video Filter Text:
[in0]scale=360:240[s0];[in1]scale=360:240[s1];[s0][s1]vstack=inputs=2[out0]
Explanation: We scale stream1(in0) and stream2(in1) and obtain hidden streams(s0 and s1). Then we merge them vertically into stream test(out0). Note that we with or height should be the same to use vstack and hstack filters. So we scaled first.
Output:
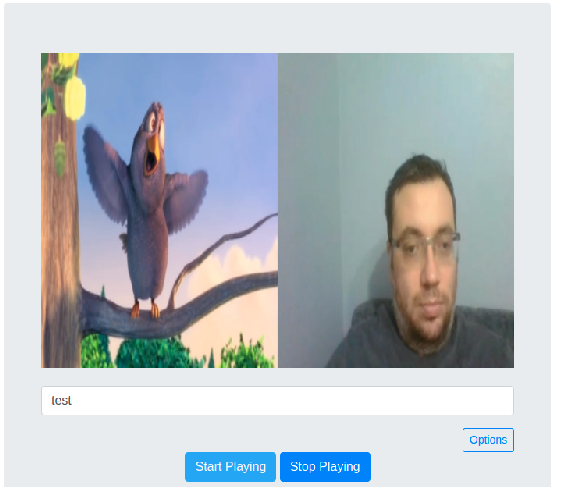
Hstack Filter
Vstack Filter
6. Green Background Replacement:
You can use colorkey and overlay filters to replace the green background of a stream with another stream.
curl command:
curl -i -X POST -H "Accept: Application/json" -H "Content-Type: application/json" "http://localhost:5080/WebRTCAppEE/rest/v2/filters/create" -d '{"filterId":"replacmentdemo","inputStreams":["stream1","stream2"],"outputStreams":["test"],"videoFilter":"[in0]scale=640:360[s0];[s0]colorkey=0x00ff00:1/3:1/5[ck0];[in1]scale=640:360[s1];[s1][ck0]overlay[out0]","audioFilter":"[in0][in1]amix=inputs=2[out0]","videoEnabled":"true","audioEnabled":"true"}'Input streams: stream1
Output streams: test
Video Filter Text:
[in0]scale=640:360[s0];[s0]colorkey=0x00ff00:1/3:1/5[ck0];[in1]scale=640:360[s1];[s1][ck0]overlay[out0]
Explanation: We scale stream1(in0) and stream2(in1) to the same resolution. We replaced the green colors in the stream1 with the stream2 and obtain the output stream test(out0).
Output:
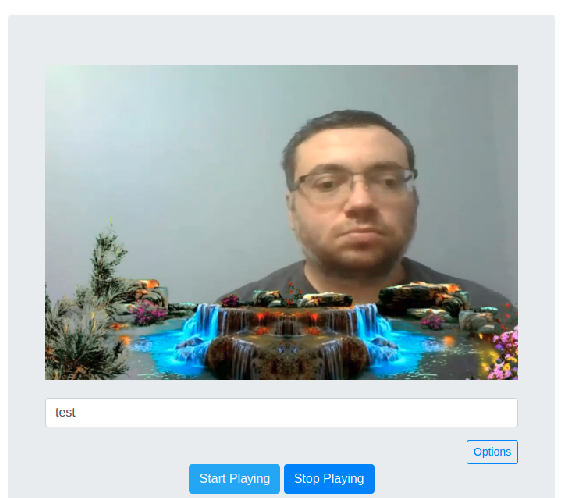
Green Background Replacement
7. Split Filter and Multiple Outputs:
You can use split filter to get multiple copies of the input.
curl command:
curl -i -X POST -H "Accept: Application/json" -H "Content-Type: application/json" "http://localhost:5080/WebRTCAppEE/rest/v2/filters/create" -d '{"filterId":"splitdemo","inputStreams":["stream1"],"outputStreams":["test1","test2"],"videoFilter":"[in0]split[out0][out1]","audioFilter":"[in0]asplit=2[out0][out1]","videoEnabled":"true","audioEnabled":"true"}'
Input streams: stream1
Output streams: test1, test2
Video Filter Text:
[in0]split[out0][out1]
Explanation: We create two outputs test1(out0) and test2(out1) from the input stream1(in0). Of course, you can apply different filters two different outputs.
Output:
Split Filter
8. Merging Video and Audio of Different Streams:
You can merge the video of a stream with the audio of another stream. So you may add any audio to your stream. Please note that you may use this after v2.4.4 version of Ant Media Server.
curl command:
curl -i -X POST -H "Accept: Application/json" -H "Content-Type: application/json" "http://localhost:5080/WebRTCAppEE/rest/v2/filters/create" -d '{"filterId":"addAudio","inputStreams":["stream1","stream2"],"outputStreams":["test"],"videoFilter":"[in0]copy[out0]","audioFilter":"[in1]acopy[out0]","videoEnabled":"true","audioEnabled":"true"}'
Input streams: stream1, stream2
Output streams: test
Video Filter Text:
[in0]copy[out0]
Audio Filter Text:
[in1]acopy[out0]
Explanation: We merge stream1‘s video with the stream2‘s audio into a new stream test.
Bonus
Here I want to list the filters that you should try at least for fun.
lagfun:
curl -i -X POST -H "Accept: Application/json" -H "Content-Type: application/json" "http://localhost:5080/WebRTCAppEE/rest/v2/filters/create" -d '{"filterId":"lagfundemo","inputStreams":["stream1"],"outputStreams":["test"],"videoFilter":"[in0]lagfun[out0]","audioFilter":"[in0]acopy[out0]","videoEnabled":"true","audioEnabled":"true"}'edgedetect:
curl -i -X POST -H "Accept: Application/json" -H "Content-Type: application/json" "http://localhost:5080/WebRTCAppEE/rest/v2/filters/create" -d '{"filterId":"edgedetectdemo","inputStreams":["stream1"],"outputStreams":["test"],"videoFilter":"[in0]edgedetect=low=1/10:high=4/10[out0]","audioFilter":"[in0]acopy[out0]","videoEnabled":"true","audioEnabled":"true"}'sobel:
curl -i -X POST -H "Accept: Application/json" -H "Content-Type: application/json" "http://localhost:5080/WebRTCAppEE/rest/v2/filters/create" -d '{"filterId":"sobeldemo","inputStreams":["stream1"],"outputStreams":["test"],"videoFilter":"[in0]sobel[out0]","audioFilter":"[in0]acopy[out0]","videoEnabled":"true","audioEnabled":"true"}'In this blog post, we tried to tell how can apply an FFmpeg filter to an AMS stream. Actually, there are lots many filters available that you can use. But here we told some of the selected filters that can be a sample for a specific case like single input, multiple inputs, generating movies, etc. Also when we selected the filters the questions from you are the main criteria. For example, we got lots of questions about adding a logo to a stream. I hope this will be useful as a basis. You can try other filters in the FFmpeg filter documentation in a similar way we told in this blog post.


