A new release (v2.4.3) is available to download for Ant Media Server. Before mentioning technical highlights including SRT ingest, the ability to develop custom applications, and the exciting play local IP Cameras from anywhere feature, I just would like to thank everyone that is being part of this journey. As you download your copy, we always welcome our community to let us know about new feature requests, submit issues, or provide feedback about our new documentation platform. No matter what level, we love reading all your comments, and we are always very excited to get connected with you.

Beyond business, our goal is to be part of the solution in the world and to show one more sample that ordinary people (like us) can work together remotely, building a platform that the whole world can benefit from. If you would like to be part of this goal, please reach out to us and we can at least have a coffee together 😉
I’m a technical person like some of you, and I think it’s enough to mention these non-technical things 😛 Let’s get back to highlights for Ant Media Server v2.4.3.
SRT ingest to WebRTC play
We have been getting a lot of requests about SRT to ingest, and this feature is now available in the Enterprise Edition. Now, you can push streams to Ant Media Server with SRT and can play not only with WebRTC but also with all other formats (e.g HLS, CMAF), and record it as MP4. Adaptive streaming is also supported for SRT ingest.
For this feature, we’ve used the official SRT library by Haivision. We’ve created an SRT preset for the JavaCPP-Presets and we plan to send a PR to the JavaCPP-Presets.
Let me tell you how to test and use this feature.

Push SRT stream with FFmpeg
I assume that you’ve installed and run Ant Media Server v2.4.3. Just enter the following command with FFmpeg:
ffmpeg -re -i {INPUT} -vcodec libx264 -profile:v baseline -g 60 -acodec aac -f mpegts srt://ant.media.server.address:4200?streamid=WebRTCAppEE/stream1
After you run the command, the stream is going to be available in “WebRTCAppEE” with a stream id “stream1”.
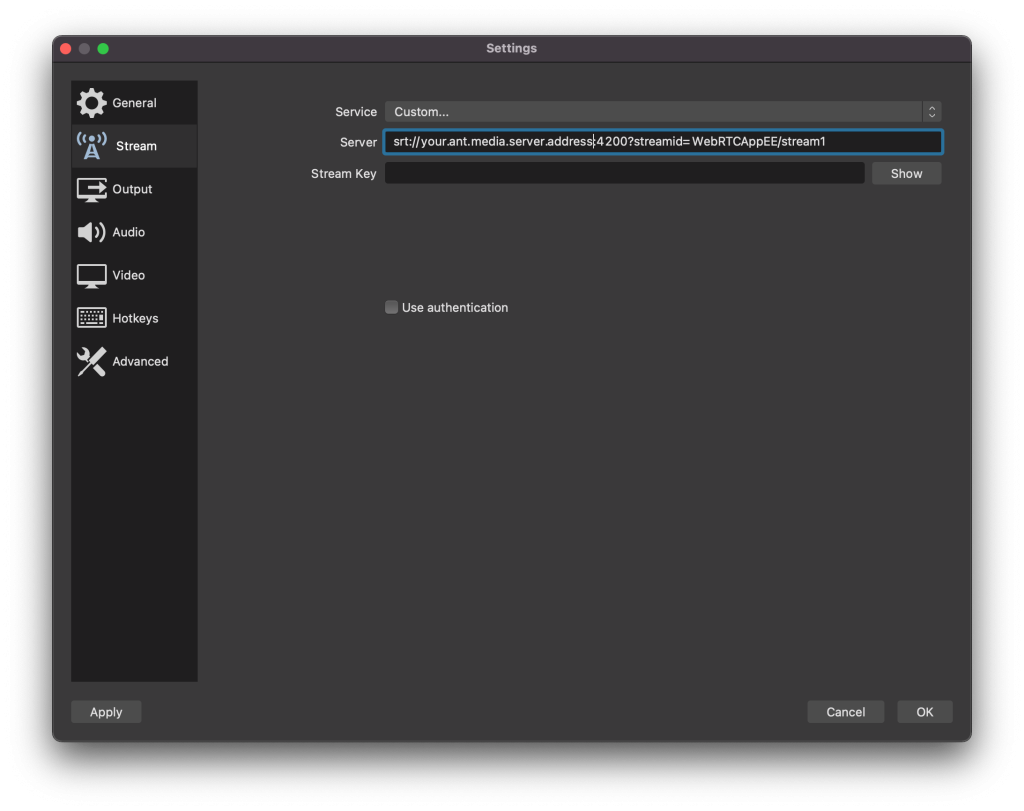
Push SRT stream with OBS
If you don’t have command line tools experience, you can use OBS to push SRT stream to the Ant Media Server. If you are not familiar with OBS, you can take a look at this blog post . Just enter the SRT URL to the stream window as shown in the image below.
Play SRT ingested stream with WebRTC
After you publish the stream to the Ant Media Server either from OBS or ffmpeg, it becomes available in the web panel to watch as any other ingested stream.

SRT is enabled by default in Ant Media Server and it uses the 4200 (UDP) port by default. If you need to change, just open the
conf/red5.properties
and add/replace the following property
server.srt_port={WRITE_YOUR_PORT_NUMBER}
After this, restart the server and it will use the new configured port number for SRT ingest.
Lastly, SRT support is available in X86_64 architectures. It’s not currently available in ARM and will be added in the next release.
Deploy custom apps to AMS
With the new updates, you can deploy your own custom-developed applications to Ant Media Server. Even if it seems that it’s a small feature, I think there is really a great opportunity for the developer community.

This way, you can develop your own applications and deploy them to your Ant Media server. Moreover, I really would like to see that you sell your application directly or through some marketplace. There are several ideas that you may start from – conferencing applications, re-streaming applications, webinar applications, auction applications, and IP camera applications – I believe there is a huge market and business you can tap into.
Relevant documentation regarding how to deploy an application is on its way, which will help you to build your applications step by step. This time I would like to show how to deploy an application to the Ant Media Server.
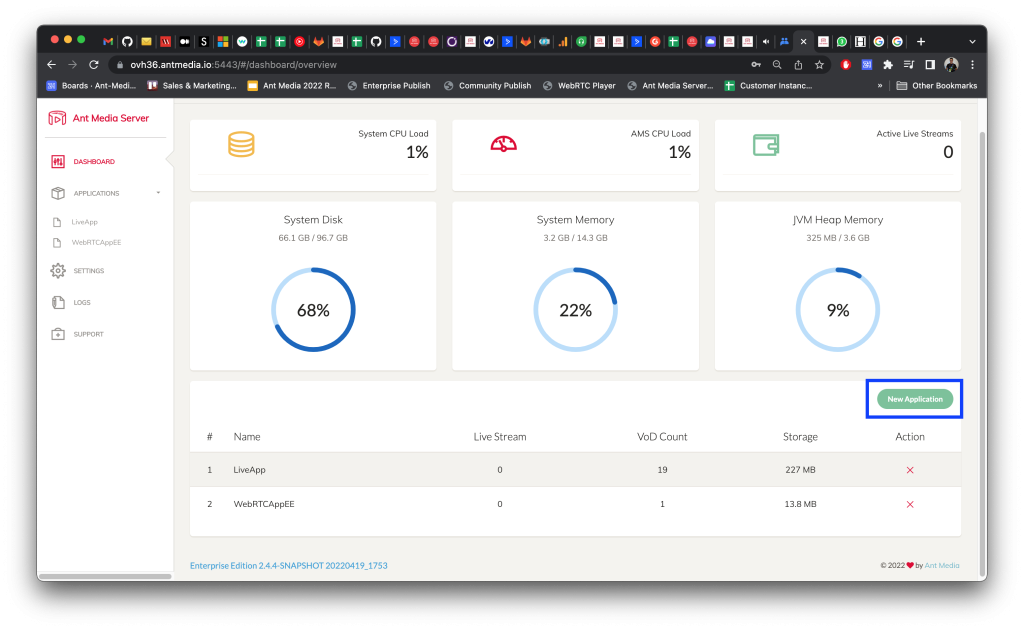
First, login to the web panel of Ant Media Server as usual and click the “New Application” button.
In earlier versions, only the default applications would be deployable. At this time, there is an opportunity to upload WAR files as shown below. This field is not necessary – if you don’t choose any WAR files, Ant Media Server just deploys the default application.
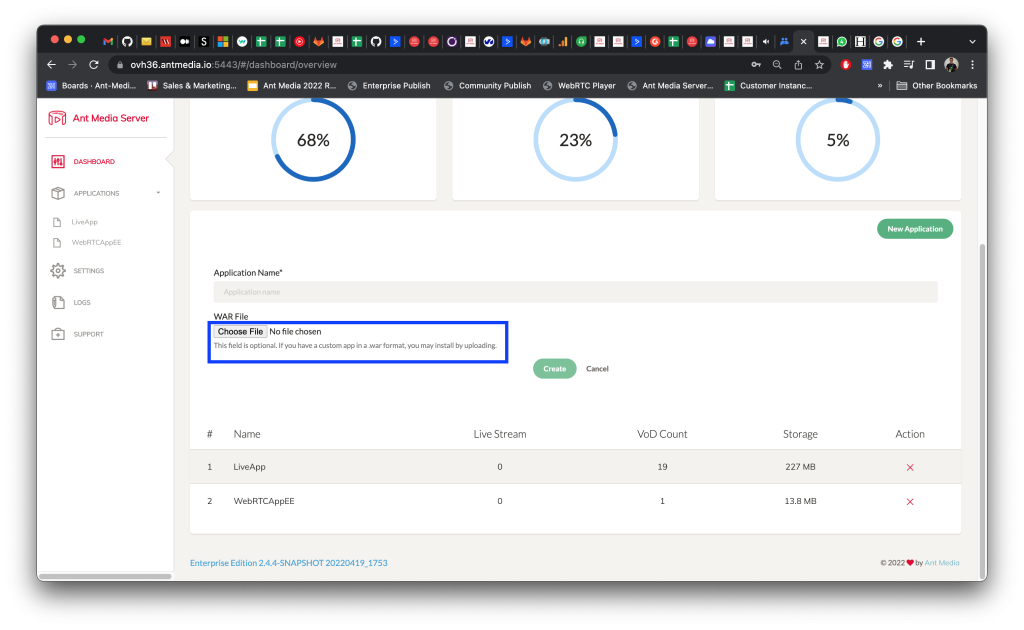
After you name your application and choose the WAR file, click the “Create” button and the application is then deployed both in standalone and cluster modes.
Play local IP cameras from anywhere
The ability to play local IP cameras is a known problem. In this version, Ant Media Server can pull RTSP streams from IP cameras and convert them to WebRTC. For a permanent solution to this, we have two deployment scenarios.
Scenario 1 & issues
If there are IP cameras in a local network behind NAT, one port should be opened in the router/switch for each IP camera to let the Ant Media Server (running in cloud) access to the IP camera. If there are just a few cameras, it’s not an issue. If there are tens of cameras, it creates both security vulnerabilities and is hard to maintain. It also consumes too much network bandwidth.
In order to make the users watch the IP camera, one port should be opened for each camera in the router in the local network configuration making this scenario vulnerable.
Scenario 2 & issues
Just like the first scenario, this time an Ant Media Server is deployed to an instance in the local network. In order to watch the stream, another instance of Ant Media Server should run in the cloud to watch those IP cameras. There is no need to configure the router/switch for each of the cameras. However, two instances should be running at the same time having the stream. It also consumes too much network bandwidth.
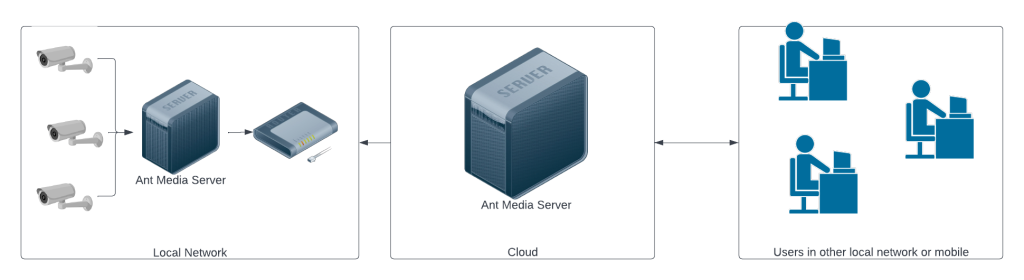
In order to make the users watch the IP camera, Ant Media Server, running in the local network, should push the IP camera streams to the Ant Media Server running in the cloud. There is no security vulnerability but it consumes too much bandwidth all the time as both servers are streaming.
Solution
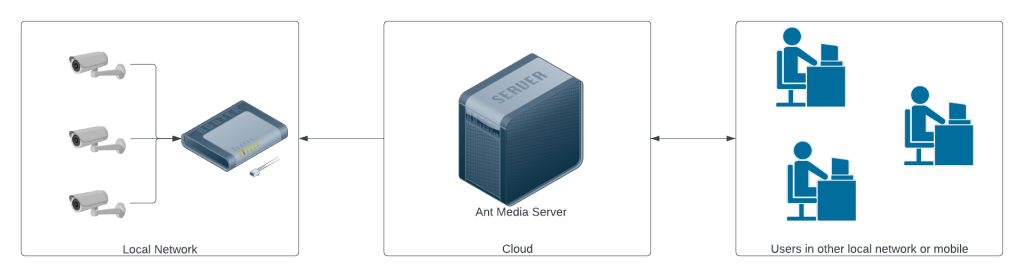
In our solution to both approaches, security is vastly improved, and bandwidth requirement is greatly reduced. Ant Media Server running in the local network gets connected to another Ant Media Server running in the cloud as a signaling server. Users also get connected to the Ant Media Server in the cloud as a signaling server. When users try to play the IP camera stream, signaling is done through the cloud, and Ant Media Server in the local network directly sends the stream to the viewers.
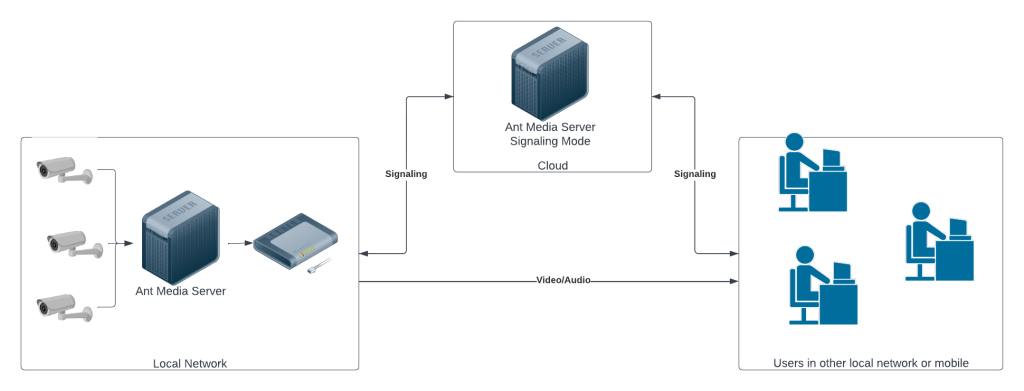
In order to make the users watch the IP camera, Ant Media Server, running in the local network, and users should connect to the signaling server. When users watch the IP camera, Ant Media Server sends the stream to the users directly. It only uses bandwidth when it’s required and it’s a cost-effective solution.
How to play IP cameras behind NAT directly
Before explaining the steps one by one, we would like to mention that this is an experimental feature.
- For the Ant Media Server running in the cloud, enable signaling mode. Open your application’s configuration file (/usr/local/antmedia/webapps/{APP_NAME}/WEB-INF/red5-web.properties) and add the following property.
signaling.enabled=true
Save the file and restart the server:
sudo service antmedia restart
- Add signaling suffix to the WebSocket URL in player.html under the application directory (/usr/local/antmedia/webapps/{APP_NAME}). It should be something like that: var path = location.hostname + “:” + location.port + appName + “websocket/signaling“;
- For the Ant Media Server running in local network, open your application’s configuration file (/usr/local/antmedia/webapps/{APP_NAME}/WEB-INF/red5-web.properties) and add the following property.
signaling.address=ws://ant.media.server.address.running.in.cloud:5080/{APP_NAME}/websocket/signaling
The important thing is that we should write the full WebSocket URL.
After that, connect an IP camera to Ant Media Server running in the local network and open the player.html (https://ant.media.server.cloud:5443/{APP_NAME}/player.html) in the Ant Media Server (signaling mode) running in the cloud and click the Play button. You will watch the IP camera coming from your local Ant Media Server.
Conclusion
In this post, we have covered the highlights of the Ant Media Server v2.4.3. If you would like to take a look at the changelog, please visit this link. You’re always welcome to give feedback and we’re happy to hear from you. Please reach out to us through the contact form or e-mail.


