
Ant Media Server v2.4 has been available for almost two months.
We introduced some great features such as the Plugin Architecture and MCU (Multipoint Control Unit) in v2.4. We’ve also published two blog posts outlining these features: Plugin Development Architecture and Unlock Amazing MCU – Merge/Mix Streams into a Single Stream in 4 Step
In addition, there are also some other super useful features available in v2.4. In this blog post, I’d like to give information about these new features and how you can benefit from them with some use-cases.
1. Use H265 in Ingesting WebRTC Stream.
2. Protect your HLS content with AES-Encryption.
3. Save CPU Resources By Using Quick Sync Hardware Transcoding.
4. Authenticate REST API calls By JWKS.
5. Webhook Authentication for Stream Publishing.
Let’s get started!
1. Use H.265 in Ingesting WebRTC Stream
Ant Media Server supports H.265 (HEVC) transcoding to play WebRTC streams and we’ve implemented RFC 7798 in WebRTC. What this means is that Ant Media Server can ingest RTMP streams with H264 and transcode them into H.265. This way they can be played on Android devices as Android devices had an H.265 decoder for some time.
At the time when we implemented the H.265 transcoding/playback support, there were no devices that supported H.265 encoding. Fortunately, now there is a good number of Android devices (i.e. Samsung S20) available on the market that has an H265 hardware encoder built-in.
In addition, we’ve started to support ingesting H.265 streams directly in WebRTC, and Ant Media Server can forward it directly to the player devices without transcoding. Not only that but, Ant Media Server can also transcode the incoming HEVC into different codecs such as H264 or VP8.

When to use H.265 WebRTC Ingesting
H.265 provides better compression rates than the H.264 encoder. The use-case is simple if you want to have better quality with the same bandwidth, you can try H.265. However, we have users who have very limited bandwidth and they would like to transfer audio/video with very low bandwidths. This is why they use H265 on their end.H265 provides better compression rates than the H264 encoder, which promises better video quality with less bandwidth required.
The use-case is simple: if you want to have better quality with the same bandwidth, you can try H.265. This will benefit users that have very limited bandwidth and who would like to transfer audio/video with very low bandwidth requirements. You should give H265 a try to see the difference!
There is also one important thing that I need to mention. Although H.265 is great, there is no widespread H.265 encoder/decoder support in mobile or desktop browsers. This is why you need to use the Android SDK to publish and play streams.
How to use H.265 WebRTC Ingesting and Playing
- H.265 support in encoding is available within a custom Android SDK. You can ask for this custom build by reaching out through the Contact Form!
- Open your application properties file. Let’s assume you use WebRTCAppEE. Open the /usr/local/antmedia/webapps/WebRTCAppEE/WEB-INF/red5-web.properties and set the following properties
settings.h264Enabled=false
settings.vp8Enabled=false<<<
settings.h265Enabled=true
- Restart the server and use one of your Android devices that has an H265 encoder to publish streams and play them on other Android devices. Please don’t forget: it will not play on mobile/desktop browsers (yet!).
2. Protect your HLS content with AES-Encryption
Ant Media Server supports HLS AES-Encryption in v2.4. Let me give some context about HLS AES-Encryption. As you may know, Ant Media Server supports HLS playback and it also supports SSL however this does not mean that the content of HLS files is encrypted.
SSL only provides security for the man-in-the-middle. It means that anyone accessing HLS files can play the stream. So If you have some concerns about the content of your HLS files, it’s a great idea to use HLS AES-Encryption.
AES-Encryption encrypts the video content with a key and only the ones who have/access to the key can decrypt the content and play the stream. You can even change the key on the fly to increase security. In other words, any WebRTC stream or RTMP stream ingested can be played securely via encrypted HLS content.

When to Encrypt HLS content with AES-Encryption
If you want to protect HLS content and let only some specific set of users watch it, it’s a good idea to use AES-Encryption. Ant Media Server supports putting the key file to any other HTTP server so the key file access should be managed by the application developers. In other words, while the users who are supposed to watch the stream can access the key file, the others should not access the key file.
How to enable HLS AES-Encryption
- Prepare a key info file with the following template. (Let’s make its name to hls_aes.keyinfo)
key URI
key file path
IV (optional)
key URIspecifies the key URI written to the playlistkey file pathspecifies the path to the key file used to obtain the key during the encryption process. The key file is read as a single packed array of 16 octets in binary format.IVspecifies the initialization vector (IV) as a hexadecimal string to be used instead of the segment sequence number (default) for encryption. It’s an optional value.
The content of the key info file should look like this
http://your_server/file.key
/path/to/file.key
0123456789ABCDEF0123456789ABCDEF
- Open your application settings file. For WebRTCAppEE, it’s /usr/local/antmedia/webapps/WebRTCAppEE/WEB-INF/red5-web.properties
- Add the key info file with the following property
settings.hlsEncryptionKeyInfoFile={FULL_PATH_OF_DIRECTORY}/hls_aes.keyinfo -
Restart the Ant Media Server
sudo service antmedia restart
- If everything is successful, Ant Media Server will create M3U8 files by adding AES-128 related lines as shown below in bold.
#EXTM3U
#EXT-X-VERSION:3
#EXT-X-TARGETDURATION:2
#EXT-X-MEDIA-SEQUENCE:16
#EXT-X-KEY:METHOD=AES-128,URI="{keypathURI}/hls_aes.key",IV=0x00000000000000000000000000000000
#EXTINF:1,970000,
streamId_0p0016.ts
#EXTINF:2,010000,
streamId_0p0017.ts
#EXTINF:2,050000,
streamId_0p0018.ts
#EXTINF:1,970000,
streamId_0p0019.ts
#EXTINF:2,090000,
streamId_0p0020.ts
3. Save CPU Resources By Using Quick Sync Hardware Transcoding
Transcoding is required in order to have multiple bitrates to provide a better user experience. While this is very important, it comes with its own challenges. Transcoding is a processing power intensive operation.
If a soft codec is used (where transcoding is performed by the CPU), it consumes more CPU resources. A hard codec (a specific hardware component does the transcoding) is a better option in order to have better video quality and efficient resource management.
Fortunately, Ant Media Server supports Nvidia GPU codecs(h264_nvenc) and it is starting to support the Quick Sync codec which is available in Intel CPUs. Quick Sync codec can be used in both ingesting WebRTC streams or RTMP streams.

When to use Quick Sync Transcoding
It’s meaningful to use Quick Sync transcoding if you fit these two criteria:
- You are transcoding the stream by adding adaptive bitrate in Ant Media Server.
- Your Intel CPU has Quick Sync support.
It’s absolutely the correct time to use Quick Sync if you are transcoding your streams and have Quick Sync available in your Intel CPU. Please check if your CPU supports QuickSync on this Intel web page.
How to Enable Quick Sync
Actually, enabling Quick Sync in an Ubuntu box is a little complicated. So we’ve prepared a wiki that shows how to enable Quick Sync step by step. Please visit this page to install the Quick Sync driver and SDK on your Ubuntu box.
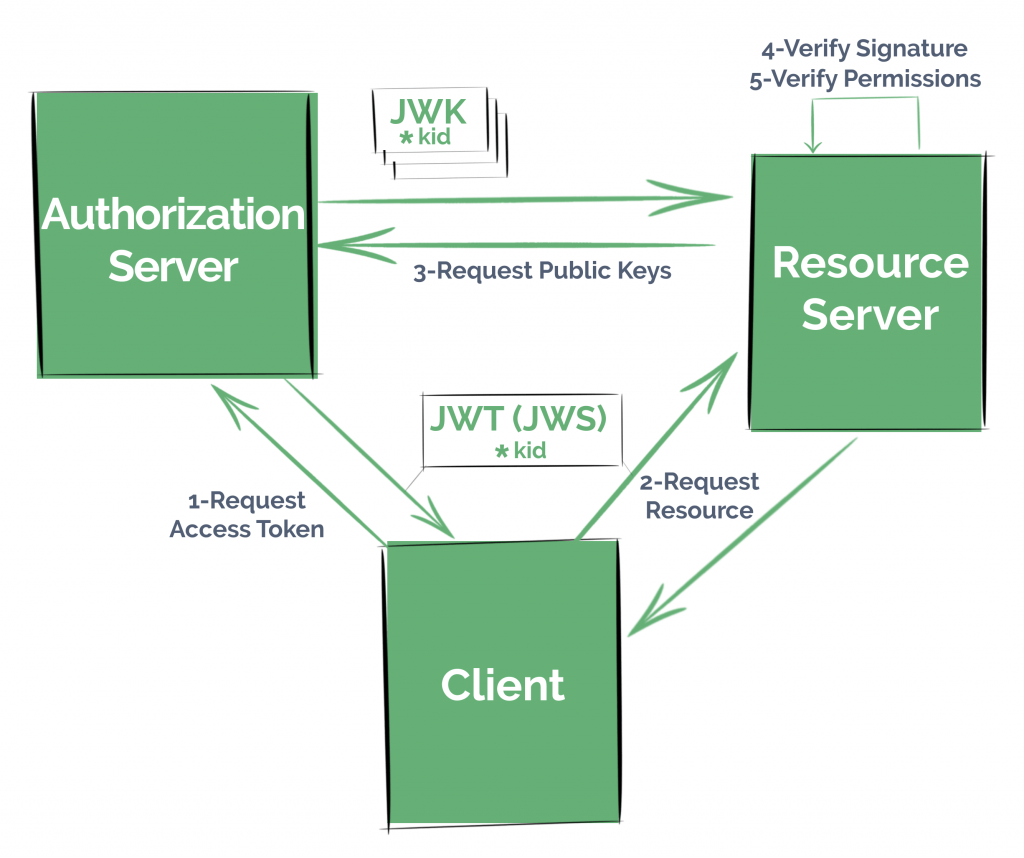
4. Authenticate REST API calls By JWKS
JWKS and JWT could be called siblings, but they have a small difference.
Ant Media Server supports JWT token authentication by entering the JWT secret key to the application properties file (the famous “red5-web.properties” file) and Ant Media Server just verifies the signature of the token to authenticate the call.
There is a slight difference with JWKS. This time Ant Media Server gets the public key from the JWKS endpoint to verify if the JWT token issued by the authorization is valid. If you want to learn more about JWKS, please visit this page.
When to use JWKS REST Filter
If you change the secret keys often to have a better level of security and you want it to be very simple, using the JWKS filter would be much simpler to manage.
How to Enable JWKS Filter
Enabling the JWKS filter is as simple as the JWT Filter. Just open the application properties file and add/edit the following properties. Properties file is located at “/usr/local/antmedia/webapps/LiveApp/WEB-INF/red5-web.properties” for LiveApp
settings.jwtControlEnabled=true
settings.jwksURL=<WRITE_YOUR_JWKS_ENDPOINT_URL>
The first line just enables the JWT token and the second line enables the JWKS. The documentation for this feature is available on the wiki as well.
Don’t forget to restart the service(sudo service antmedia restart) to make the changes be effective.
5. Webhook Authentication for Stream Publishing
There are plenty of Security options for Publishing and Playing Streams available in Ant Media Server.
In this version, we’ve added another one which is Webhook Authentication for Stream Publishing. As the name suggests, Ant Media Server just calls your webhook URL in order to decide if it accepts this stream. BTW, Ant Media Server also sends the ID of the stream so you can check on your end if it’s valid or not.
As a result, if your Webhook URL returns status code 200, Ant Media Server accepts the stream. If it returns something else, Ant Media Server does not accept the stream.
When to use Webhook Authentication
If you don’t know the stream id in advance and you don’t want to verify it with some tokens and you have the all stream id on your application servers, you can use Webhook Authentication for Stream Publishing. Webhook Authentication can be used both in ingesting WebRTC streams or RTMP streams.
How to enable Webhook Authentication
It’s just as simple as adding the following line to your application properties file.(/usr/local/antmedia/webapps/LiveApp/WEB-INF/red5-web.properties for LiveApp)
settings.webhookAuthenticateURL=<WRITE_YOUR_WEB_HOOK_URL>
Just restart the server(sudo service antmedia restart)
These are some of the unknown features of Ant Media Server and we just would like to point them out in this blog post. Please let us know if you have any questions through our Contact Form.
Take care!
You can check out our Guide From Zero to WebRTC hero, and RTSP Explained posts to learn more about applications of Ant Media.
About Ant Media
Ant Media Server is a real time streaming software that provides adaptive, ultra-low latency streaming by using WebRTC technology with ~0.5 seconds latency. Ant Media Server is highly scalable both horizontally and vertically. It can run on-premise or on-cloud. Ant Media has a vast client portfolio in 120+ countries that include several industries and sectors such as education, gaming, broadcasting, auctioning and surveillance. For more information about Ant Media Server, please contact us. If you’re looking to build a streaming solution with adaptive bitrate streaming, ultra-low latency, and highly scalable features you can get started for free.


