
At Ant Media, we always try our best to listen to what you need and to meet your requirements. With the latest 2.4.3 version, we provided a solution for one of the requests which have a high demand. Although being an experimental feature, we are thrilled to announce that you can now start to use Ant Media Server behind NAT!
What is the use case?
Imagine you are having a closed network of 1000 IP cameras which all of them is behind a NAT. You want to watch the cameras somehow and here the new feature comes in handy. You can deploy the Ant Media Server in the same network and then you can watch the IP camera streams from the server.
How does that work?
It is actually made possible by adding a signaling server mode to the original server (Check this out for more information about signaling). To make that possible, you will require 2 servers, one is deployed on the network behind the NAT, and the other one is staying on the open internet (any cloud or any server that stays on the open internet).
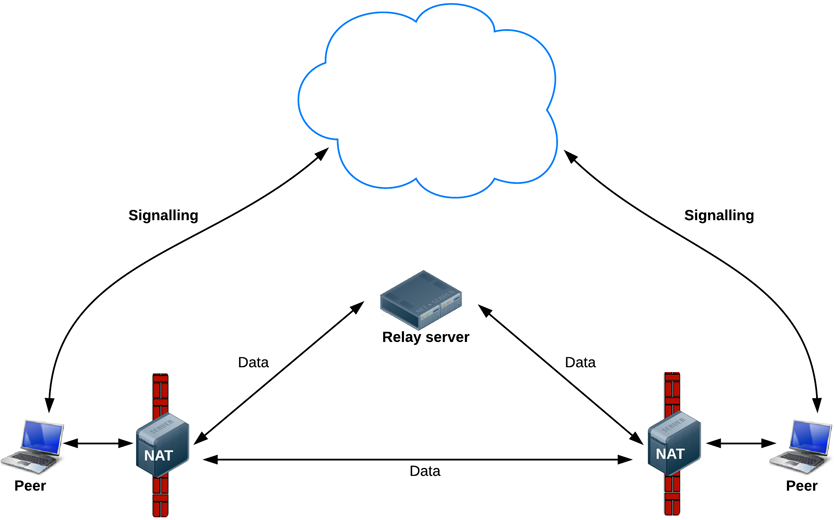
Figure 1. Here, one of the peers is actually an AMS behind a NAT, the other peer is the client who wants to watch the stream, and the signaling cloud is also another Ant Media instance in signaling server mode which stays on the cloud.
Step-by-step guide
To enable the signaling mode of the Ant Media Server, you need to follow these steps.
- Install Ant Media on any server that resides on an open internet
- Go to your
<AMS_DIR>/webapps/<AppName>/WEB-INF/red5-web.properties file
- Add the following line;
signaling.enabled=true
- It is done.
By doing this, you enable the signaling usage of the server as well as the regular video usage. This entity is specific to the applications. Let’s assume that if you go into WebRTCAppEE as <AppName> then only that app’s endpoints will be available to use as a signaling endpoint.
Ant Media Server deployed behind NAT
- Install Ant Media on any server that resides behind your NAT.
- Edit this file and add:
<AMS_DIR>/webapps/<AppName>/WEB-INF/red5-web.properties
-
signaling.address=
ws://<your_signaling_server_address>:<your_port(default:5080)>/WebRTCAppEE/websocket/signalingAdd the following line;And the application will connect and register itself to the signaling server.
Connecting to a server behind NAT as a client
The server behind NAT is the normal AMS for its internal network. You can publish, play, and do everything Ant Media can do on that network. For the clients outside of the NAT, they need to connect to the WebSocket endpoint of the signaling server like the Ant Media behind the NAT. What you need to do is basically as follows.
- Go to this file:
<AMS_DIR>/webapps/<AppName>/player.html
- Edit this line:
var path = location.hostname + “:” + location.port + appName + “websocket”;
You need to change it to this:
var path = location.hostname + “:” + location.port + appName + “websocket/signaling“;
And just use player.html normally – enter the stream ID and click on play.
The application should be able to play the stream on its own. We would like to remind you that streaming from behind NAT is currently just an experimental feature and we are planning to enhance this functionality, in case there is more interest in this feature. If you are willing to collaborate with us on the development of this feature, please feel free to reach us.


