Scaling Ant Media Server with AWS CloudFormation is a game-changer for anyone dealing with live video streaming demands. In an era where digital content consumption is skyrocketing, ensuring your streaming infrastructure can handle growth without downtime is crucial.
Whether you’re broadcasting live events, hosting virtual classrooms, or delivering on-demand videos, scaling Ant Media Server with AWS CloudFormation provides automated, resilient solutions. This approach leverages AWS’s powerful tools to create a clustered environment that scales dynamically.
In this ultimate guide, we’ll explore everything you need to know about scaling Ant Media Server with AWS CloudFormation, from basics to advanced tips.
Why Choose Scaling Ant Media Server with AWS CloudFormation?
Live streaming has evolved rapidly by 2026. With more users demanding ultra-low latency experiences, Ant Media Server stands out for supporting a variety of protocols like WebRTC, WHIP, SRT, HLS, RTMP, etc.
But why focus on scaling Ant Media Server with AWS CloudFormation? Simply put, it automates infrastructure management, allowing you to focus on content rather than servers.
AWS CloudFormation treats your setup as code, making deployments repeatable and error-free. For Ant Media Server, this means quick provisioning of clusters that handle traffic spikes effortlessly.
What is AWS CloudFormation and How It Enables Scaling?
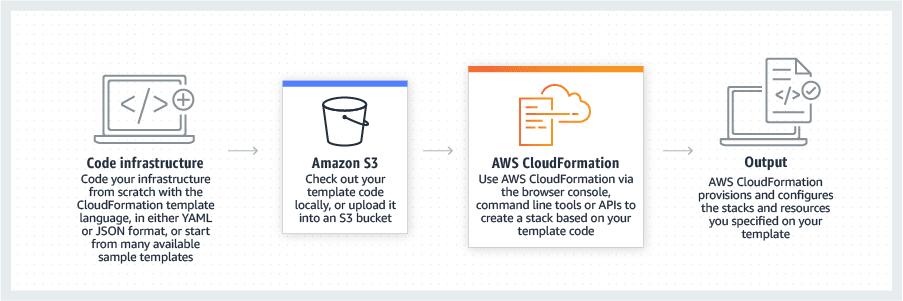
AWS CloudFormation is a service that helps model and set up AWS resources using templates. Think of it as infrastructure as code (IaC).
In the context of scaling Ant Media Server with AWS CloudFormation, the template defines servers, databases, and load balancers in YAML format.
This enables rapid scaling by automating the creation and management of resources. No manual configurations needed— just deploy and watch it grow.
Learn more from AWS’s CloudFormation overview.
Key Benefits of Scaling Ant Media Server with AWS CloudFormation
- Auto-scaling ensures resources match demand, reducing costs during low traffic.
- High availability across zones minimizes downtime.
- Ease of updates: Modify the template and redeploy.
- Security features like IAM roles and security groups are built in.
- Overall, it provides a cost-effective, reliable way to scale streaming services.
Prerequisites for Scaling Ant Media Server with AWS CloudFormation
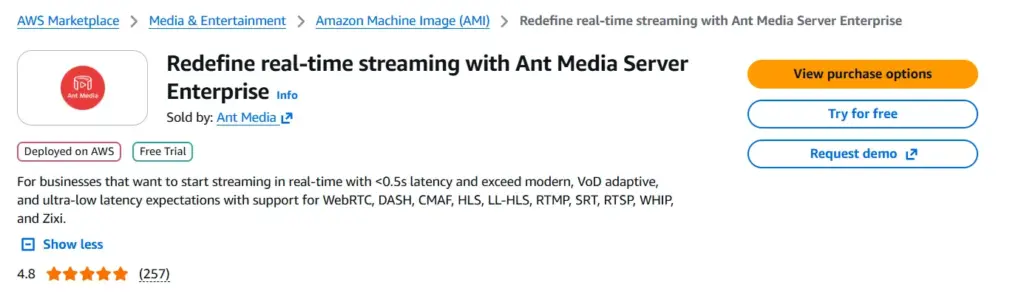
- Before starting, subscribe to Ant Media Server via the AWS Marketplace.
- Download the template from GitHub.
- You’ll need an AWS account, EC2 key pair, and an SSL certificate from ACM.
PS: Generating SSL Certificate from ACM.
The Architecture Behind Scaling Ant Media Server with AWS CloudFormation
- The setup includes origin servers for ingestion, edge servers for distribution, MongoDB for data, and an ALB for traffic routing.
- Auto-scaling groups monitor CPU and add instances as needed.
- Security groups restrict access, ensuring only necessary ports are open.
For a deeper dive, explore Ant Media Server Cluster Nomenclature.
Setting Ant Media Server Auto Scaling Cluster with AWS CloudFormation
Step 1: Subscribe to Ant Media Server on AWS Marketplace
- Navigate to the Marketplace page and subscribe. This activates the AMI for your account.
- Confirm subscription to avoid launch issues.
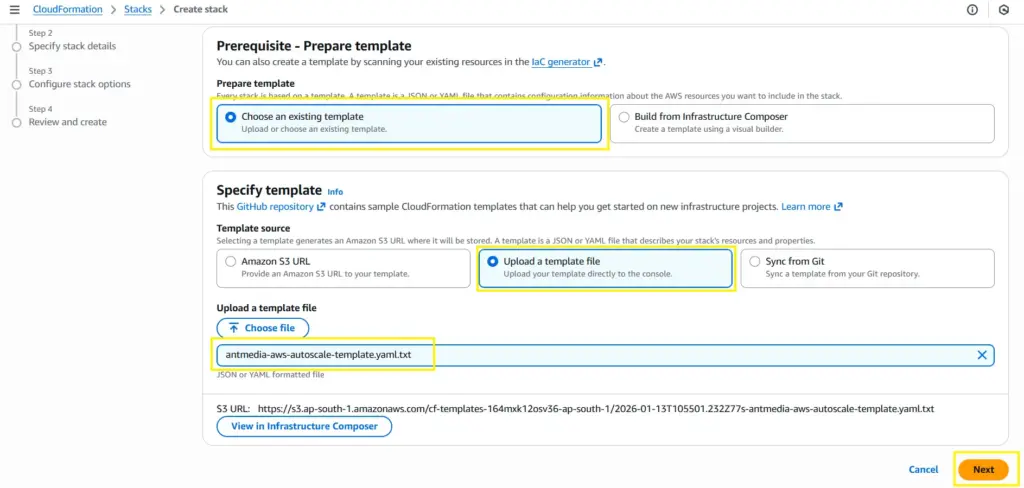
Step 2: Download the CloudFormation Template
- Grab the YAML file from GitHub. It contains definitions for all resources.
- Please review it to understand the structure.
Step 3: Create the CloudFormation Stack
- In the AWS Console, go to CloudFormation and create a new stack.

- Upload the template and proceed.
Step 4: Specify Stack Details for Customization
Enter parameters like stack name, instance capacities, CPU thresholds, and instance types.
- Minimum capacity means the minimum number of Ant Media Server instances that will be launched at the time of cluster creation.
- Maximum capacity means the maximum number of Ant Media Server instances that will be launched at the time of cluster creation.
- CPUPolicyTargetValue is the average CPU utilization of the Auto Scaling group. When the servers reach this CPU utilization average, new instances get added.
- GPUImage: By default, it is false. Select “true” to use GPU Image for Origin Group if heavy transcoding is required. You must select one of the g or p instance types.
- KeyName: An Amazon EC2 key pair for SSH. If there is no key pair, you can create a ssh key (EC2 > Key Pairs).
- LoadBalancerCertificateArn: Amazon Resource Name (ARN) of the certificate to associate with the load balancer.
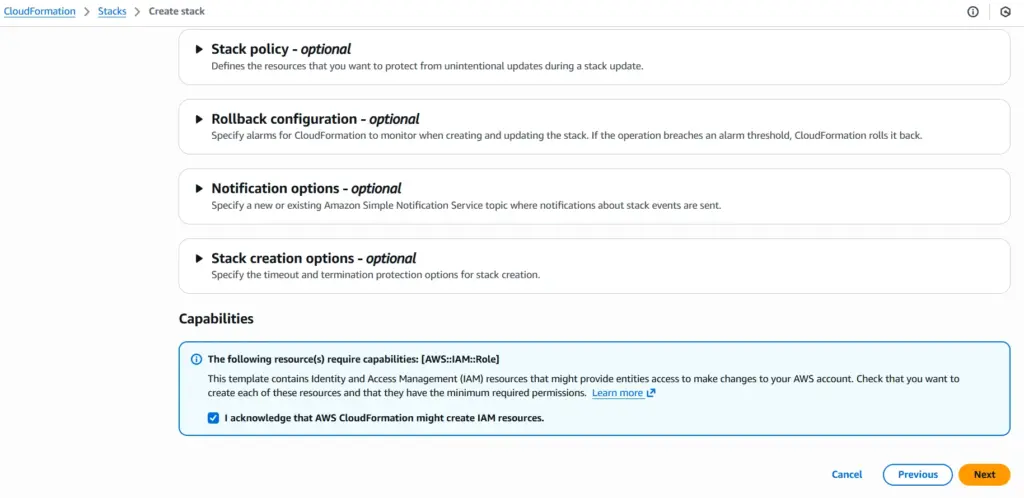
Step 5: Configure Stack Options
- Acknowledge IAM resource creation for Lambda functions.
- Add tags for organization, if required.
Step 6: Review and Launch the Stack
Verify all inputs. Submit and monitor progress—it takes approximately 5 minutes to launch your auto-scaling Ant Meda Server cluster using AWS CloudFormation.
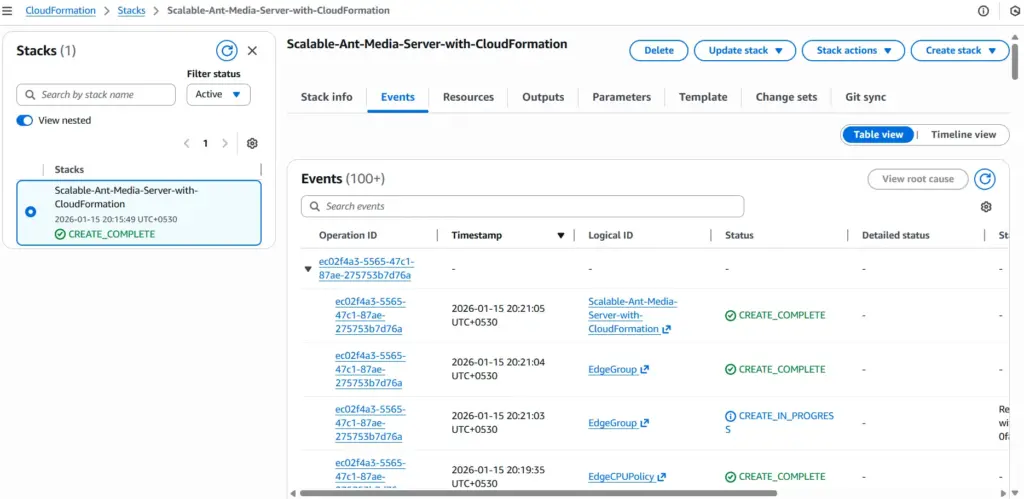
Step 7: Verify and Access Your Scaled Setup
Check Outputs for URLs.
It shows the Application Load Balancer (Dashboard) and the RTMP Load Balancer.
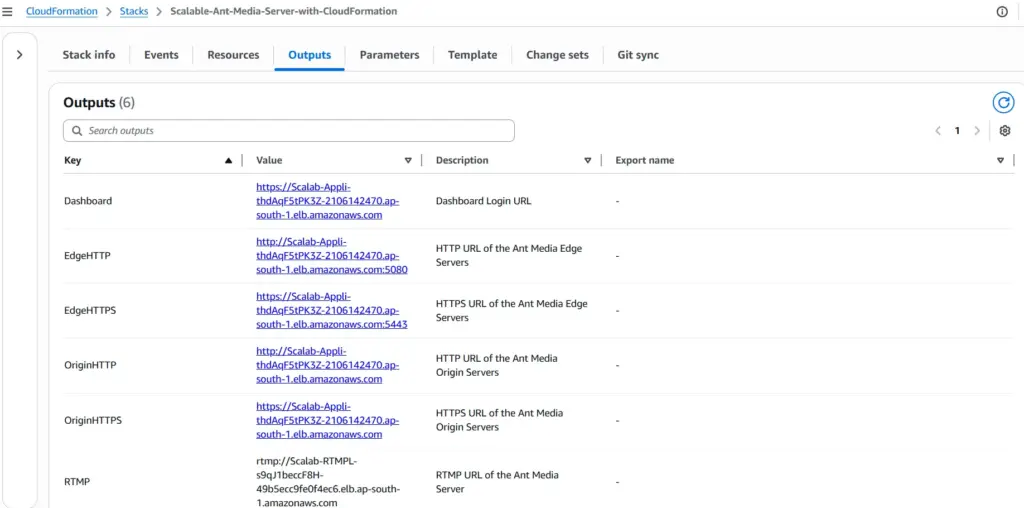
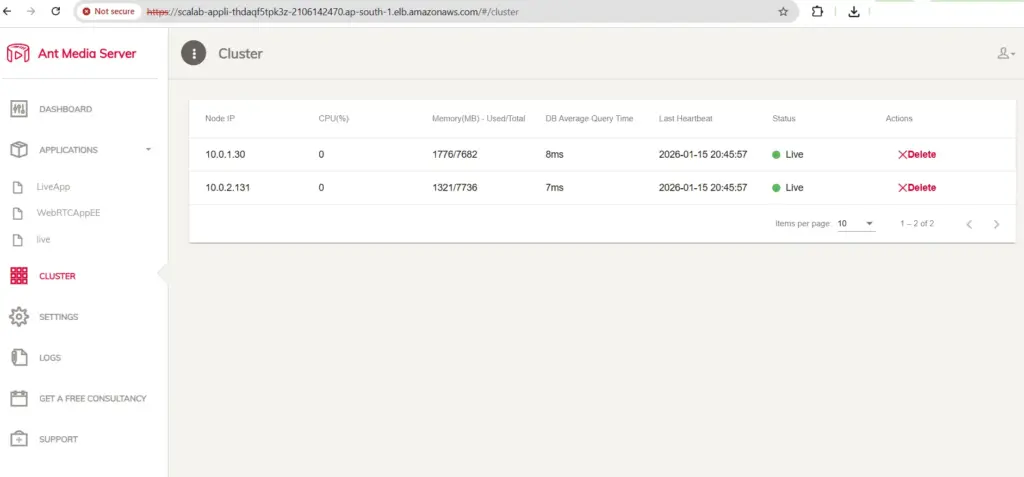
Access the dashboard, create the login credentials, and confirm cluster status.
Watch this helpful video tutorial on the process:
Post-Deployment Configuration for Optimal Performance
To avoid browser warnings and certificate errors, you must associate your Load Balancer with a valid domain and certificate.
Here’s how it works:
- By default, the Outputs tab will show you the Load Balancer DNS names (e.g.,
cloudf-appli-xxxx.elb.amazonaws.com). - These DNS names are functional, but they use an AWS-issued certificate that does not match your custom domain.
- If you try to open them directly over HTTPS, most browsers will mark them as insecure or show a certificate mismatch error.
To fix this:
- Define a CNAME record in your DNS (e.g.,
stream.example.com) that points to your Load Balancer DNS name. - This can be done for both ALB and RTMP LB.
After this configuration, you’ll be able to access Ant Media Server securely on your own domain (e.g., https://stream.example.com) without any certificate errors.
Let’s Publish and Play
Congratulations! You’ve successfully deployed Ant Media Server using CloudFormation. While you were sipping your coffee, the template automatically took care of:
- EC2 instance provisioning
- Security Group configuration
- Ant Media Server installation
- Ant Media Server cluster setup (Origin + Edge)
- Auto Scaling configuration
- Load Balancer setup with HTTPS support
The best part?
You don’t have to manually install, configure, or connect anything. With just a few clicks, you now have a fully functional cluster that’s ready to publish and play streams within minutes.
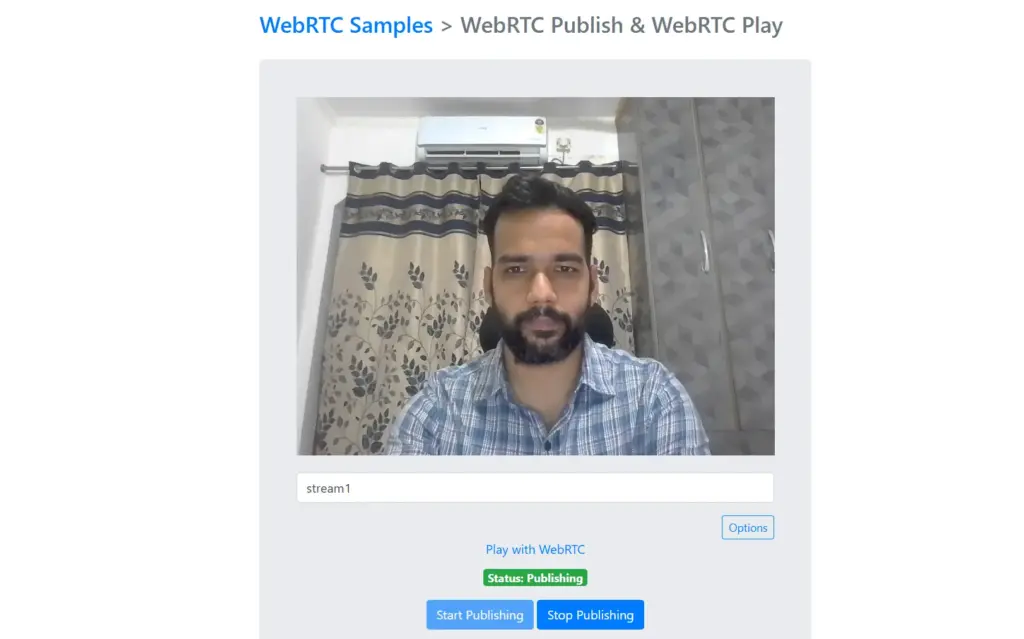
Publish
Go to the sample WebRTC page https://stream.example.com/live
WebRTC Play
Click on Play with WebRTC or go to the sample player page at https://stream.example.com/live/player.html?id=stream1
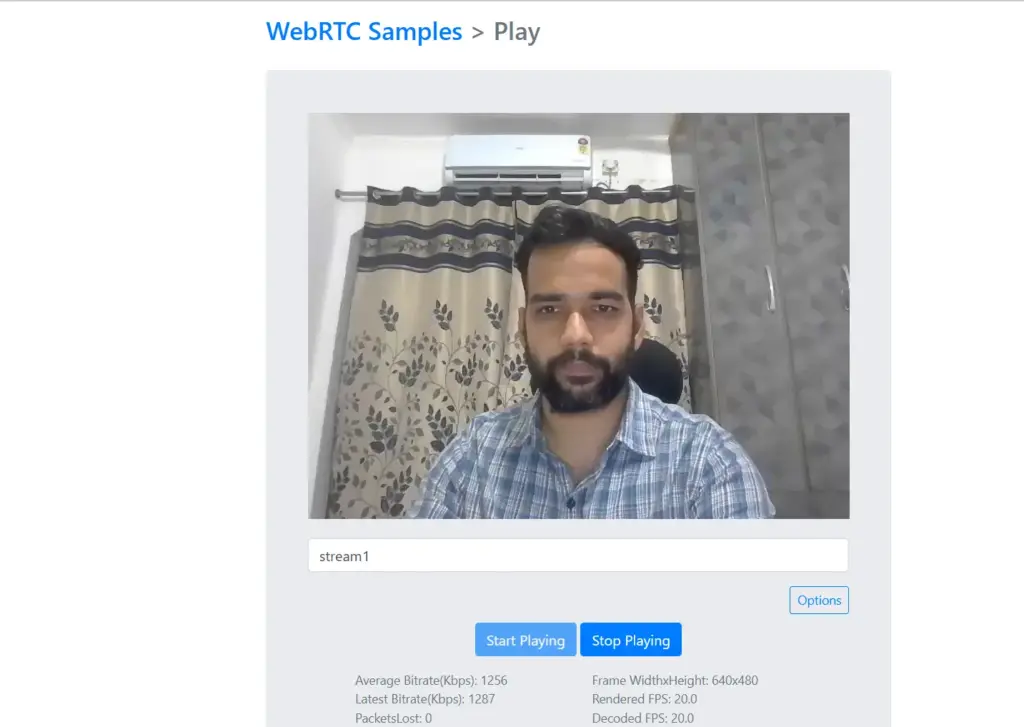
For more information: Check the Publish & Play docs.
Managing the Cluster
Once your streaming session is over & if you want to:
Scale Down the Cluster
- EC2 > Auto Scaling Group.
- Set the Desired and Minimum capacities to 0 for both the Origin & the Edge scaling groups.
- Stop the MongoDB EC2 instance.
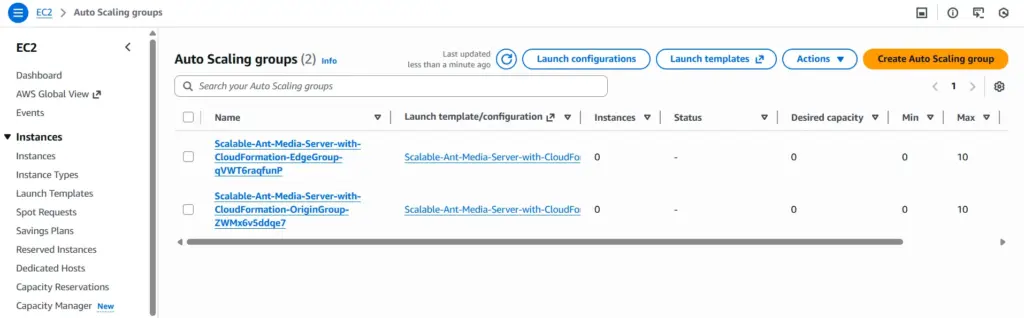
Scale Up the Cluster
- Start the MongoDB EC2 instance.
- EC2 > Auto Scaling Group.
- Set the Desired and Minimum capacities to 1 for both the Origin & the Edge scaling groups.
Delete the Stack
When you delete a stack, AWS CloudFormation deletes all resources in that stack.

Conclusion
Scaling Ant Media Server with AWS CloudFormation empowers you to build scalable, low-latency streaming solutions effortlessly. By following this guide, you’re set for success today and beyond.
Ready to scale? Start with the template today.
Questions? Visit Ant Media’s community.
Frequently Asked Questions (FAQs)
Do I need prior AWS experience?
Basic knowledge helps, but the template simplifies the process.
Can I use GPU instances?
Yes, set the GPUImage parameter to true for transcoding.
Is this cost-effective?
Yes, with CloudFormation and Ant Media Server’s auto-scaling, idle resources are minimized.


