Building a WebRTC conference room from scratch is often more challenging than it appears. The WebRTC implementation itself is usually the easy part. The real complexity comes from managing the surrounding infrastructure: provisioning media servers, configuring TURN services, setting up SSL certificates, scaling for concurrent users, and shutting down idle resources to control costs.
Ant Media’s Auto-Managed Live Streaming Service removes that operational overhead. Instead of managing servers and infrastructure, you work with a single HTTPS endpoint. When your application connects, an Ant Media Server instance is automatically provisioned on demand, allowing your WebRTC conference room to go live within seconds—without DevOps setup, infrastructure management, or idle server costs.
In this tutorial, you’ll learn how to build a fully functional WebRTC audio/video conference room using AMS SDK v2and Ant Media’s Auto-Managed Live Streaming Service. By the end, you’ll have a production-ready conferencing application running with minimal setup and no server management.
Table of Contents
One Time AMS Setup
Deploy the CloudFormation template once. It provisions a Lambda function and exposes a public HTTPS endpoint that serves as your backend for creating and managing Ant Media Server instances.
For detailed setup instructions, see How to Enable Auto-Managed Live Streaming Service.
After deployment, you’ll receive an endpoint similar to:
https://your-lambda.lambda-url.us-east-1.on.aws/
That’s all the infrastructure you need to configure. This single endpoint handles server provisioning, scaling, and lifecycle management automatically, allowing you to focus entirely on building your WebRTC application.
Spin Up Your First Room
We are sharing a repo with fully working example, nothing else required then just to serve it — conference-v2-auto-managed.html — with the assets already in place. No build, no asset copying:
git clone https://github.com/golgetahir/AutoManagedConference.git
cd AutoManagedConference
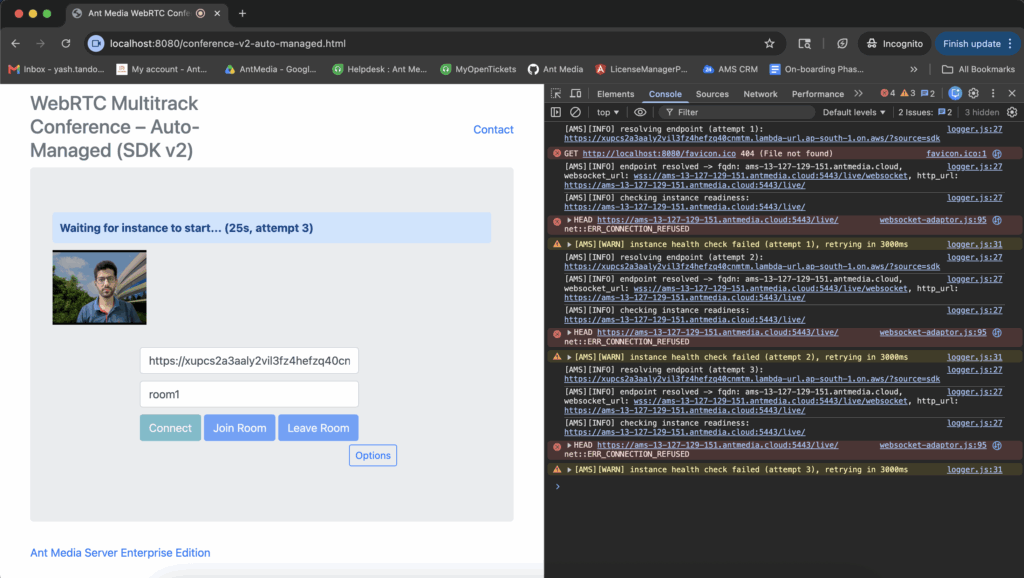
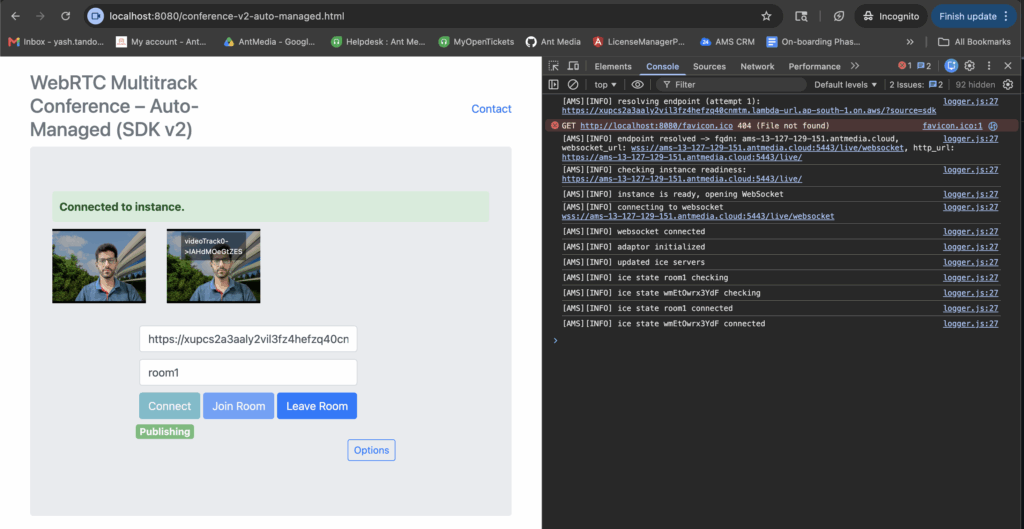
python3 -m http.server 8080Open `http://localhost:8080/conference-v2-auto-managed.html`, paste your Lambda URL, and click Connect. You’ll see the status banner progress through “Resolving endpoint” → “Waiting for instance” → “Connected”. Then enter a room name and click Join Room.
You can also pass the endpoint URL directly:
The Only Configuration You Need
This is the only difference between auto-managed and self-managed in your code:
import { ConferenceClient } from './js/index.js';

const client = new ConferenceClient({
  httpEndpointUrl: 'https://your-lambda.lambda-url.us-east-1.on.aws/',
  localVideo: document.getElementById('localVideo'),
  mediaConstraints: { video: true, audio: true },
  autoReconnect: true,
});
Pass httpEndpointUrl instead of websocketURL, and the SDK handles the rest: it calls the Lambda, waits for the EC2 instance to come up (~20–60s on first spin-up), and opens the WebSocket. Every method you call — publish, play, joinRoom — waits for the connection internally, so your app code is identical to a direct-WebSocket setup.
Want a loading indicator while the instance boots? Hook into instance_waiting:
client.on('instance_waiting', ({ elapsedMs }) => {
  showStatus(`Starting server... ${Math.round(elapsedMs / 1000)}s`);
});
client.on('initialized', () => showStatus('Connected'));
Join Conference Room
Conferencing with AMS SDK v2 requires just two calls: publish your own stream and play the room.
await client.publish({ streamId: myId, roomId: 'room1', token });
await client.play({ streamId: 'room1', roomId: 'room1', userPublishId: myId });

client.on('newTrackAvailable', ({ track, trackId }) => {
  const participantId = trackId.substring('ARDAMSx'.length);
  attachTrackToTile(participantId, track);
});
AMS SDK v2 provides simple controls for camera, microphone, and screen-sharing.
await client.turnOffLocalCamera();
client.muteLocalMic();
await client.startScreenShare();
Chat and room state go over the data channel with client.sendJSON(...) and the data_received event — ideal for broadcasting mute state, raise-hand signals, or in-room messages across every participant in the WebRTC conference room.
Self-Managed? Change One Field.
If you’d rather run your self hosted Ant Media Server, swap httpEndpointUrl for websocketURL:
const client = new ConferenceClient({
  websocketURL: 'wss://your-server:5443/live/websocket',
  // everything else identical
});
Every other line in this post stays the same.
API Reference
Check out AMS SDK V2 vs V1 comparison
AMS SDK v2 ships with TypeDoc configuration. Generate the full API docs locally:
npm run docsKey types for auto-managed:
BaseClientOptions.httpEndpointUrl— the Lambda URLBaseClientOptions.httpEndpointAccessToken— optional access tokenBaseClientOptions.endpointTimeoutMs— max wait time (default 120s)- Events:
endpoint_resolving,endpoint_resolved,instance_waiting,endpoint_timeout
A Few Helpful Tips
Autoplay restrictions: Browsers may block autoplay with sound. Call video.play() from a user gesture if needed.
HTTPS required: getUserMedia and getDisplayMedia require HTTPS (or localhost). The auto-managed service handles this for you. For self-managed, ensure your server has a valid SSL certificate.
CORS on the Lambda endpoint: The Lambda URL must allow CORS from your application’s origin. The CloudFormation template configures this by default.
Timeout tuning: If you’re in a region where instance spin-up takes longer, increase endpointTimeoutMs beyond the default 120 seconds.
What’s Next
With the Auto-Managed Live Streaming Service, building a WebRTC conference room becomes remarkably simple: deploy a CloudFormation template, copy a single endpoint URL, and configure one SDK option. The infrastructure is handled automatically, so you can focus on creating a great user experience instead of managing servers.
Start with the conference-v2-auto-managed.html example, deploy the CloudFormation template, and you’ll have a working WebRTC conference room in minutes. When you need more control — selective track subscriptions, bandwidth tuning, custom signaling — the SDK has it all built in, and none of it changes between auto-managed and self-managed.
The full WebRTC SDK is open source and is in repository here: SDK repository
Frequently Asked Questions
1. Do I need to manage Ant Media Server instances manually?
No. With the Auto-Managed Live Streaming Service, AMS SDK v2 automatically provisions, connects to, and manages Ant Media Server instances through a single HTTPS endpoint. There is no need to configure servers, SSL certificates, or scaling infrastructure yourself.
2. How is the auto-managed setup different from a self-managed deployment?
The only code change is the connection option you provide. Auto-managed deployments use httpEndpointUrl, while self-managed deployments use websocketURL. All SDK APIs, including publish(), play(), and joinRoom(), remain the same.
3. How long does it take for a conference room to become available?
If an Ant Media Server instance is already running, connections are established almost immediately. When a new instance needs to be provisioned, startup typically takes around 20–60 seconds, during which the SDK emits lifecycle events such as instance_waiting.
4. Can I add screen sharing, chat, and participant controls?
Yes. AMS SDK v2 includes built-in support for screen sharing, camera and microphone controls, data-channel messaging, room events, and participant management, making it easy to build a complete conferencing experience.